KVM fast-forwarding
This is the first of a few sections on how to deal with the fact that simulation is slow. It’s not our fault, it’s the nature of simulation!
By the end of this section, you will be able to:
- Set up KVM fast-forwarding for simulation.
- Determine whether KVM fast-forwarding is an appropriate technique for a given simulation need.
Get to the point… faster
The reality is that there are often large parts of the simulation that we need… but don’t really care about. You want to know how your system performs under your specific benchmark, not how quickly it can boot Linux.
Ideally, we would only simulate in high fidelity and collect detailed statistics during our region of interest (ROI) and just speed through the rest without collecting any information we don’t care about.
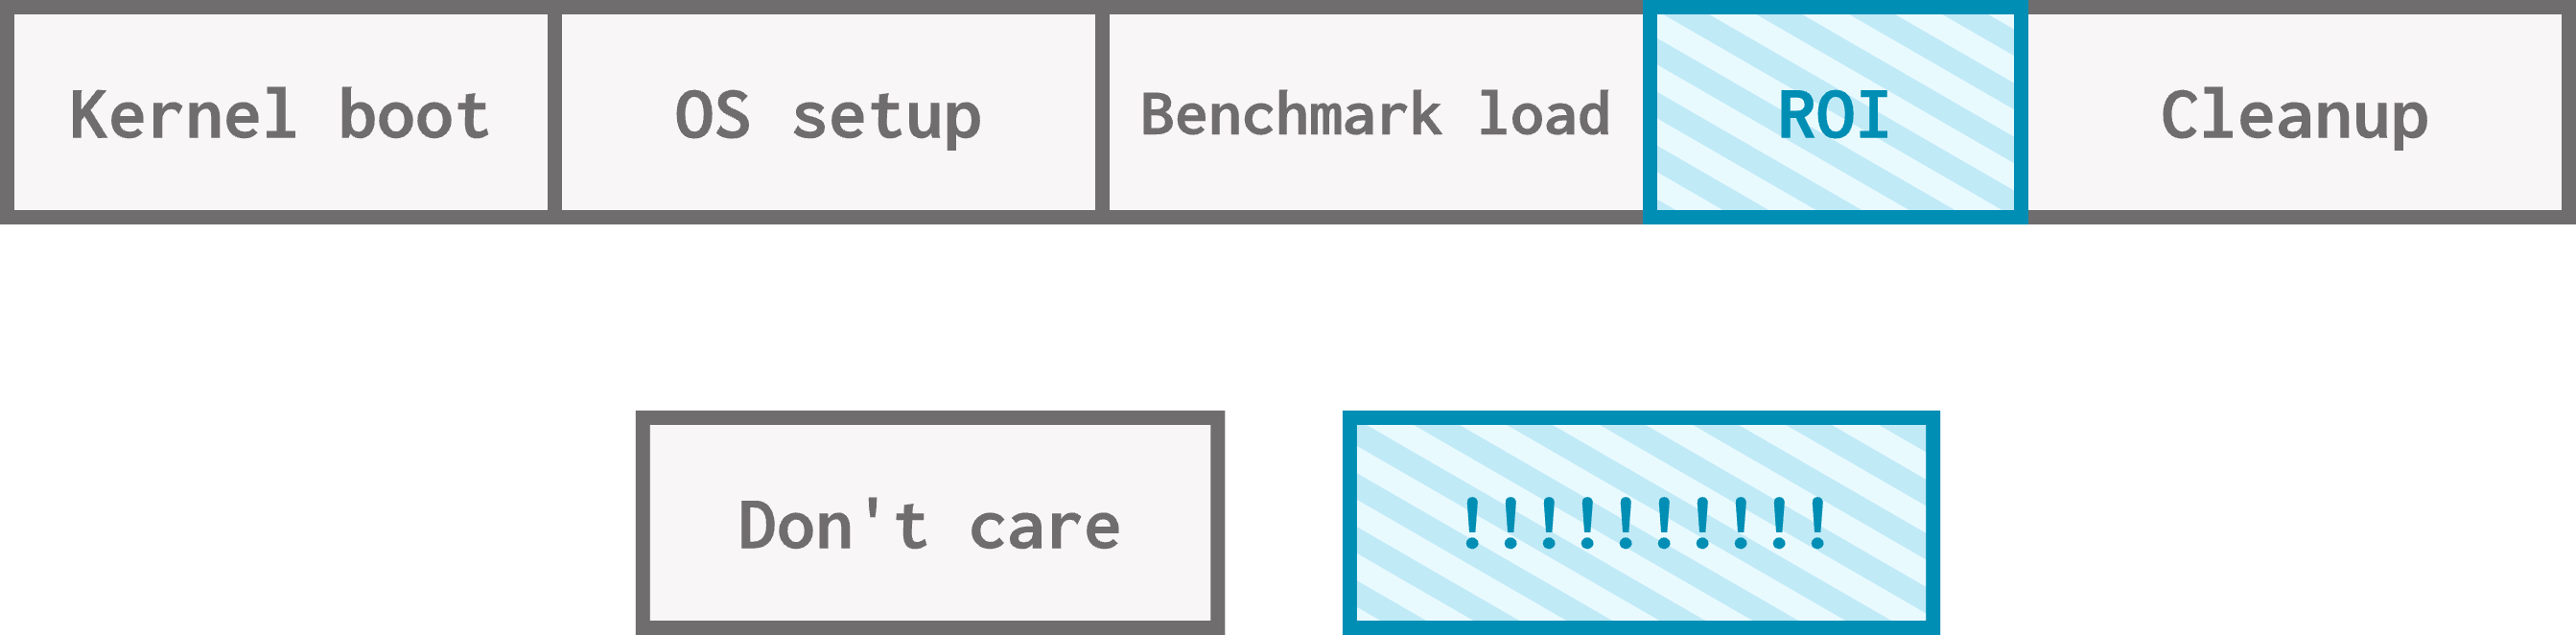
Good news! This is possible with KVM fast-forwarding.
What’s KVM fast-forwarding?
As you might remember when we covered CPU basics earlier in the bootcamp, KVM (which stands for Kernel Virtual Machine) is a CPU model available in gem5. KVM CPUs just use the host’s CPU to execute the code, which makes them really fast.
The idea behind KVM fast-forwarding is to take advantage of this really fast execution by using a KVM CPU during the boring sections of simulation and only bringing in a timing CPU model for the region of interest. The result is a simulation that runs a lot faster and still yields helpful statistics about the region of interest.
Sounds great, how do I do it?
Setting up KVM
Before you can use a KVM CPU in gem5, you need to verify that KVM is set up correctly for you to use on your machine. Instructions for how to do that can be found gem5’s KVM setup page, which will walk you through how to verify that your host machine is compatible with hardware virtualization and how to install the required dependencies to use KVM in gem5.
Using KVM
Using KVM fast-forwarding requires us to:
1) Indicate where in the workload our region of interest lies, 2) Have a way of switching between CPUs, 3) Switch between CPUs when we hit the indicated region of interest.
Let’s go through an example to show how KVM fast-forwarding is done. Open kvm_time.py to get started.
Hypercalls for KVM fast-forwarding
The workload you use for KVM fast-forwarding must be annotated using m5ops to indicate the beginning and end of the ROI. The most common way to do this is to include a work/ROI begin (hypercall number 4) at the beginning of the ROI and a work/ROI end (hypercall number 5) at the end.
Since KVM CPUs use the host CPU to execute code, and the host CPU has no idea what m5ops are, it will not recognize any instruction-mode m5ops calls. Instead, you must use the address mode versions.
One workload that is already annotated in this way is the Class A EP benchmark in the NPB benchmark suite. Let’s use that for this example.
Your turn: Fill in
TODO (1)inkvm_time.pyto obtain the"x86-ubuntu-24.04-npb-ep-a"workload and pass it to the simulation board.Answer
board.set_workload(obtain_resource("x86-ubuntu-24.04-npb-ep-a"))
An important note on ISAs: Since KVM uses the host CPU to execute instructions, the ISA of the workload being used must match the ISA of your host CPU. For this section, we assume an x86 CPU. If your host CPU is not an x86 machine, be sure to use the corresponding version of the workload (for example,
arm-ubuntu-24.04-npb-ep-a). Also remember to switch the required ISA at the top of the configuration file.
SwitchableProcessor
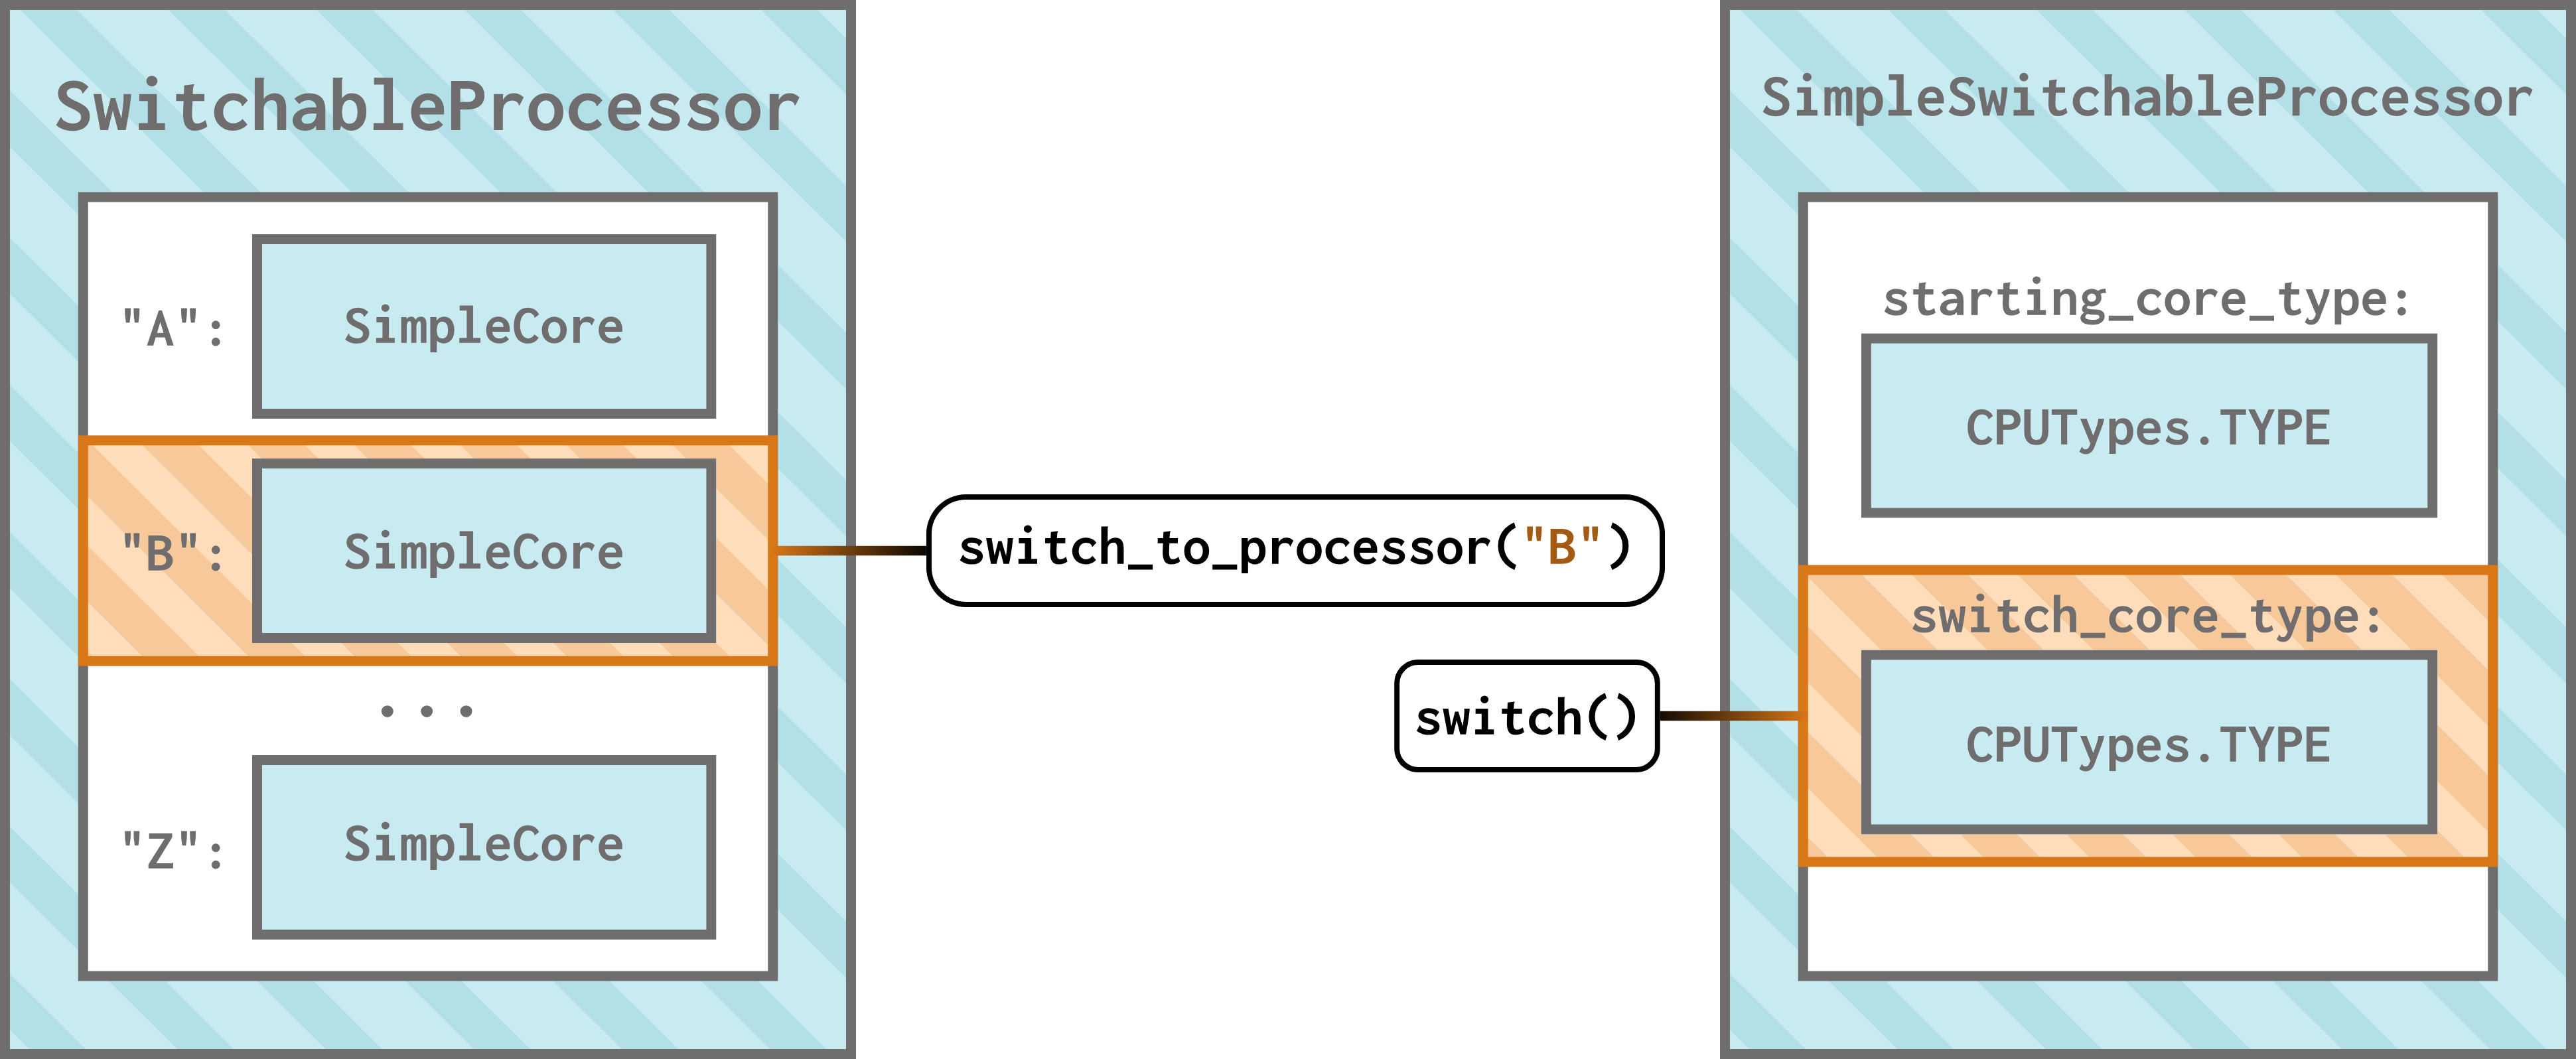
A SwitchableProcessor is a component that allows for a processor to switch between cores during execution, as long as your system uses SimpleCores. You can give a SwitchableProcessor any number of cores to switch between, then tell is to switch to a specific core using the switch_to_processor() function.
For the purposes of KVM fast-forwarding, we only need two cores: a KVM core for fast-forwarding and a TIMING core for the ROI. Thankfully, there already exists a component that does this for us! The SimpleSwitchableProcessor class only takes two cores types: a starting and switch core type, then allows you to switch between them using the switch() function.
Your turn: Fill in
TODO (2)inkvm_time.pyto initializeprocessoras aSimpleSwitchableProcessorwith a starting core type ofCPUTypes.KVM, a switch core type ofCPUTypes.TIMING, the ISA that matches your host machine’s ISA, and 2 cores.Answer
processor = SimpleSwitchableProcessor(
  starting_core_type = CPUTypes.KVM,
  switch_core_type = CPUTypes.TIMING,
  isa = ISA.X86, # For example...
  num_cores = 2
)
Exit event handlers
We can customize the behavior of the work/ROI begin and work/ROI end exit event handlers to switch between the cores in our SimpleSwitchableProcessor. We want the work/ROI begin handler, which indicates the beginning of the ROI, to do the following:
1) Dump the current statistics from the KVM fast-forwarding segment, 2) Switch from the KVM CPU to the timing CPU, 3) Reset the statistics, 4) Fall back to simulation.
This way, we have some information about what happened during fast-forwarding, and we prepared ourselves for the ROI.
We want the work/ROI end handler, which indicates the end of the ROI, to do the following:
1) Dump the current statistics from the detailed simulation segment, 2) End the simulation.
This way, we print out the statistics we gathered from the timing phase and stop simulating.
Your turn: Fill in
TODO (3)inkvm_time.pyto write a work/ROI begin handler that does the following:1) Dump the current statistics from the KVM fast-forwarding segment, 2) Switch from the KVM CPU to the timing CPU, 3) Reset the statistics, 4) Schedule an exit event after running from 1,000,000,000 ticks, 5) Fall back to simulation.
You should write this handler as a function; we’ll use
register_exit_event()on it momentarily.Note that we added a new thing for the work/ROI begin handler to do: automatically exit the simulation for us after 1,000,000,000 ticks. This way, we don’t have to implement a work/ROI end handler, and we don’t have to simulate the entire ROI (which might take a while).
Answer
def ROI_begin_handler():
    print("Reached the ROI!")

    print("Dump the current stats")
    m5.stats.dump()

    print("Switching from KVM to TIMING CPU")
    processor.switch()

    simulator.set_max_ticks(1000_000_000)

    print("Resetting stats at the start of ROI!")
    m5.stats.reset()

    return False
We also need to register this handler to the work/ROI begin hypercall number (4).
Your turn: Fill in
TODO (4)inkvm_time.pyto register our newROI_begin_handlerfunction to trigger on theROI_beginexit event.Answer
register_exit_handler(4, ROI_begin_handler, "ROI begin handler")
Let’s run this thing!
Running a simulation that uses KVM looks exactly like running a simulation without it. For the sake of readability, let’s redirect output streams to files:
gem5 -re kvm_time.py
If your simulation fails with a message warning about the value of
kernel.perf_event_paranoid, and you don’t have the ability to adjust that value on your setup, don’t worry! You can disableusePerfin the simulated CPU by adding the following:for proc in processor.start: proc.core.usePerf = FalseThis tells the KVM CPU not to collect statistics, which disables some simulation features, but it allows the simulation to work!
There is now quite a bit of output to parse through. Let’s start with board.pc.com_1.device, which collects the output of the simulated stdout. Below quite a bit of boot-related printing, you should see the following as the last few lines of the file:
Ubuntu 24.04 LTS gem5 ttyS0

gem5 login: gem5 (automatic login)


In after_boot.sh...
Interactive mode: false
Starting gem5 init... trying to read run script file via readfile.
Running script from gem5-bridge stored in /tmp/script
 --------------------- M5 INIT ---------------------


 NAS Parallel Benchmarks (NPB3.4-OMP) - EP Benchmark

 Number of random numbers generated:       536870912
 Number of available threads:                      2

 -------------------- ROI BEGIN --------------------
You can see that we started executing the benchmask and hit the beginning of the ROI. The printing stops here because we didn’t actually execute the full ROI; we just started to do it, then only executed for a set amount of ticks before exiting.
We can now turn our attention to simout.txt, where we can see the following:
info: Using default config
Global frequency set at 1000000000000 ticks per second
      0: board.pc.south_bridge.cmos.rtc: Real-time clock set to Sun Jan  1 00:00:00 2012
Reached the ROI!
Dump the current stats
Switching from KVM to TIMING CPU
switching cpus
Resetting stats at the start of ROI!
These are the prints we expect to see from hitting the ROI begin handler we defined, so we know it got called.
Lastly, let’s look at stats.txt. You’ll notice that there are two statistics segments bookended by
---------- Begin Simulation Statistics ----------
...
---------- End Simulation Statistics   ----------
The first one was created at the beginning of simulation and collected statistics up until the call to m5.stats.dump() in the ROI begin handler. Note that since we called m5.stats.reset() in that same handler, the next segment represents the stats from the next time we enter back into simulation until the simulation ended.
Let’s look at the first chunk. If we look for board.processor.start0.core.commitStats0.numOps and board.processor.start1.core.commitStats0.numOps, which track the number of ops committed, you’ll see that number is 0:
board.processor.start0.core.commitStats0.numOps 0
board.processor.start1.core.commitStats0.numOps 0
This is because KVM does not simulate any operations; this is slightly annoying for stats, but more importantly, this means that it does not warm up micro-architectural components (like caches). If having warmed-up components is important to your analysis, you might want to consider utilizing a short warm-up period before collecting statistics.
In the second chunk, we can see actual stats:
board.processor.switch0.core.commitStats0.numInsts 1032538
board.processor.switch1.core.commitStats0.numInsts 1657548
…including memory stats, if you like:
board.cache_hierarchy.l1dcaches0.overallMissRate::total 0.001050
Since we ran the ROI for exactly 1,000,000,000 ticks, we can see this information, too:
simSeconds   0.001000
simTicks     1000000000
Caveats
KVM fast-forwarding is great, but it’s not applicable everywhere. It has a few major downsides which are important to consider:
The simulated CPU must have the same ISA as the host
Once again, the fact that KVM CPUs rely on the host CPU comes back to bite us. You can’t make an x86 CPU execute ARM instructions! This means that if you want to use KVM fast-forwarding, you can’t simulate an ISA different from your host machine.
KVM might impact parallelism
KVM CPUs require the actual hardware KVM thread, so using KVM fast-forwarding might constrain the amount of simulations we can run in parallel (more on this in the multisim section).
We’re still executing the boring parts
KVM fast-forwarding helps us spend less time on the regions of the simulation that we don’t care about, but we still have to execute those sections every time we want to run a simulation. If the fast-forwarded region is large, we could still be waiting a while to get to the good stuff.
Non-deterministic
Since KVM fast-forwarding still executes everything leading up to the ROI, any non-determinism (for example, thread interleaving) in the fast-forwarded region will affect how the ROI executes between fast-forwarded runs.
We’ll address these concerns in the next section about checkpointing.