Communicating from the simulation to the simulator
How can we let the simulator know that something interesting is going on in-simulation?
By the end of this section, you will be able to:
- Explain what hypercalls and exit events are in gem5.
- Change exit event behavior by writing a custom event handler.
- Modify C workloads by adding
m5opsannotations.
Exit events and hypercalls
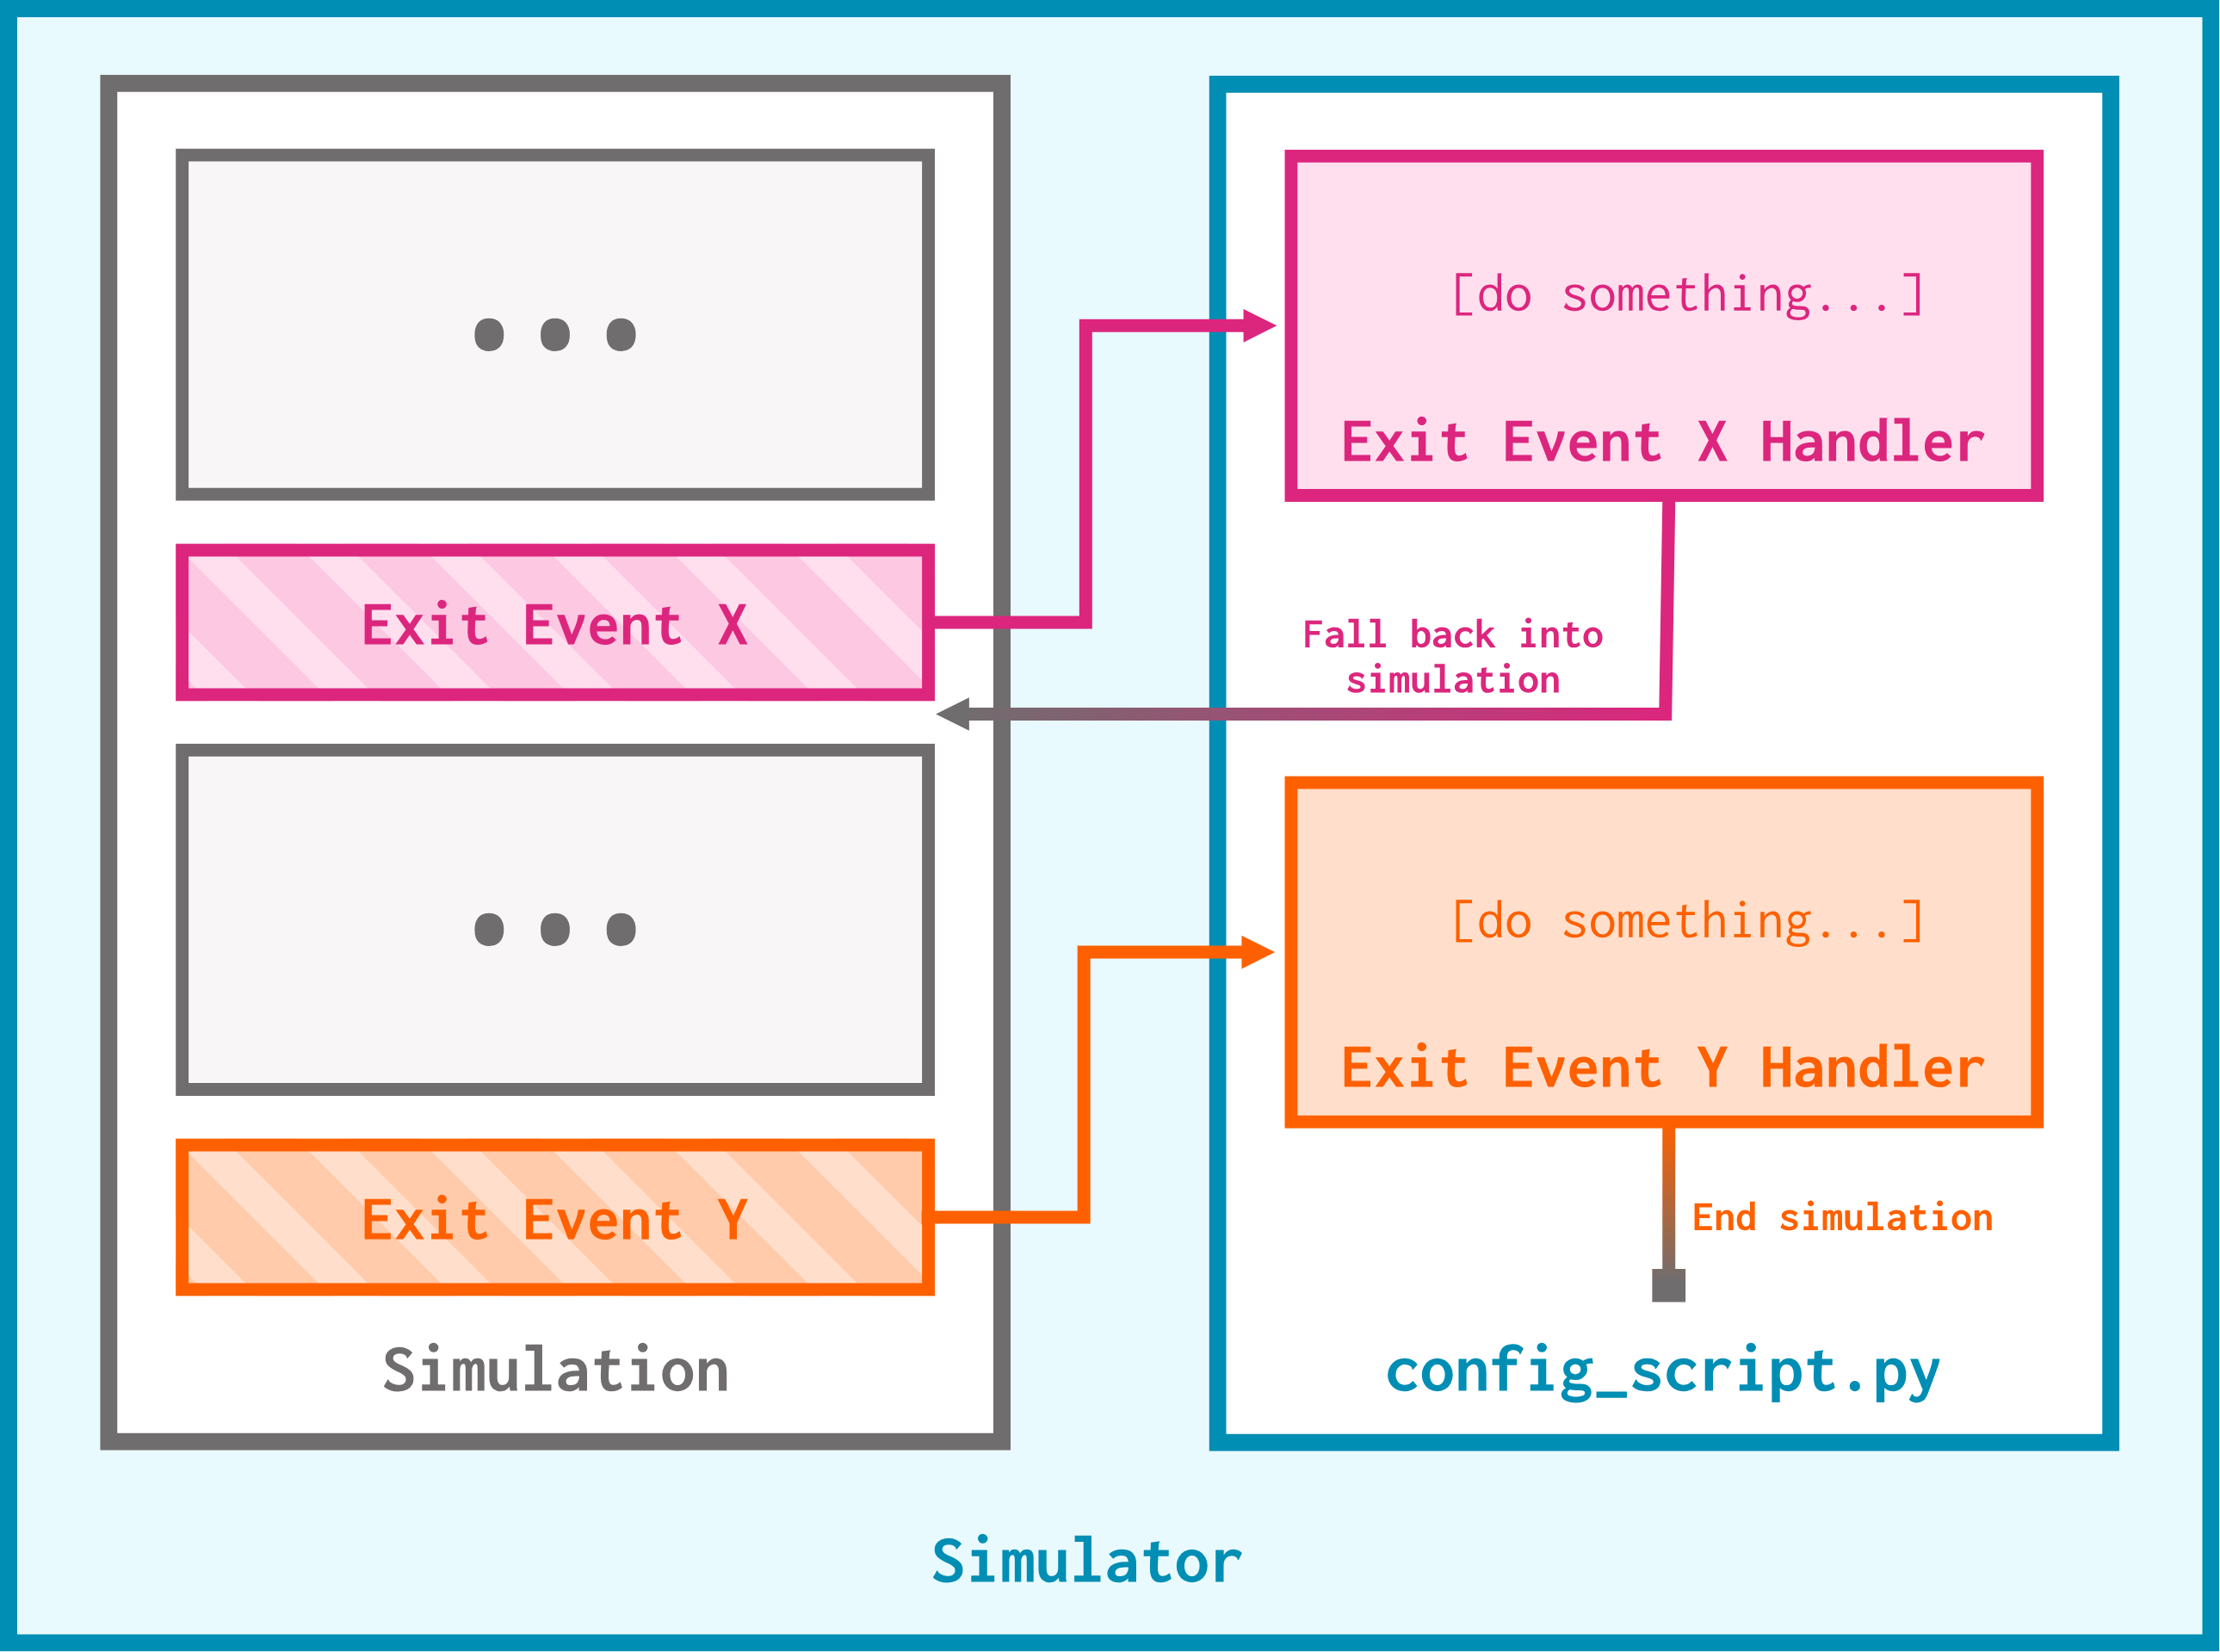
An exit event is a simulation event that passes control back to the simulator. It exits the simulation (hence the name) and gives the simulator an opportunity to do something. What the simulator does is dictated either by the default behavior of the exit event or by a custom exit event handler.
Hypercalls
A hypercall is a term for the mechanism by which the simulation can contact the simulator. Making a hypercall results in an exit event.
Hypercalls are distinguished from one another by their hypercall number:
- 0: Reserved for all “classic” exit events (more on these below)
- 1: Kernel boot (default behavior: exit the simulation)
- 2: Ubuntu boot (default behavior: continue the simulation)
- 3: After
boot.sh(which is launched after Ubuntu boot) finishes running (default behavior: exit the simulation) - 4: Work/ROI (region of interest) begin (default behavior: reset stats and continue simulation)
- 5: Work/ROI end (default behavior: dump stats and continue simulation)
- 6: Scheduled exit event (default behavior: exit the simulation)
- This exit event is triggered when
scheduleTickExitFromCurrentorscheduleTickExitAbsolute(more on these later) are used and a justification string is passed in addition to the number of ticks. - Without the justification string, a classic exit event (hypercall 0) is triggered instead.
- This exit event is triggered when
- 7: Allows the user to take a checkpoint (default behavior: save a checkpoint and continue simulation)
- More on checkpoints in the advanced topics unit!
- 1000: This hypercall is used in conjunction with
util/hypercall_external_signalto send a payload to a gem5 simulation and receive a response with information from the simulation, or update the debug flags that are enabled for that simulation.
While these hypercall numbers are already defined, you can always create your own! This interface is very flexible by design.
The utility of having this many different hypercalls is not necessarily to use their default behavior; it’s to be able to differentiate between many simulation events and tailor your handling accordingly. Hypercalls/exit events are useful for:
- Configuring when the simulation should end,
- Resetting and printing statistics during specific simulation points,
- Accelerating simulation (if you’re curious about this, check out the advanced topics unit),
- Taking checkpoints (also covered in the advanced topics unit),
- Using sampling tools like SimPoint and LoopPoint (also in the advanced topics unit),
- …and more!
You may encounter classic exit events (hypercall number 0) in older configuration scripts. These are features from older versions of gem5 before hypercall support which have since been adjusted to use the hypercall mechanism.
Here are some of the “classic” exit events defined in gem5:
ExitEvent.EXITExitEvent.CHECKPOINTExitEvent.RESETSTATSExitEvent.SWITCHCPUExitEvent.WORKBEGINExitEvent.WORKENDExitEvent.MAX_INSTSExitEvent.MAX_TICKAll of these trigger hypercall number 0. The default behavior for almost all of these exit events is to just exit the simulation.
In newer version of gem5 (25.0.0.0 onwards) it’s best practice to use numbered hypercalls over classic exit events (hypercall 0).
Scheduling exit events
There are multiple ways to add exit events to a simulation:
1) Using function calls in the configuration script, 2) Annotating workloads with m5ops hypercalls (more on this later), 3) Using pre-annotated workloads.
For now, let’s focus on the first method. m5.simulate has two ways to schedule an exit event:
- The
scheduleTickExitFromCurrent()function makes a hypercall 6 (scheduled exit event) a number of ticks in the future from the current tick value. - The
scheduleTickExitAbsolute()function makes a hypercall 6 (scheduled exit event) once the simulation hits the given number of ticks.
Both of these functions take a number of ticks (relative and absolute, respectively), as well as an optional justification string. If the justification string is not provided, hypercall 0 is triggered instead.
There are also some functions in the
Simulatorobject that schedule “classic” exit events (hypercall 0):
- The
schedule_simpoint()function schedules a “classic”SIMPOINT_BEGINexit event at a specific instruction number,- The
schedule_max_insts()function schedules a “classic”MAX_INSTSexit event once a certain number of instructions has executed in any thread on any core,- The
set_max_ticks()function (or themax_ticksparameter when instantiating theSimulator) sets the number of simulation ticks that can occur before the simulation exits with a “classic”MAX_TICKexit event.This means that when we run
simulator.run(1_000_000_000), we’re setting the simulator’smax_ticksparameter to 1,000,000,000! The default behavior of theMAX_TICKexit event is to exit the simulation, which is why the simulation runs for 1,000,000,000 ticks then exits when we do this.
Handling exit events
As previously mentioned, we handle exit events by writing corresponding exit event handlers. Each hypercall number can have a unique exit event handler associated with it, and some (0 through 7 and 1000, which we discussed above) already have pre-written handlers implementing their default behavior. All of these handlers extend a class named ExitHandler, which implements the basic behavior of an exit event handler.
If you’re curious, you can find the definitions of these handlers in
gem5/src/python/gem5/simulate/exit_handler.py.
There are a few different strategies for creating custom exit event handlers:
1) Creating a new exit event handler class by extending the ExitHandler class directly, 2) Extending an existing default exit handler class, 3) Writing an exit event handler as a function and registering it using the register_exit_handler() function.
Let’s write some exit events and handlers! Our goal for this exercise is to detect when the simulation hits 1,000,000 instructions executed, execute for another 1,000 ticks, then finally exit the simulation 1,000 ticks later. Open exit_events.py to get started.
Our first exit event
Currently, this file is a simple configuration script for an Ubuntu boot workload. Let’s first schedule an exit event at the 1,000,000th instruction. We can do this with our Simulator using schedule_max_insts().
simulator.schedule_max_insts(1_000_000)
Remember, this function will schedule a “classic” exit event with hypercall number 0.
If we ran the simulation now without any further modifications, the simulation will simply end after 1,000,000 instructions have been simulated. If we want to achieve the behavior we want, we need to write a custom event handler. This handler should do 3 things:
1) Print that we’ve reached 1,000,000 instructions, which will help us know that our exit event has been reached,
2) Schedule another exit event 1,000 ticks into the future,
3) Fall back into simulation.
We can do this by creating a new exit event handler class that extends the ExitHandler class. The ExitHandler class has two important methods which we’ll need to override:
_process(), which is called when an exit event with the class’ matching hypercall number has occurred,_exit_simulation(), which determines whether simulation should continue or not after processing an exit event. ReturningTrueexits simulation, and returningFalsefalls back into simulation.
Our handler will catch all exit events with a specific hypercall number, in this case 0. We’ll name it ClassicExitHandler and define it as follows:
class ClassicExitHandler(ExitHandler, hypercall_num=0):

  def __init__(self, payload):
    super().__init__(payload)
    self.should_exit = True

  def _process(self, simulator) -> None:
    print("Encountered a classic exit event!")
    self.should_exit = True

  def _exit_simulation(self):
    return self.should_exit
Notice hypercall_num=0 in the class declaration and the overriding of _process() and _exit_simulation(). For now, all this class does on encountering a classic exit event is print out "Encountered a classic exit event!" and exit the simulation by setting self.should_exit to True.
Instead of extending
ExitEventand defininghypercall_num=0, we could have extendedClassicGeneratorExitHandler, the default handler for classic exit events. We’ll look at an example of doing things this way when we define our scheduled exit event handler next.
Since all classic exit events result in hypercall number 0, we’ll also want this handler to figure out which classic exit event triggered the hypercall. We can do this using ExitEvent.translate_exit_status(). This function takes an exit event cause string (which we can get using simulator.get_last_exit_event_cause()) and maps it to a classic exit event type.
Let’s modify _process() to schedule an exit event 1,000 ticks into the future and fall back into simulation specifically when it encounters an ExitEvent.MAX_INSTS:
class ClassicExitHandler(ExitHandler, hypercall_num=0):

  def __init__(self, payload):
    super().__init__(payload)
    self.should_exit = True

  def _process(self, simulator) -> None:
    # get the classic exit event type
    exit_enum = ExitEvent.translate_exit_status(
      simulator.get_last_exit_event_cause()
    )
    # check for MAX_INSTS
    if exit_enum == ExitEvent.MAX_INSTS:
      print("Reached the 1,000,000th instruction!")
      print(f"Current tick is {simulator.get_current_tick()}")
      scheduleTickExitFromCurrent(1_000)
      self.should_exit = False
    else:
      print("Encountered a classic exit event!")
      self.should_exit = True

  def _exit_simulation(self):
    return self.should_exit
This handler now treats MAX_INSTS classic exit events the way we want and exits simulation for any other classic exit events. Let’s run it and see what we get!
gem5 exit_events.py
The simulation outputs:
Reached the 1,000,000th instruction!
Current tick is 1454488722
Encountered a classic exit event!
The first two prints are a result of the exit event triggered by simulating the 1,000,000th instruction. The next print indicates another classic exit event occurred: this is the scheduled event we scheduled with scheduleTickExitFromCurrent(1_000). Remember, if we want scheduleTickExitFromCurrent() to make a scheduled hypercall (hypercall number 6) instead of a classic hypercall (hypercall number 0), we need to provide a justification string. Let’s do that now by replacing the exiting call with this one:
scheduleTickExitFromCurrent(1_000, "1,000 ticks from the 1,000,000th instruction")
If we re-run, we can see that the final print disappears:
Reached the 1,000,000th instruction!
Current tick is 1454488722
This is because we haven’t written our own handler for scheduled exit events (hypercall number 6) yet, and the default handler, ScheduledExitEventHandler, just exits simulation without printing anything.
Scheduled exit event handler
Now we need to write an exit event handler for the scheduled exit event (hypercall number 6) caused by scheduleTickExitFromCurrent. For now, we want this handler to do the following:
1) Print out the current tick value, 2) Schedule another scheduled exit event 1,000 ticks from now, 3) Exit the simulation (we’ll change this in a moment)
For this handler, instead of extending ExitHandler directly, we’ll extend ScheduledExitEventHandler, the existing default handler for hypercall number 6. We’ll call it MyScheduledExitEventHandler and define it like so:
class MyScheduledExitEventHandler(ScheduledExitEventHandler):
  def _process(self, simulator):
    super()._process(simulator)
    print("Encountered a scheduled exit event!")
    print(f"Current tick is {simulator.get_current_tick()}")
    scheduleTickExitFromCurrent(1_000, "2,000 ticks from the 1,000,000th instruction")
    self.should_exit = True

  def _exit_simulation(self):
    return self.should_exit
Note that unlike when we extend ExitEvent directly, we don’t have to specify the hypercall number, and we don’t have to redefine __init__. If we run the simulation again, we should see the following:
Reached the 1,000,000th instruction!
Current tick is 1454488722
Encountered a scheduled exit event!
Current tick is 1454489722
Our custom scheduled exit event handler is being invoked exactly 1,000 ticks after hitting the 1,000,000th instruction!
Complicating the scheduled exit event handler
Now, our simulation reaches the 1,000,000th instruction, executes for 1,000 more ticks, then exits. However, this means we’ll never hit the next scheduled exit event we scheduled in MyScheduledExitEventHandler’s _process() method. Since that event is also a scheduled exit event, we need to use the same handler to address this future exit event.
To do this, we need some way to track how many times this handler has already been invoked. We do this with a class variable that tracks the number of hypercalls.
We need to use a class variable since every hypercall creates a new instance of the handler.
We’ll call this variable num_hypercalls and increment it every time _process() is called. We can then use its value to schedule a scheduled exit event and fall back in simulation only when the handler is invoked for the first time:
class MyScheduledExitEventHandler(ScheduledExitEventHandler):
  num_hypercalls: int = 0 # Declare the class variable

  def _process(self, simulator):
    super()._process(simulator)
    MyScheduledExitEventHandler.num_hypercalls += 1 # Increment hypercall count

    print("Encountered a scheduled exit event!")
    print(f"Current tick is {simulator.get_current_tick()}")

    if MyScheduledExitEventHandler.num_hypercalls == 1:
      scheduleTickExitFromCurrent(1_000, "2,000 ticks from the 1,000,000th instruction")
      self.should_exit = False
    else:
      self.should_exit = True

  def _exit_simulation(self):
    return self.should_exit
Let’s run this script one last time:
gem5 exit_events.py
We should now see:
Reached the 1,000,000th instruction!
Current tick is 1454488722
Encountered a scheduled exit event!
Current tick is 1454489722
Encountered a scheduled exit event!
Current tick is 1454490722
You’ll notice that the three exit events are exactly 1,000 ticks apart, just like we planned.
m5ops
Let’s get back to that other way of creating exit events: annotating workloads with m5ops. You might’ve noticed that the configuration script way of scheduling events can only really interact with the number of instructions executed and the number of ticks that have passed. This is helpful, but what if you want to let the simulator know when the code being executed has finished a specific task?
m5ops allow us to make annotations in our workload that have unique behavior, including making hypercalls. You can think of m5ops as pseudo-instructions that our simulated processor can recognize.
When the processor finds an m5op, it triggers the corresponding simulation behavior. Here are some examples:
exit [delay]: Create a class exit event of typeExitEvent.EXITindelaynanoseconds- Similar
m5opsexist for other classic exit events such asExitEvent.SWITCHCPUandExitEvent.RESETSTATS; all of these trigger hypercall number 0.
- Similar
hypercall: Make a hypercall of the desired hypercall number.
You can check out all
m5opsand their behavior ingem5/src/sim/pseudo_inst.cc!
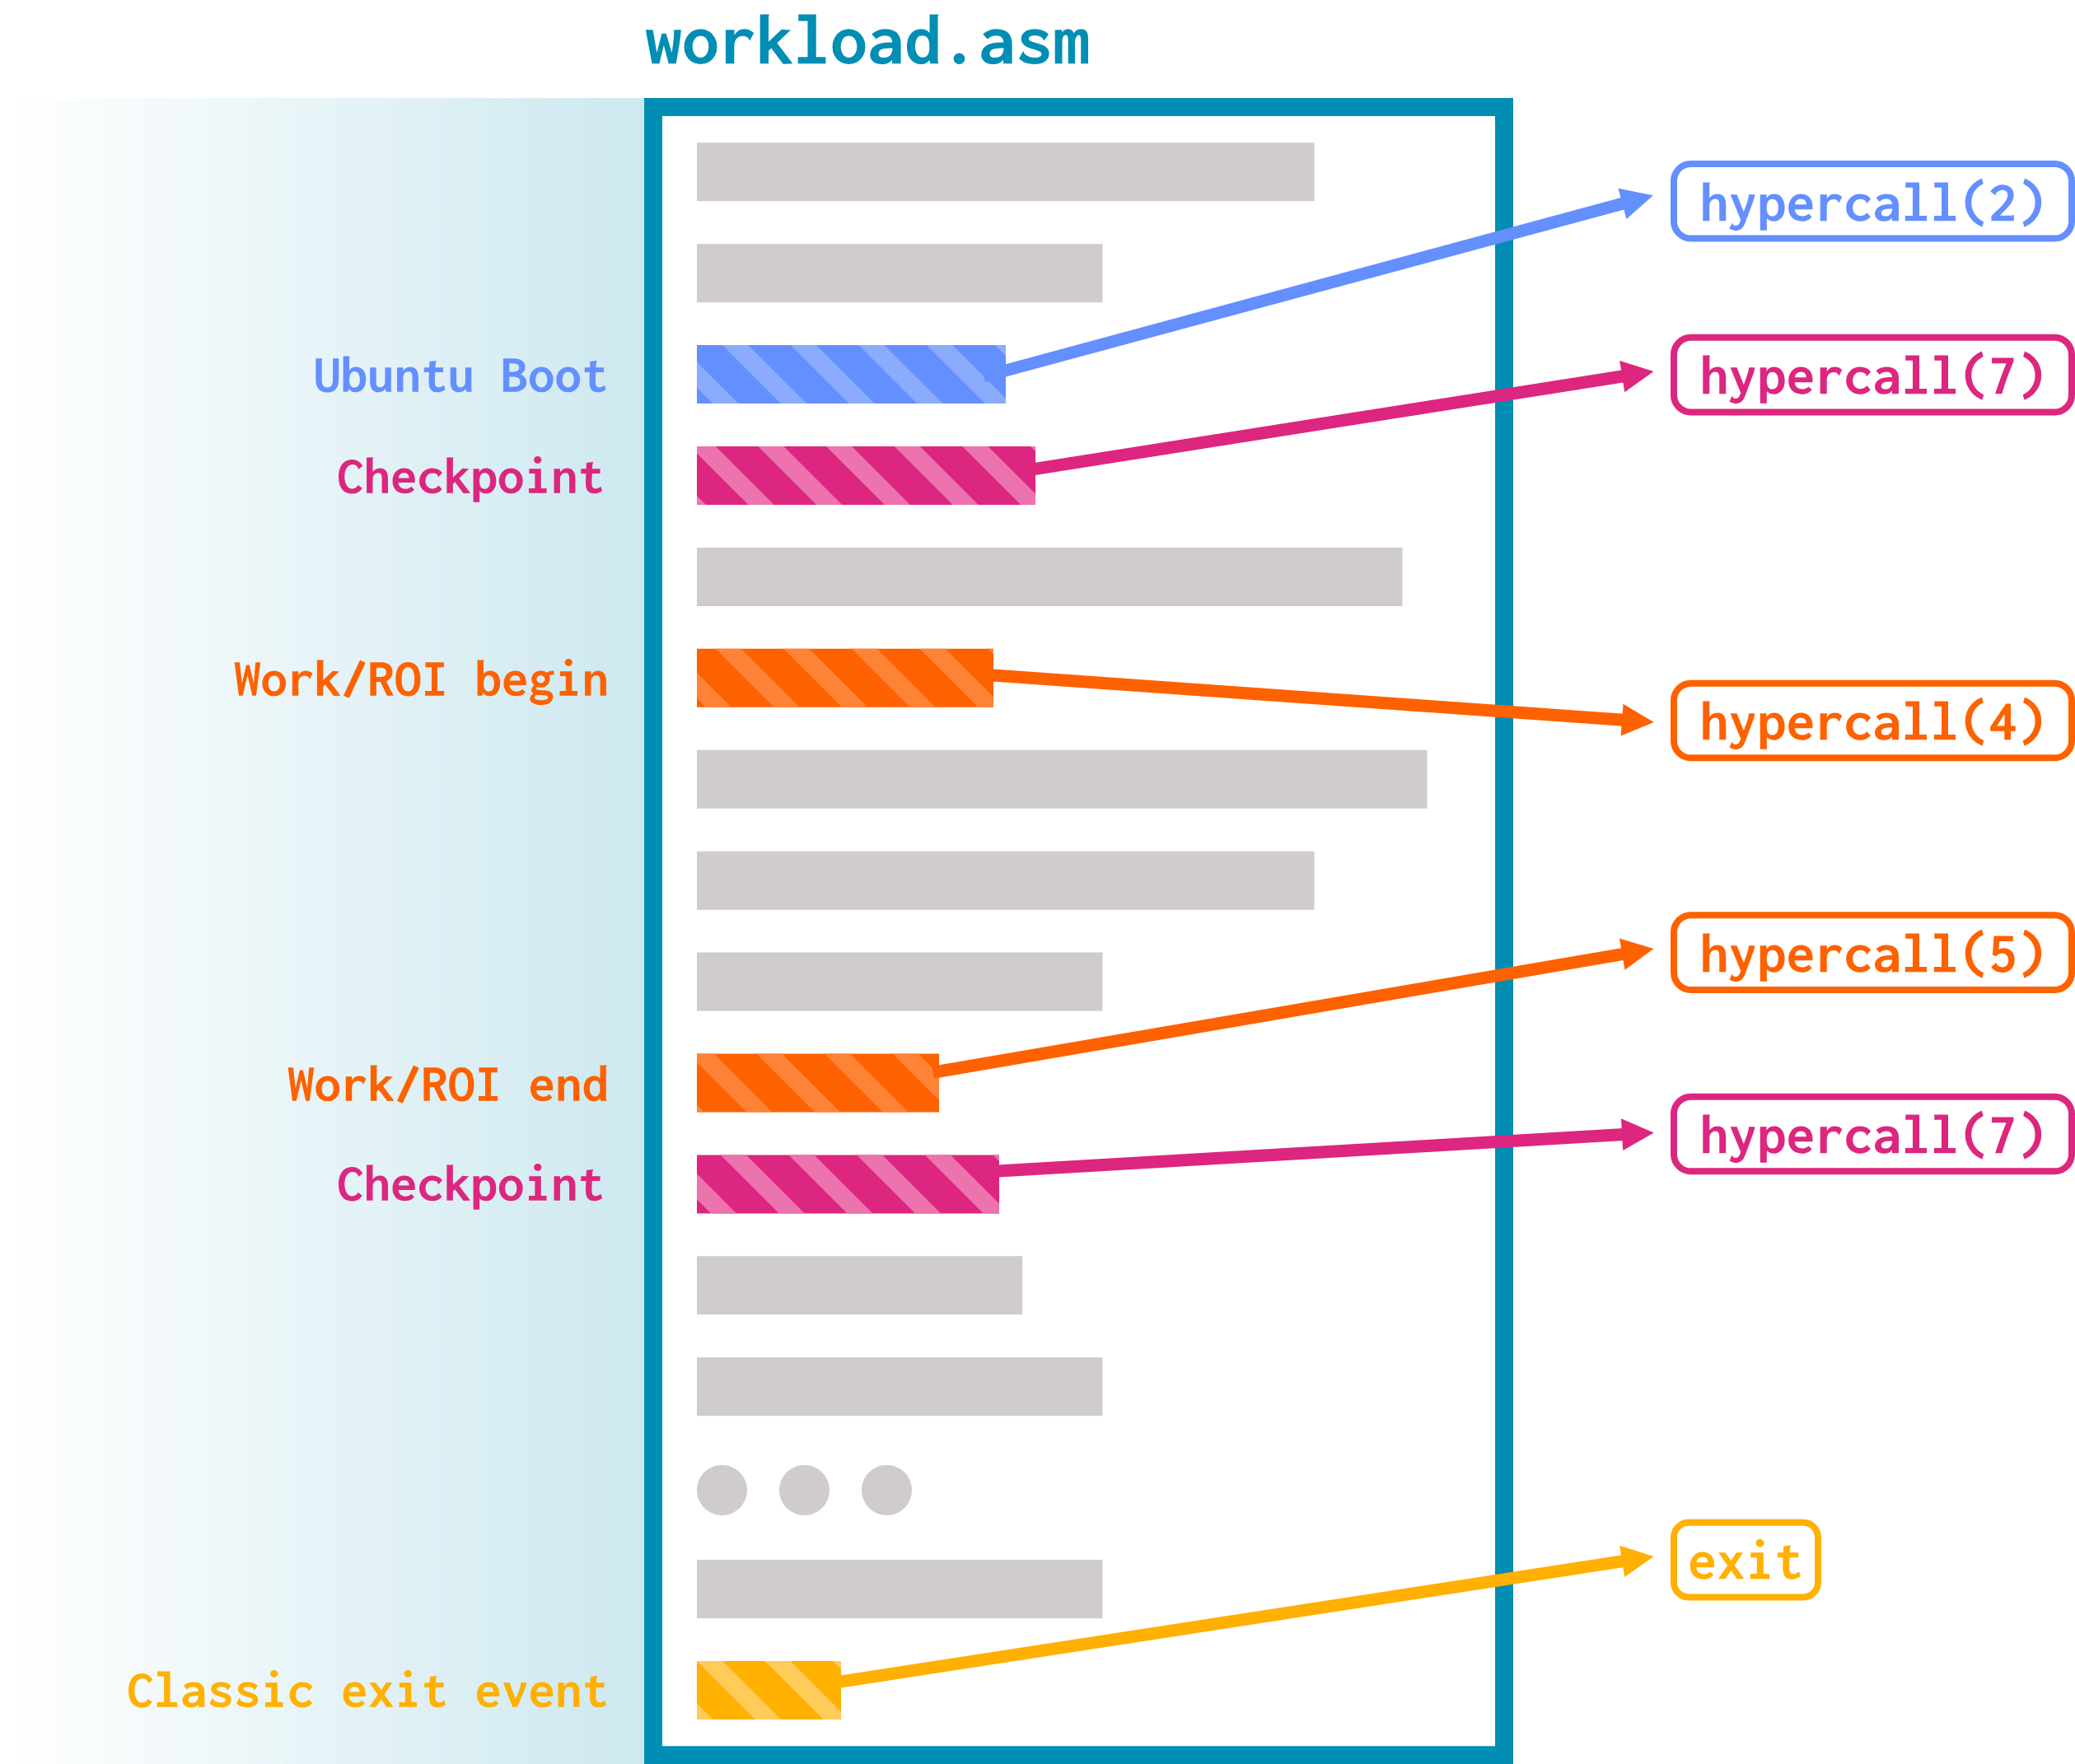
The main benefit of m5ops that we’ll be focusing on is the ability to place hypercalls in locations that make sense in the context of our specific workload.
Using m5ops
We have three versions of m5ops:
- Instruction mode:
m5opsin this mode just show up as pseudo-assembly instructions (in fact, they take advantage of unmapped instructions from the ISA). As such, they only work on simulated (non-KVM) CPU models (your host CPU won’t recognize them!). - Address mode: instead of unmapped instructions, these rely on memory accesses to a specific address range to trigger hypercall behavior. As such, a non-simulated CPUs can recognize them, so you can use them with the KVM CPU model. However, address mode is only supported in x86 and ARM.
- Semihosting: this mode was added for ARM’s Fast Model CPUs. It extends ARM’s semihosting support. Other simulated CPU models that use ARM can also use semihosting mode
m5ops.
Building the m5ops library
Before we can use m5ops, we need to build the m5ops library and link it to our workload’s source file(s). First, make sure you’re in the correct directory:
cd gem5/util/m5
Next, we need to use scons to build. Depending on your host ISA and the ISA you want to use in simulation, you might have to cross-compile.
Cross-compilation is the process of compiling to an ISA that is different from your host machine.
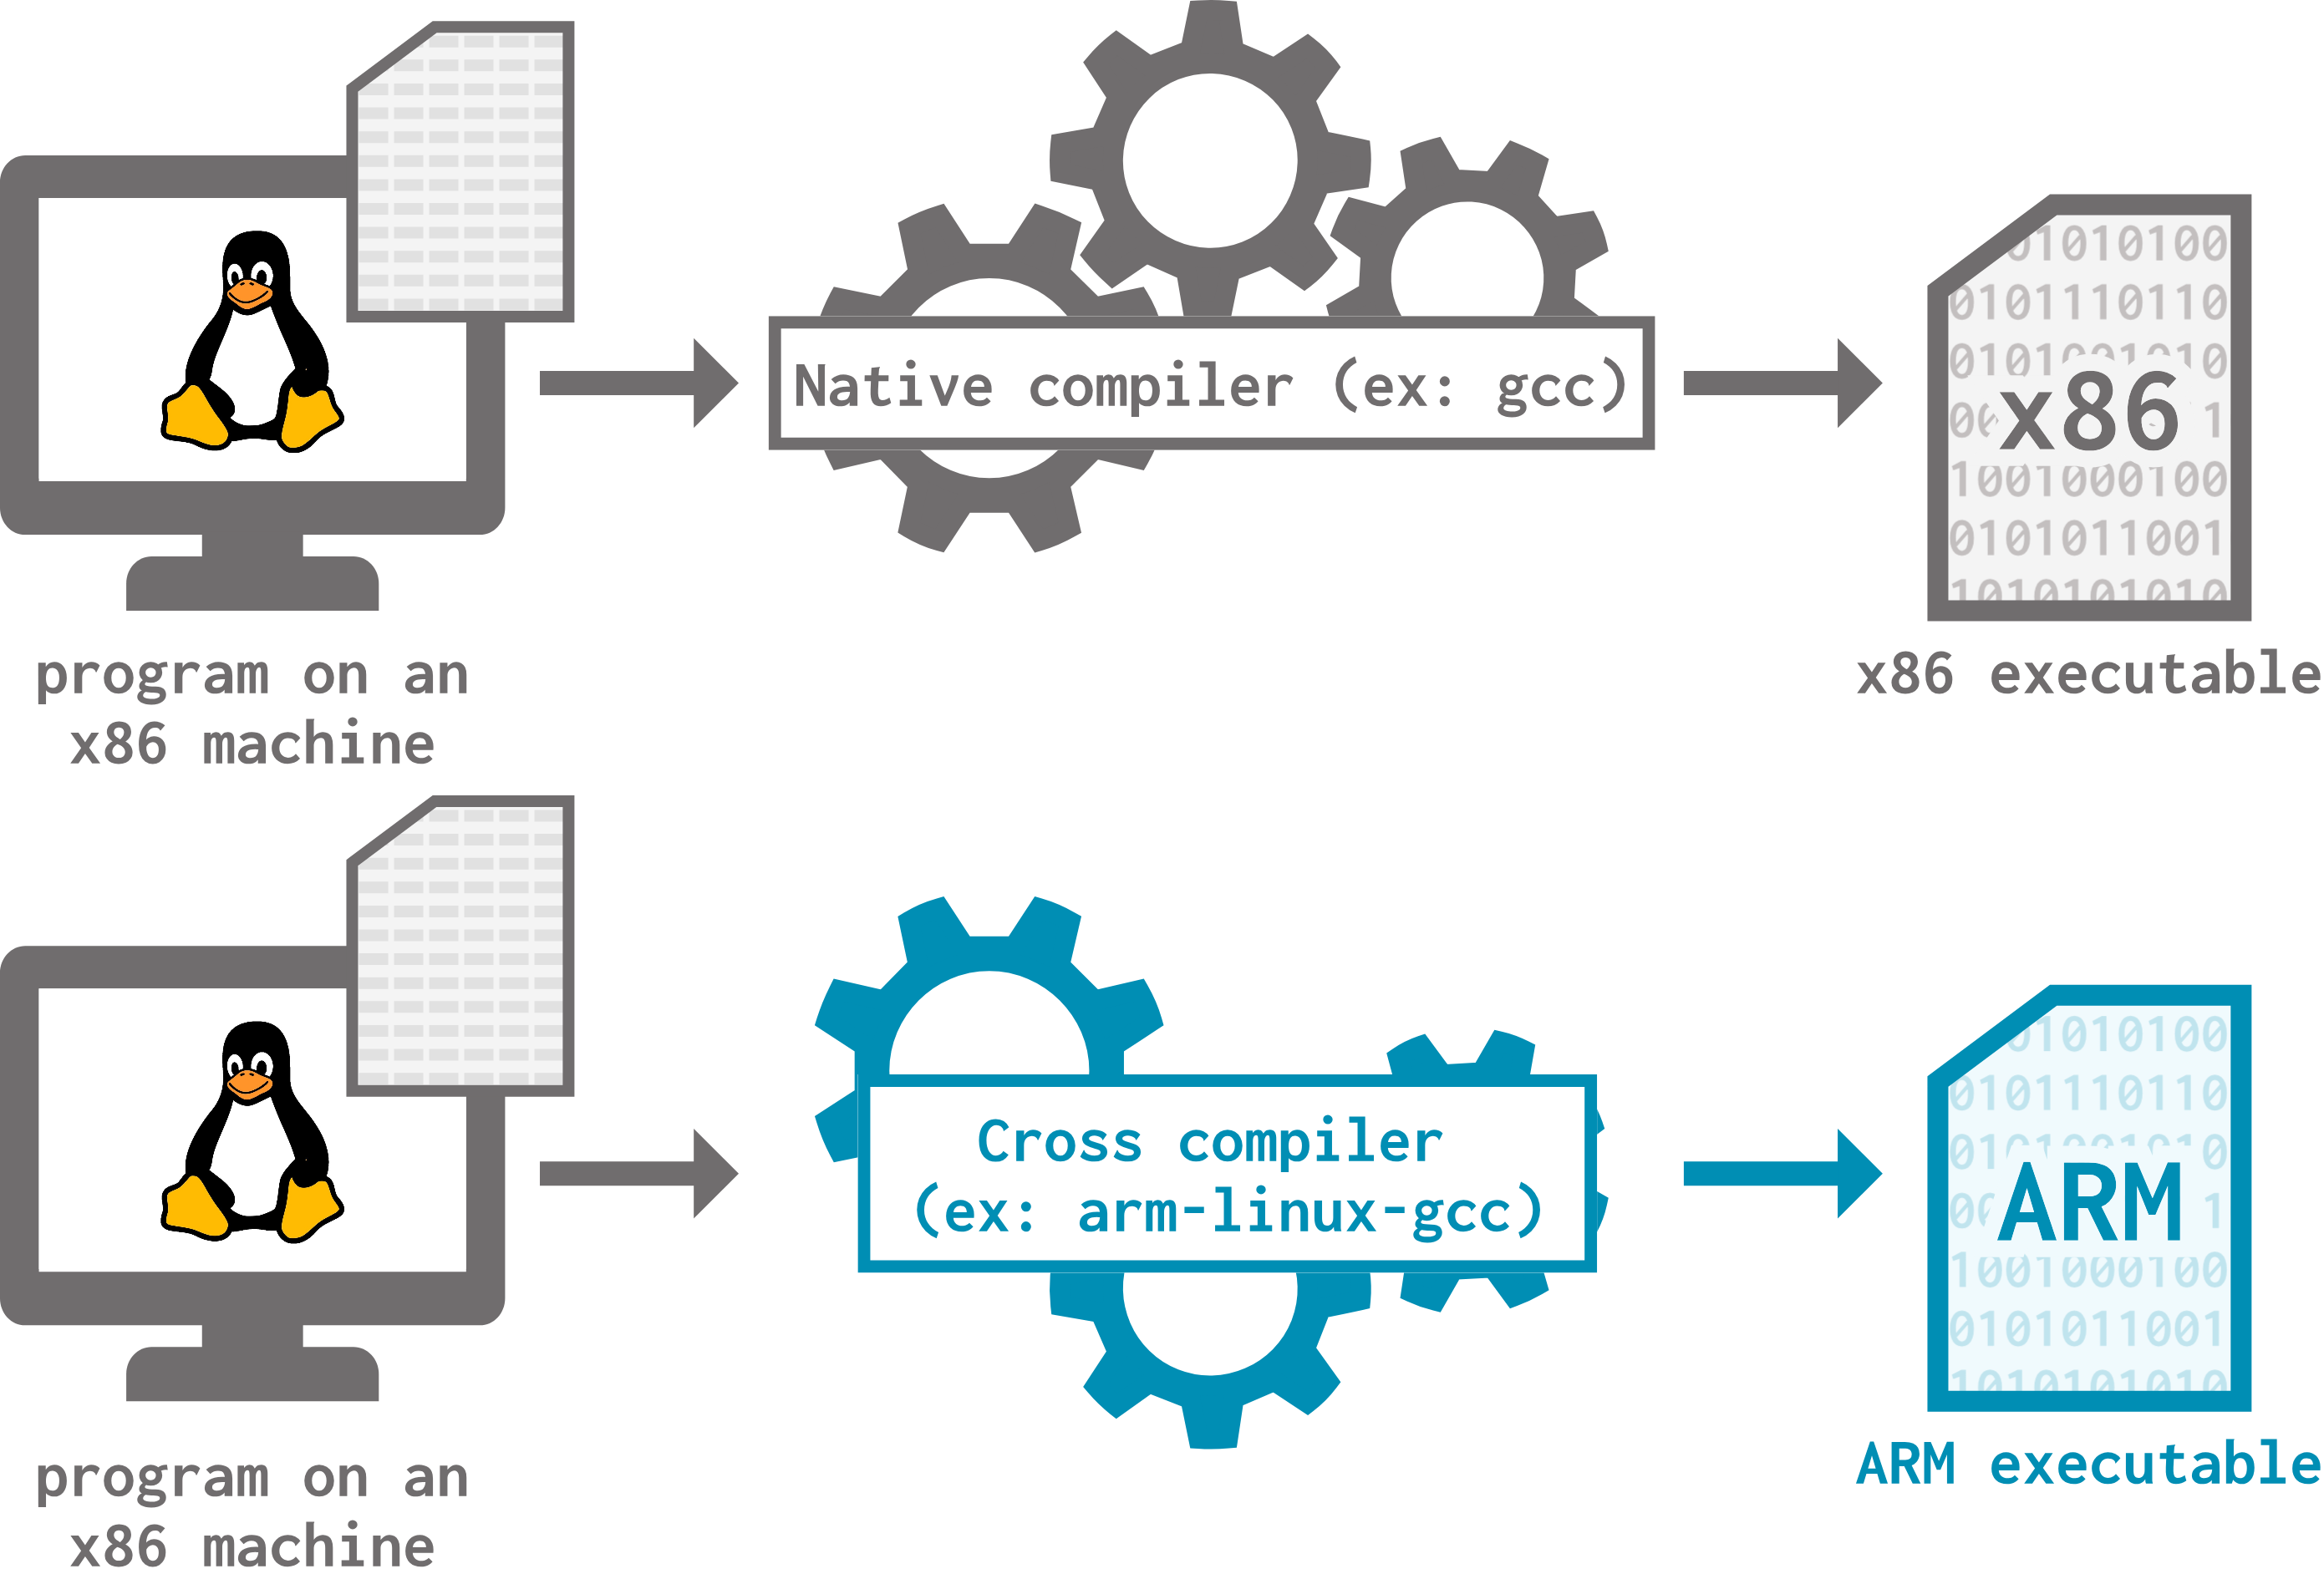
Let’s build the m5ops library in both x86 and ARM to get a sense for what it’s like to compile natively and cross-compile. Assuming we’re on an x86 host, building the m5ops library for x86 looks like this:
scons build/x86/out/m5
On the other hand, building the m5ops for ARM requires the cross-compiler:
scons arm64.CROSS_COMPILE=aarch64-linux-gnu- build/arm64/out/m5
No matter what, both processes only require one command!
Note that although we’re using
sconsto build this, this is NOT the same build environment we use to build gem5! There are different targets and options available.Don’t expect things to be identical between the gem5 build environment and this one! For example, we specify
arm64to indicate building m5ops for ARM, but useARMto specify building ARM for gem5.
Annotating a workload
Our goal is to annotate the beginning and end of a region of interest (ROI) within a workload with appropriate hypercalls. gem5 designates hypercall number 4 as the work/ROI begin hypercall and hypercall number 5 as the work/ROI end hypercall.
As a reminder, the default behavior of the work/ROI begin hypercall is to reset the simulation statistics and continue, and the default behavior of the work/ROI end hypercall is to dump the simulation statistics and continue.
This way, we can reset our statistics when we’ve reached the ROI and print them out when the ROI has executed all the way through.
Instruction mode
Open instruction-mode/annotated_workload.c to get started. This workload is very simple; it just prints a hello message to stderr.
We can link the m5ops library to this workload by adding:
#include <gem5/m5ops.h>
at the top of the file.
Let’s annotate this workload with instruction-mode m5ops! We can do this by calling m5_hypercall(4) and m5_hypercall(5) in the appropriate places in the code:
int main(int argc, char** argv) {
  m5_hypercall(4);  // work/ROI begin hypercall
  fprintf(stderr, "Hello, stderr!\n");
  m5_hypercall(5);  // work/ROI end hypercall
  return 0;
}
As you might expect, the function argument indicates the hypercall number!
We now need to make sure to do the following when we compile:
- Add
gem5/includeto the compiler’s search path (this allows the#includeat the top of the file to findm5ops.h),- We do this using the
-Igem5/includeoption.
- We do this using the
- Add
gem5/util/m5/build/x86/outto the linker’s search path (this allows the linker to find the actual m5ops library),- We do this using the
-Lgem5/util/m5/build/{TARGET_ISA}/outoption.
- We do this using the
- Link against
libm5.a(this is the library we need to use).- We do this using the
-lm5option.
- We do this using the
This is a bit of a long command, so we put it in a Makefile:
$(GCC) -o annotated_workload annotated_workload.c \
  -I$(GEM5_PATH)/include \
  -L$(GEM5_PATH)/util/m5/build/$(ISA)/out \
  -lm5
Be sure to update
GEM5_PATHin the Makefile to point to the absolute path of gem5 on your machine.
Let’s compile the workload with make! If all goes well, we can try to run the workload with:
./annotated_workload
However, we’ll see the following error:
Illegal instruction (core dumped)
This is expected! Remember that instruction-mode m5ops are not recognized by normal CPUs since they use unmapped instructions. Our simulated CPU will be able to handle these just fine, though.
The configuration script at run_annotated_workload.py already sources the workload’s binary, so we can simply run the script now and see what happens:
gem5 run_annotated_workload.py
First, the simulation output matches what we’d expect:
Hello, world!
Simulation Done
Second, if we look at stats.txt, we should see not one but two segments of statistics bookended by
---------- Begin Simulation Statistics ----------
...
---------- End Simulation Statistics   ----------
The default behavior of the work/ROI end exit event is to dump the statistics; this dump is the first segment of statistics. When the simulation ends, the statistics are dumped again, creating the second segment.
Let’s write some handlers for these hypercalls so that we can see some console output instead of statistics. Instead of creating whole classes like we did before, we can write handler functions in our configuration script:
def handle_work_begin():
  print("Encountered a work begin hypercall!")
  return False

def handle_work_end():
  print("Encountered a work end hypercall!")
  return False
You can think of these functions as shorthand for
_process()and_exit_simulation(). The body of the function is executed when the exit event triggers, and the return value indicates whether the simulation should exit.
We now need to register these functions with register_exit_handler():
register_exit_handler(4, handle_work_begin, "Simple work begin handler")
register_exit_handler(5, handle_work_end, "Simple work begin handler")
If we rerun the simulation now, we should see:
Encountered a work begin hypercall!
Hello, stderr!
Encountered a work end hypercall!
Simulation Done
Some debug prints about stack size might be interleaved, too; this is normal!
Address mode and semihosting
Instruction-mode m5ops work very well for simulated CPU models, but if you need to use a KVM CPU (for example, for simulation acceleration, which we’ll cover in the advanced topics unit), address-mode (or semihosting) m5ops are required.
The process for setting these up is a tiny bit more involved, but it’s not too different from how we set up instruction-mode m5ops. You can find more details on address-mode and semihosting m5ops here.