Simulation modes
You might have noticed us using “SE mode” functions like set_se_binary_workload in previous sections; what’s that about?
By the end of this section, you will be able to:
- Assess whether SE or FS mode is more appropriate for a particular simulation goal.
- Contrast the benefits and drawbacks of Syscall Emulation (SE) and Full-System (FS) simulation modes.
- Change whether a simulation uses SE or FS mode.
What’s SE mode?
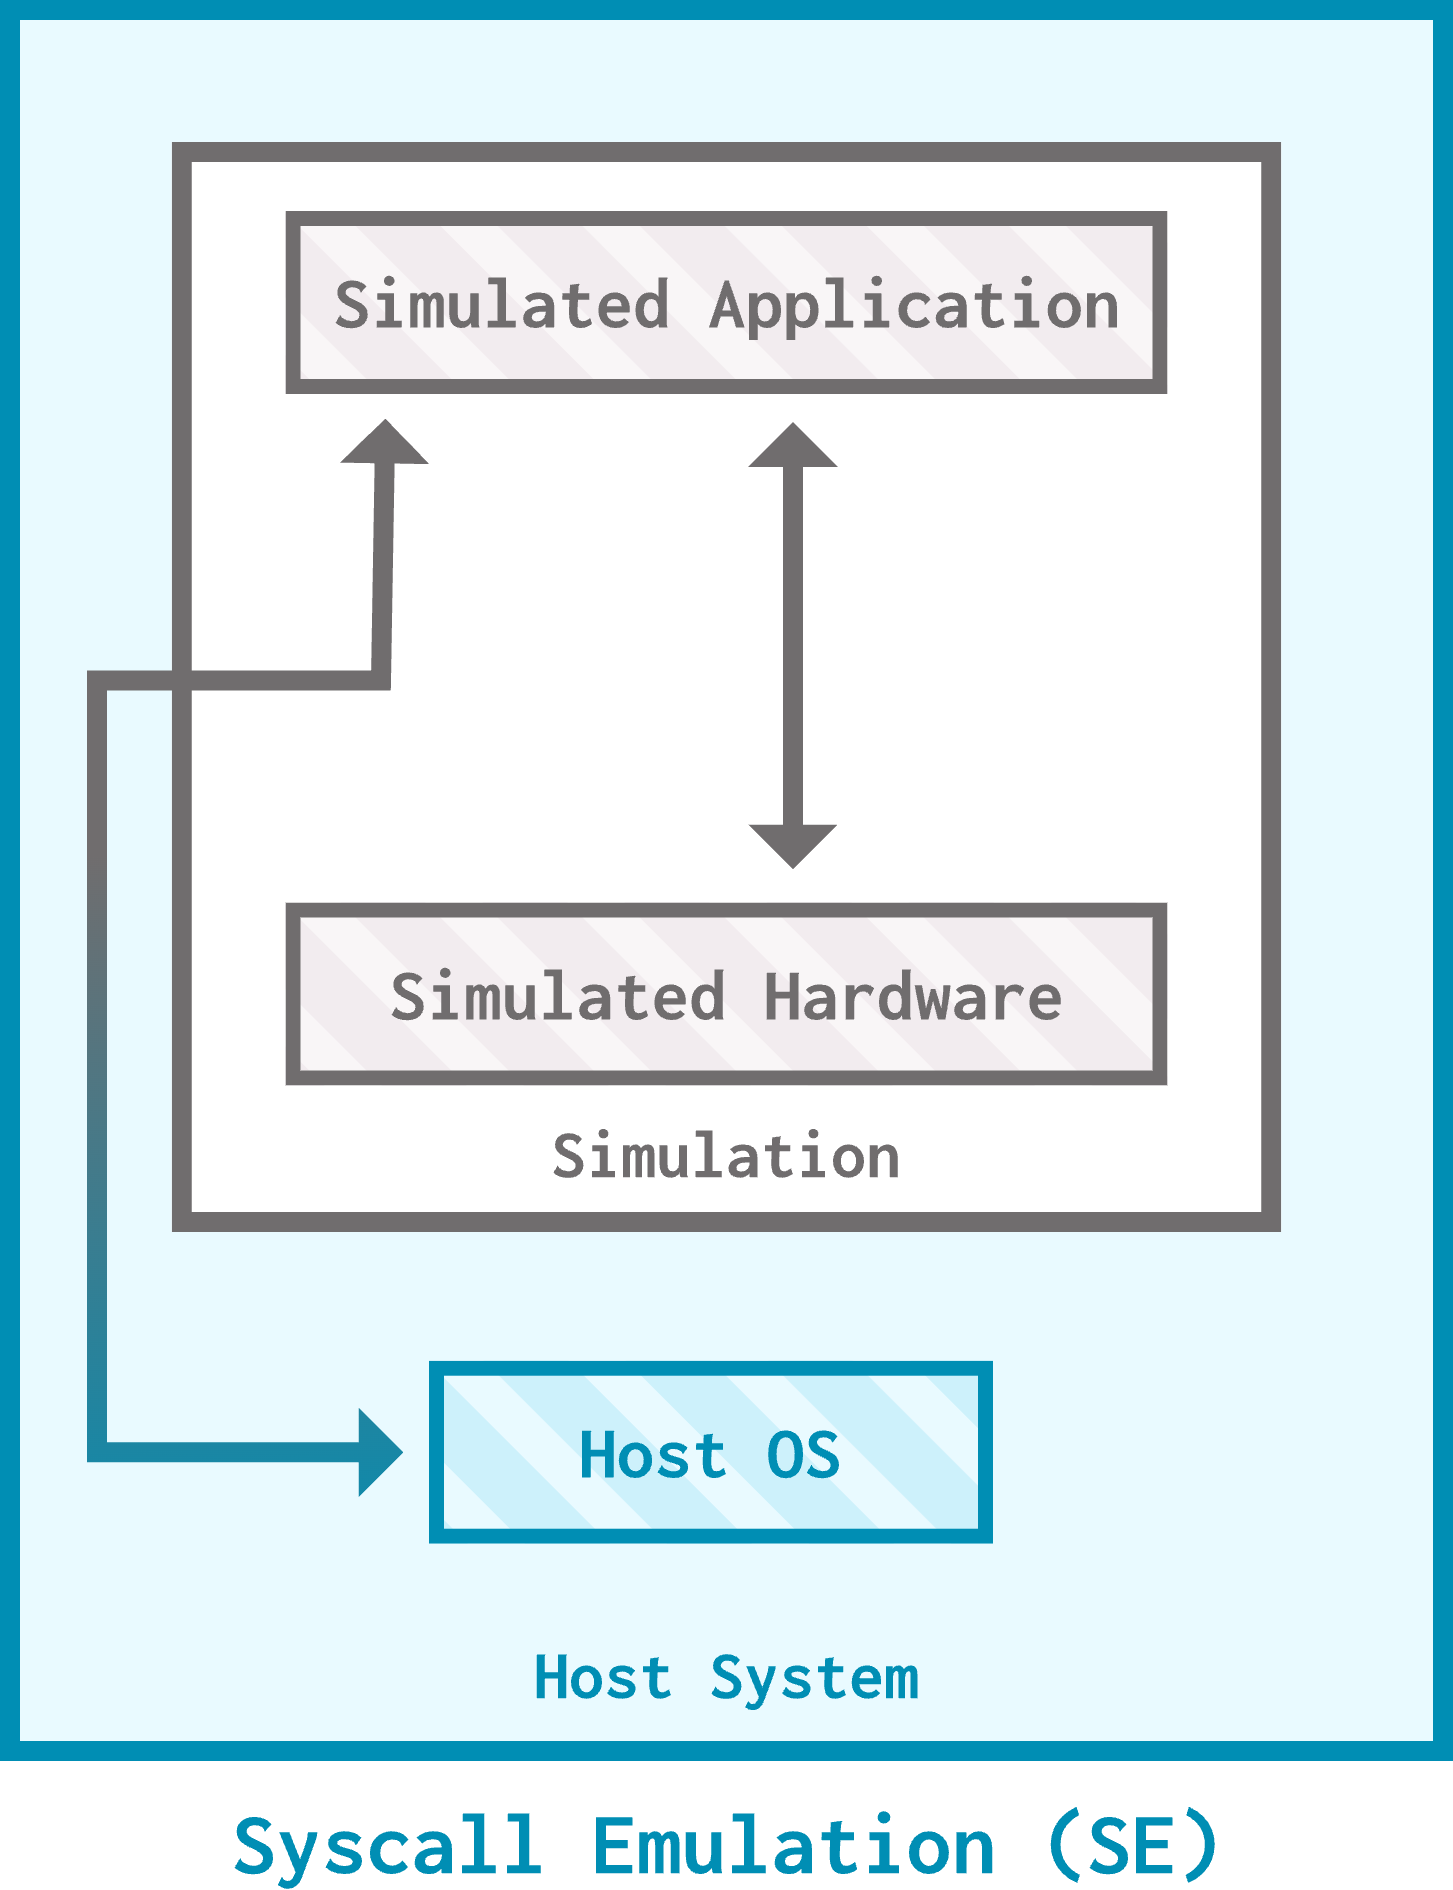
Syscall emulation (SE) mode is a simulation mode in gem5 that emulates the operating system as opposed to simulating it. Only user-level code is simulated, and any system calls made within that code trap into the host. SE mode supports most common Linux system calls.
The good news
SE mode is great if you really only care about the processor and the cache/memory system: it makes it easy for you to set up simulations by not requiring instantiation of every device in the system. Since it simulates less, SE mode also gives faster simulation speeds.
SE mode is simpler, easier to set up, and simulates faster.
The bad news
Since SE mode does not simulate the OS, you shouldn’t use it if you care about any OS features or interactions (for example, page table walks). Think of the syscall emulation SE mode provides as the bare minimum needed to get user-level code to work. SE mode also has lower simulation fidelity, so if you require a high-fidelity simulation of your system, SE mode is not the right choice. Binaries that require elevated permissions also don’t work in SE mode.
SE mode is lower-fidelity, does not simulate the OS, and does not support elevated permissions.
Example
Let’s take a look at how SE mode handles user-level code with system calls. Open SE_hello_world.py to get started! This file sets up a simple system with a PrivateL1CacheHierarchy, a SingleChannelDDR4_2400, and a TIMING SimpleProcessor. We then use set_se_binary_workload to set an SE mode workload for the board. This is all we need to do to simulate using SE mode!
The
Simulatorobject in gem5 has an optional parameter calledfull_system, which can be used to specify the simulation mode. However, this is usually inferred from the board, as you can see here.
The workload we choose to use is arm-hello64-static, a simple program that prints “Hello world!” to the console. Recall that printing to the console requires a system call.
Let’s run this thing! Use the following command:
gem5 --outdir=SE_mode -re --debug-flags=SyscallAll SE_hello_world.py
You’ll notice two new flags in this command:
-reredirects simulation output (stdoutandstderr) to files (simout.txtandsimerr.txt) in the output directory instead of outputting to the console, making things more readable if there’s a lot of output.--debug-flags=SyscallAllenables a set of debug flags to log system calls instdout.
When the simulation wraps up, you should see a few logging statements in simout.txt (the redirected output of stdout). All of these represent various system calls (mainly brk) being called and returning. Let’s focus on the ones surrounding the “Hello world!” print:
28305000: board.processor.cores.core: T0 : syscall Calling write(1, 4798048, 13)...
Hello world!
28305000: board.processor.cores.core: T0 : syscall Returned 13.
One thing to know about gem5 output is that the simulation’s stdout and the simulator’s stdout are both printed to the same stdout (and thus redirected to the same simout.txt file). These two lines were printed to the simulator’s stdout:
28305000: board.processor.cores.core: T0 : syscall Calling write(1, 4798048, 13)...
28305000: board.processor.cores.core: T0 : syscall Returned 13.
…and this one line was printed to the simulation’s stdout:
Hello world!
For debugging messages, the number at the beginning of a line corresponds to the tick that the line was printed at. The two lines in the simulator’s stdout show the write syscall being called at tick 28305000, then that same write syscall returning at 28305000: the same tick! As you can see, SE mode does NOT record timing information for system calls, but, as the line of simulation in stdout shows, the behavior of the system call still functions.
What’s FS mode?
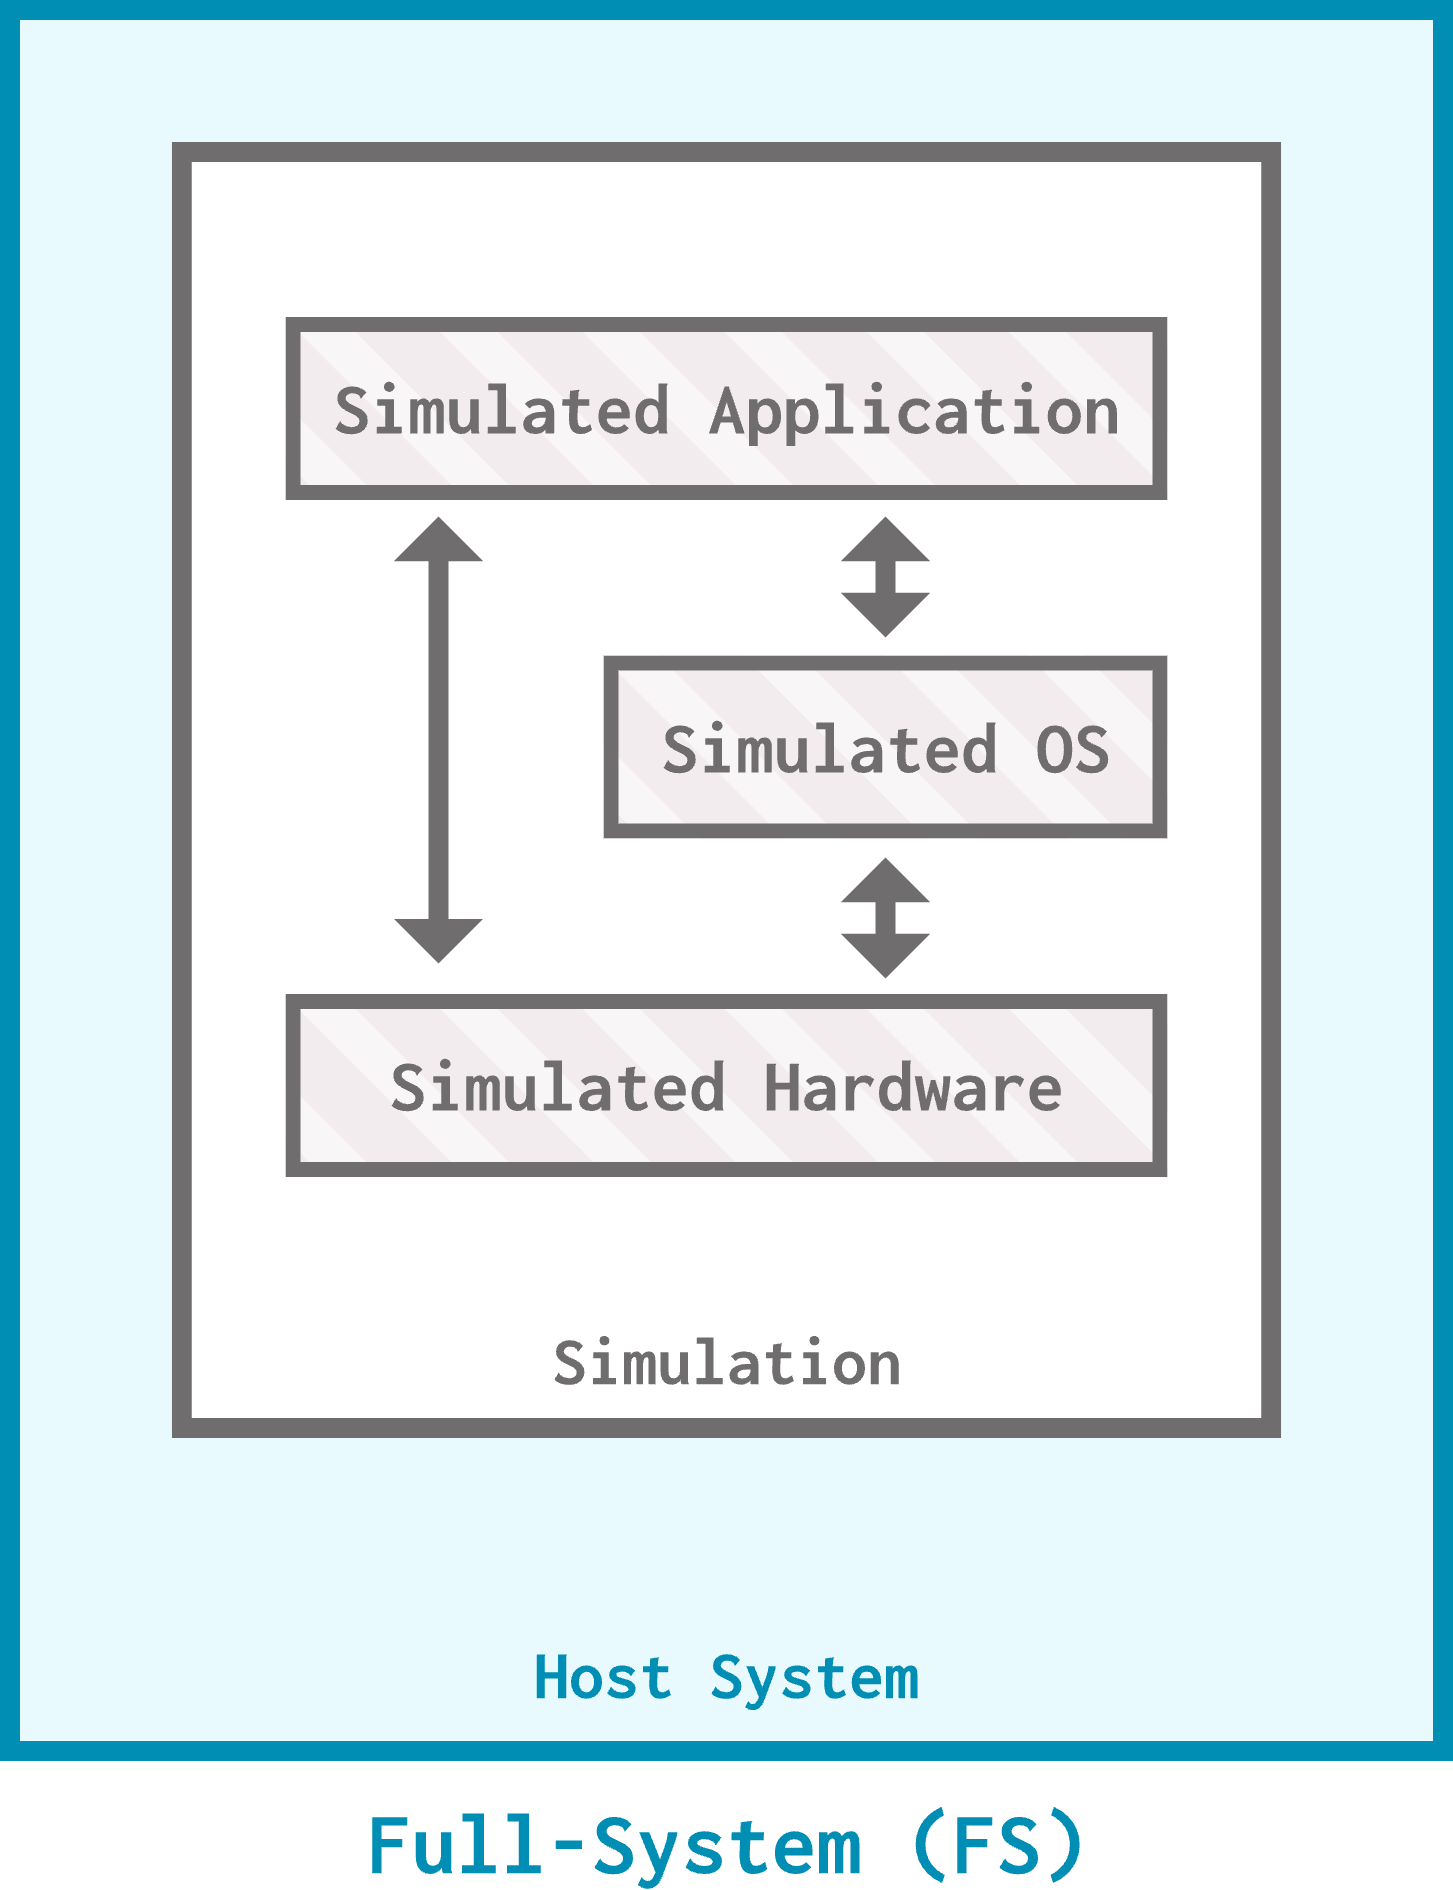
Full-system (FS) mode is a simulation mode in gem5 that simulates the entire system. It simulates the CPU and the memory system (like SE mode does), but it also simulates I/O devices like disk and network interfaces along with the entire software stack including the OS, drivers, and applications.
The good news
Full-system mode is the go-to simulation mode if you need to simulate an entire system in high fidelity. It allows for detailed analysis and debugging of hardware and software interactions. If you care about I/O or the operating system, FS mode is the right move.
FS mode simulates the entire system (including the OS) and allows for detailed system analysis.
The bad news
All of that extra simulating comes at the price of simulation speed. If you don’t care about the OS boot process, but need the OS to be fully simulated, you’ll have to wait through that boot process every time (that is, unless you accelerate the simulation… we’ll discuss this in the advanced topics section). You’ll also need to provide extra resources other than just a binary (like the kernel and disk image) to run an FS mode simulation.
FS mode is slower and requires extra gem5 resources.
Example
Let’s try to run a simulation in full-system mode. Running a custom binary in full-system mode is a bit involved, so for now, let’s just boot Ubuntu. Since full-system mode simulates the entire system, we’re going to need more than a binary to get this simulation off the ground. Open FS_hello_world.py to get started. This configuration script is similar to its SE mode cousin, with two main differences. First, we’re using an ArmBoard instead of a a SimpleBoard, since SimpleBoard does not support full-system mode:
board = ArmBoard(
    clk_freq="1GHz",
    processor=processor,
    memory=memory,
    cache_hierarchy=cache_hierarchy,
)
Second, we’re using set_kernel_disk_workload instead of set_se_binary_workload to set our workload. This function requires a kernel, a disk image, and a bootloader, which we obtain individually using obtain_resource:
board.set_kernel_disk_workload(
  kernel = obtain_resource("arm64-linux-kernel-6.8.12"),
  disk_image = obtain_resource("arm-ubuntu-24.04-img"),
  bootloader = obtain_resource("arm64-bootloader-foundation")
)
We can now run this script:
gem5 --outdir=FS_mode -re FS_hello_world.py
You’ll notice we didn’t turn on any debug flags this time, mostly because this workload doesn’t make any system calls from user-mode code (it only boots the kernel). Still, you may notice some new files in the output directory (FS_mode) that weren’t there in the SE mode simulation:
FS_mode
  |---board.realview.uart1.device
  |---board.realview.uart2.device
  |---board.realview.uart3.device
  |---board.terminal
  |---device.dtb
These files (and potentially others, depending on the simulation parameters) are auto-generated for FS mode simulations. The .device files will record any output on the corresponding simulated devices, the .terminal file shows stdout, and the .dtb file reflects the contents of disk in a binary format.
After this example, you may have some questions about how we’ve been able to avoid listing the kernel, disk image, and bootloader individually in previous full-system simulations (like the first configuration script from Unit I), or what the deal is with the
set_workloadfunction. All will be answered in the next section on gem5 resources!
Which should I choose?
One way to quickly know that you need to use FS mode is if your simulation requires a feature that SE mode does not support. For example, you may need to simulate system calls or any other aspect of the operating system in detail. Your binary may require elevated privileges to work, or you may rely on a more esoteric system call that is not implemented in SE mode, even if you don’t care about its timing.
It’s important not to treat SE mode as just “FS mode but faster”. As we just looked at, SE mode doesn’t simulate everything that FS mode does, and if you’re not 100% sure that SE mode simulates everything you need, you should use FS mode instead. FS mode simulates everything that SE mode does, so it’s a safe option.
When in doubt, use FS mode.
That being said, if you’re certain that SE mode meets your needs, it is a quicker option! You’ll notice that we’ve used SE mode quite a bit in this bootcamp to look at simpler simulations and examine processors, caches, and memory components. SE mode is another useful tool in your toolbox!