Traffic generation in gem5
Sometimes, you just don’t need to model a processor.
By the end of this section, you will be able to:
- Test the performance of a memory system in-simulation using standard library traffic generators.
- Create a new traffic generator by extending the AbstractGenerator class.
- Interpret statistics for simulations that use traffic generators.
What’s synthetic traffic generation?
Synthetic traffic generation is a technique that allows us to simulate a pattern of memory accesses without needing to simulate a processor or a workload.
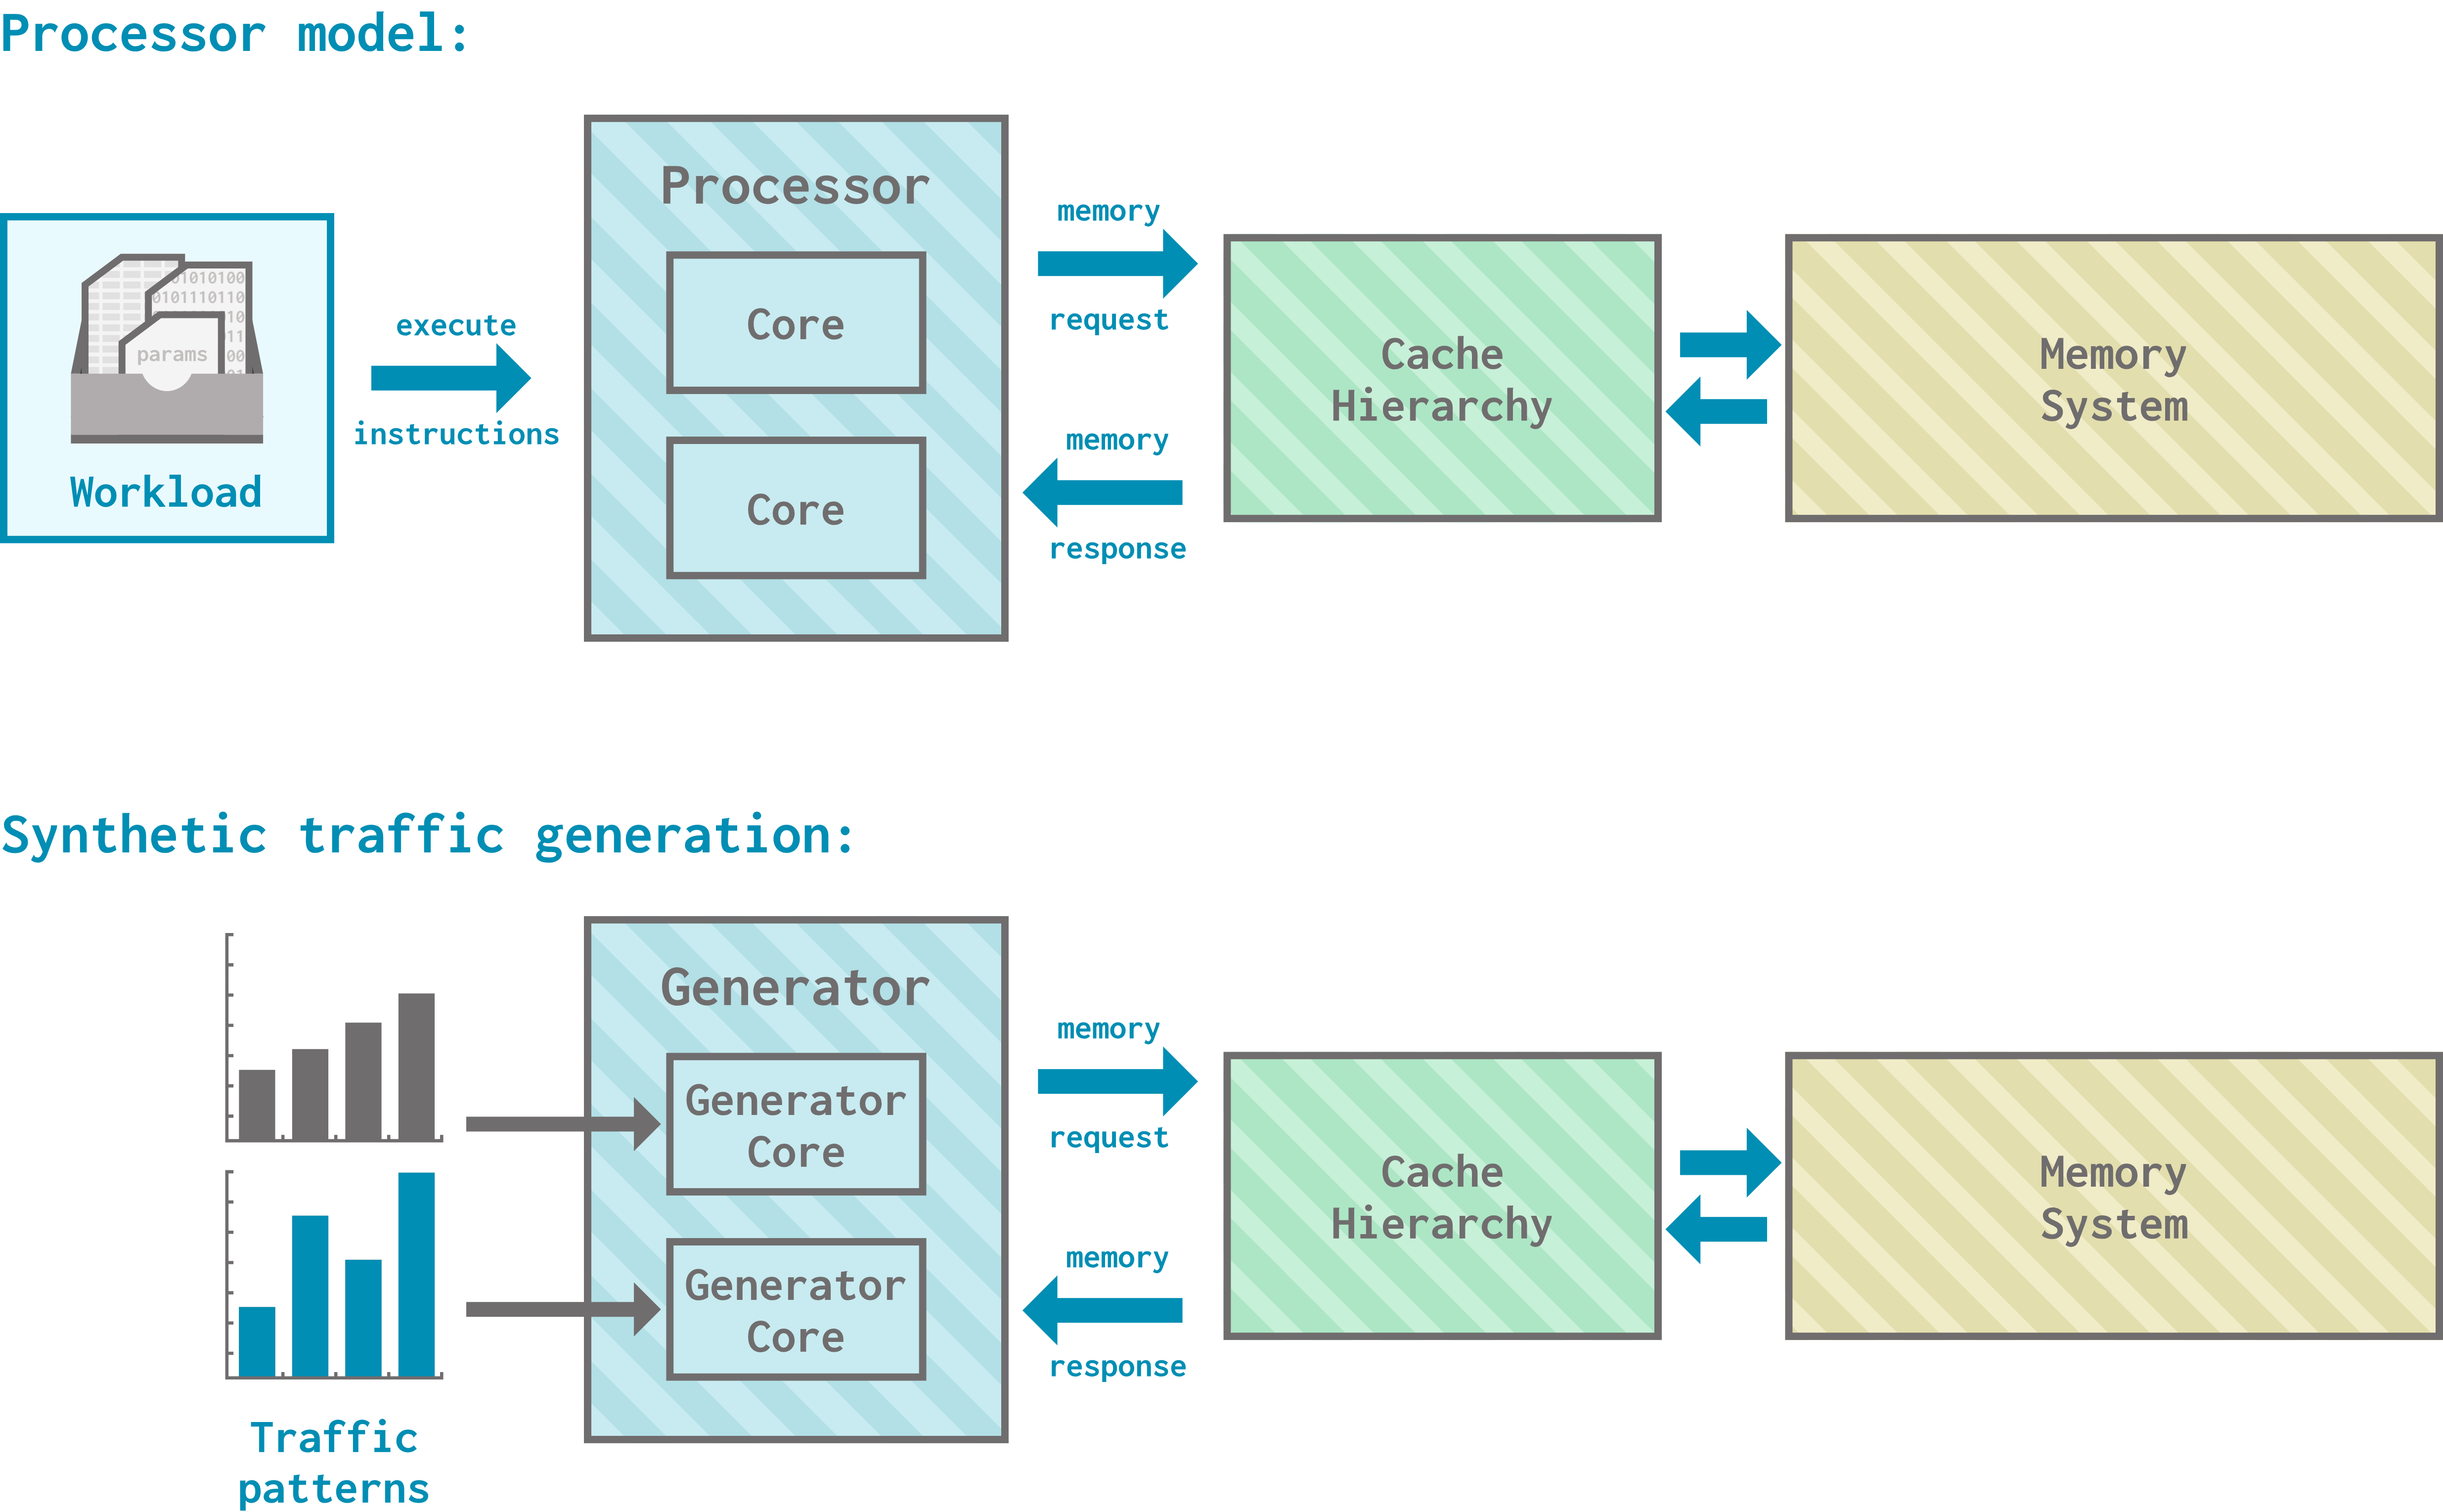
It’s useful for measuring the performance of memory systems; for example, assessing the maximum theoretical bandwidth of a system or testing the correctness of a new cache coherency protocol. It’s not useful for situations where the presence of a processor makes a difference; for example, measuring the execution time of workloads.
Traffic generators in the standard library
The gem5 standard library includes a collection of components for synthetic traffic generation, which includes generators (which replace processors on a gem5 simulation board) and generator cores (the cores that generators have).
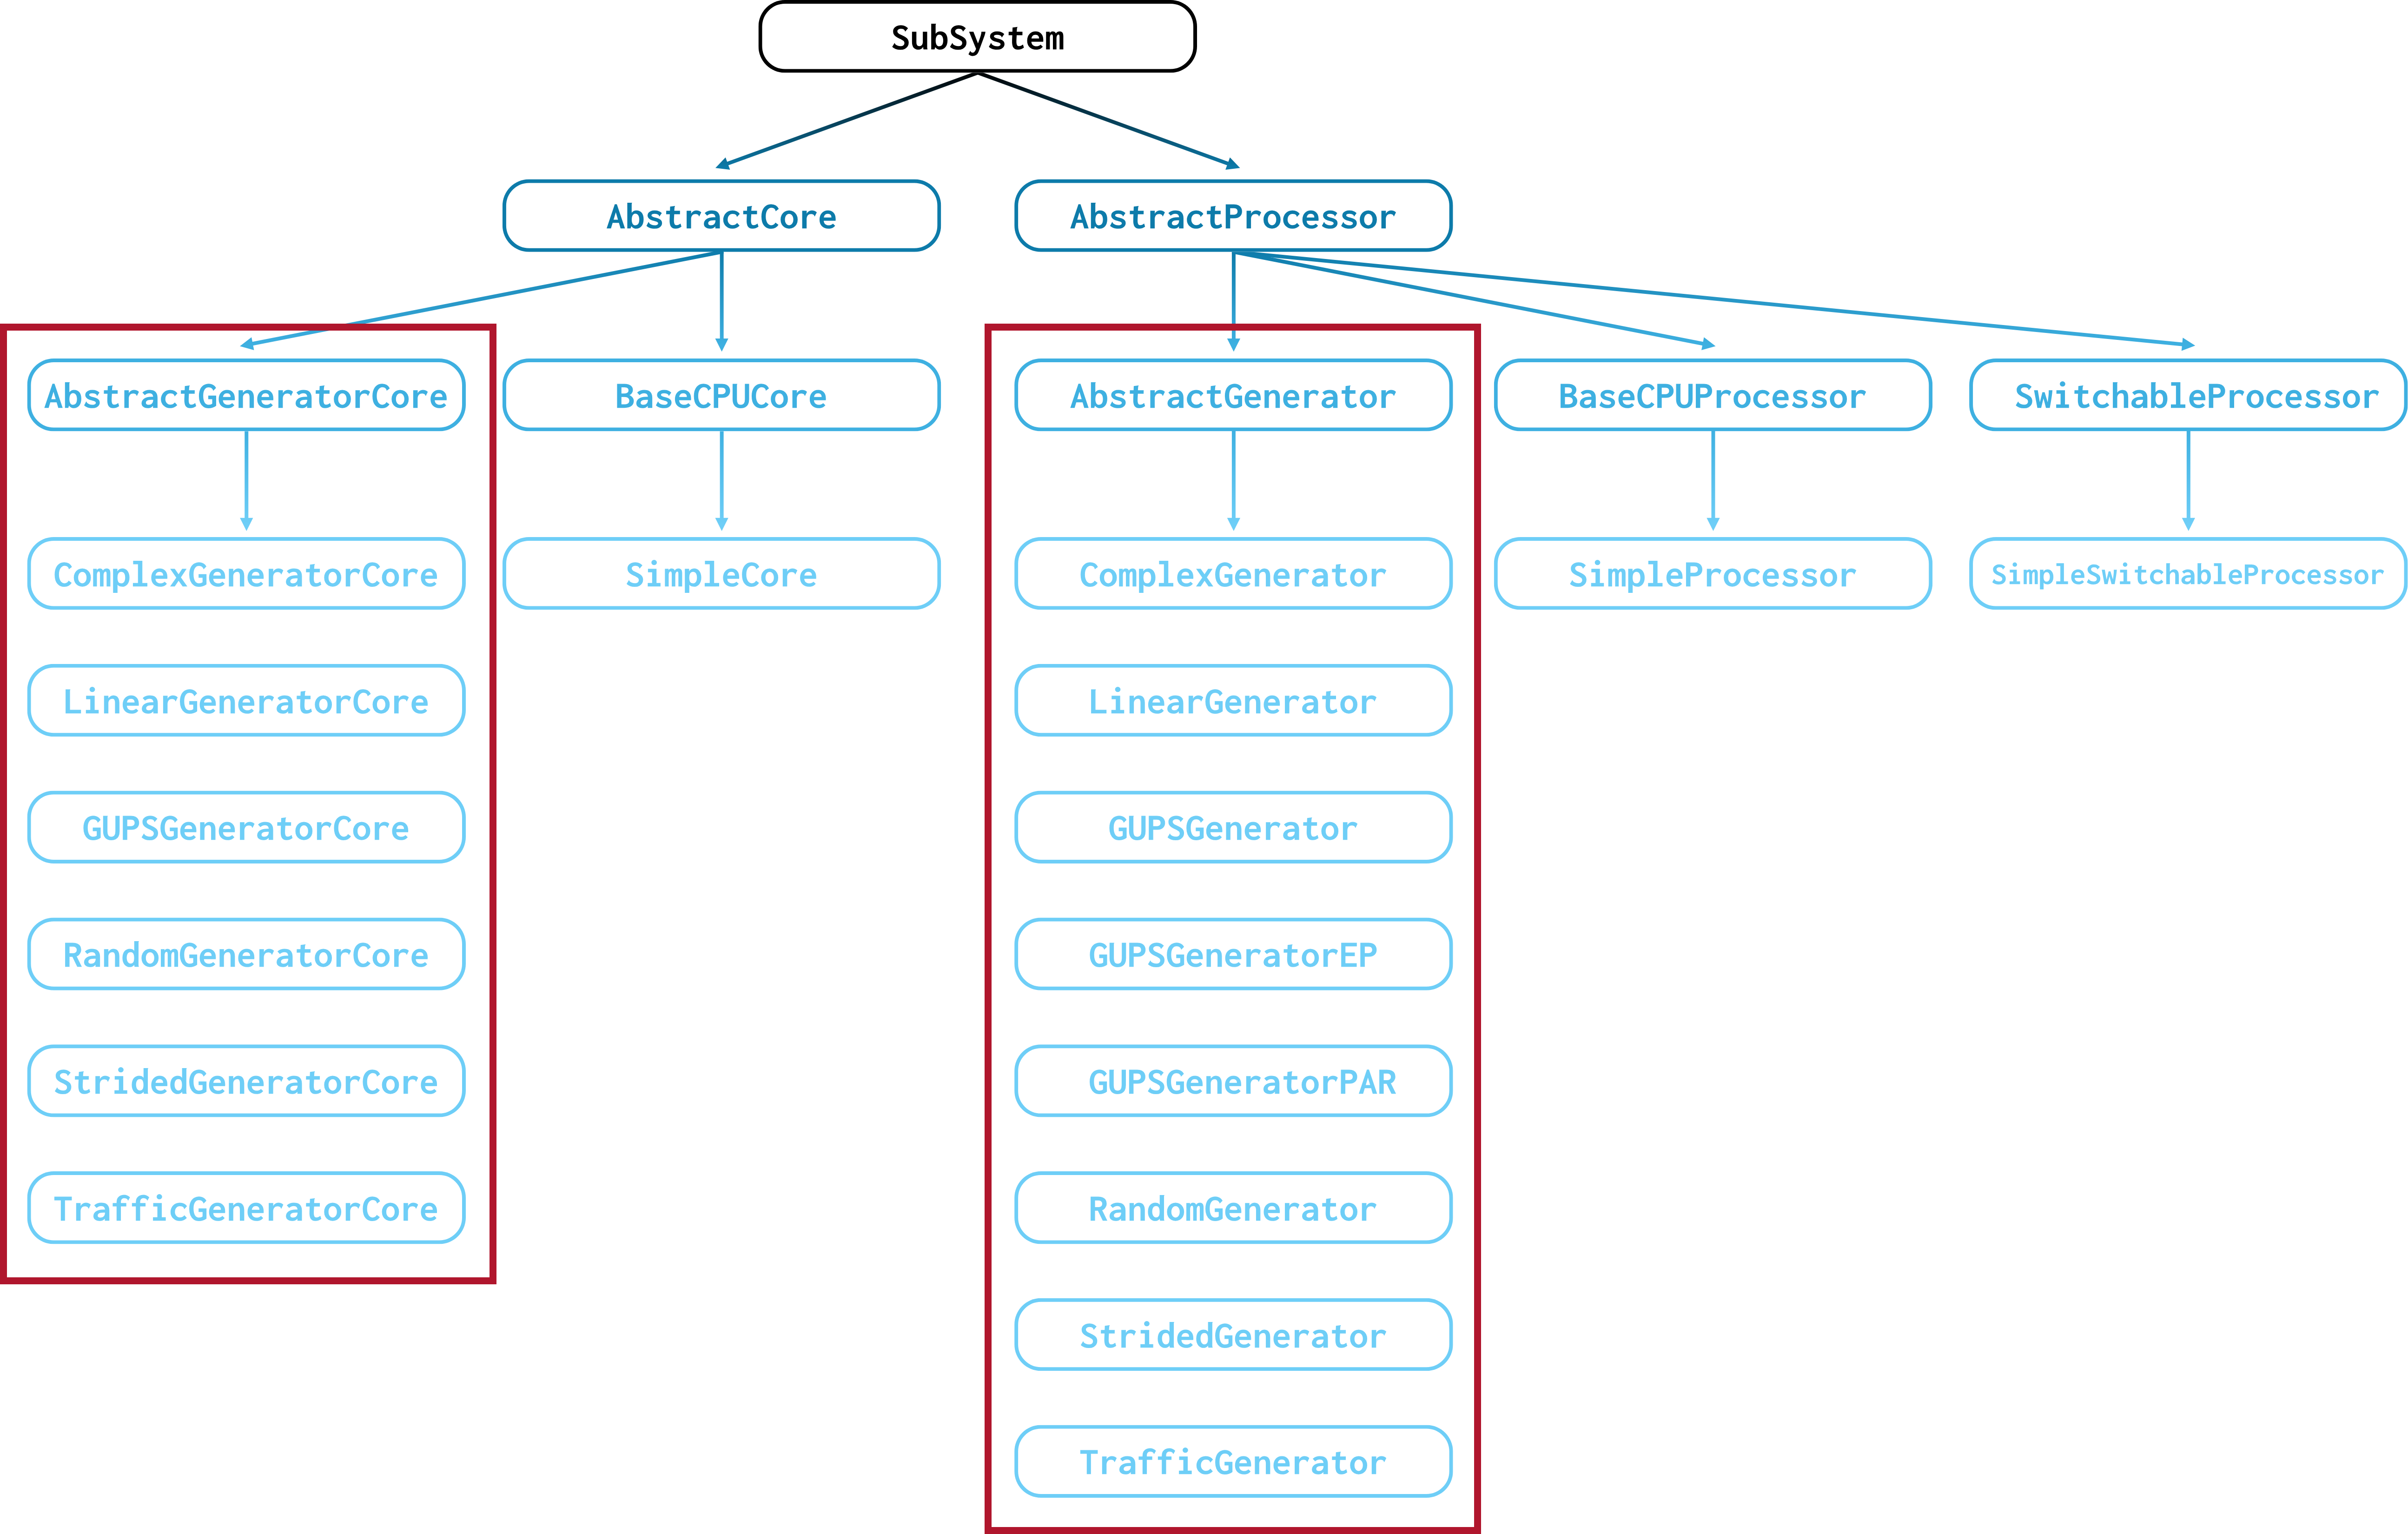
These components simulate memory accesses (both reads and writes!).
If you’re curious, you can find the definitions for all of these standard library components in
src/python/gem5/components/processors.
Linear and random generators
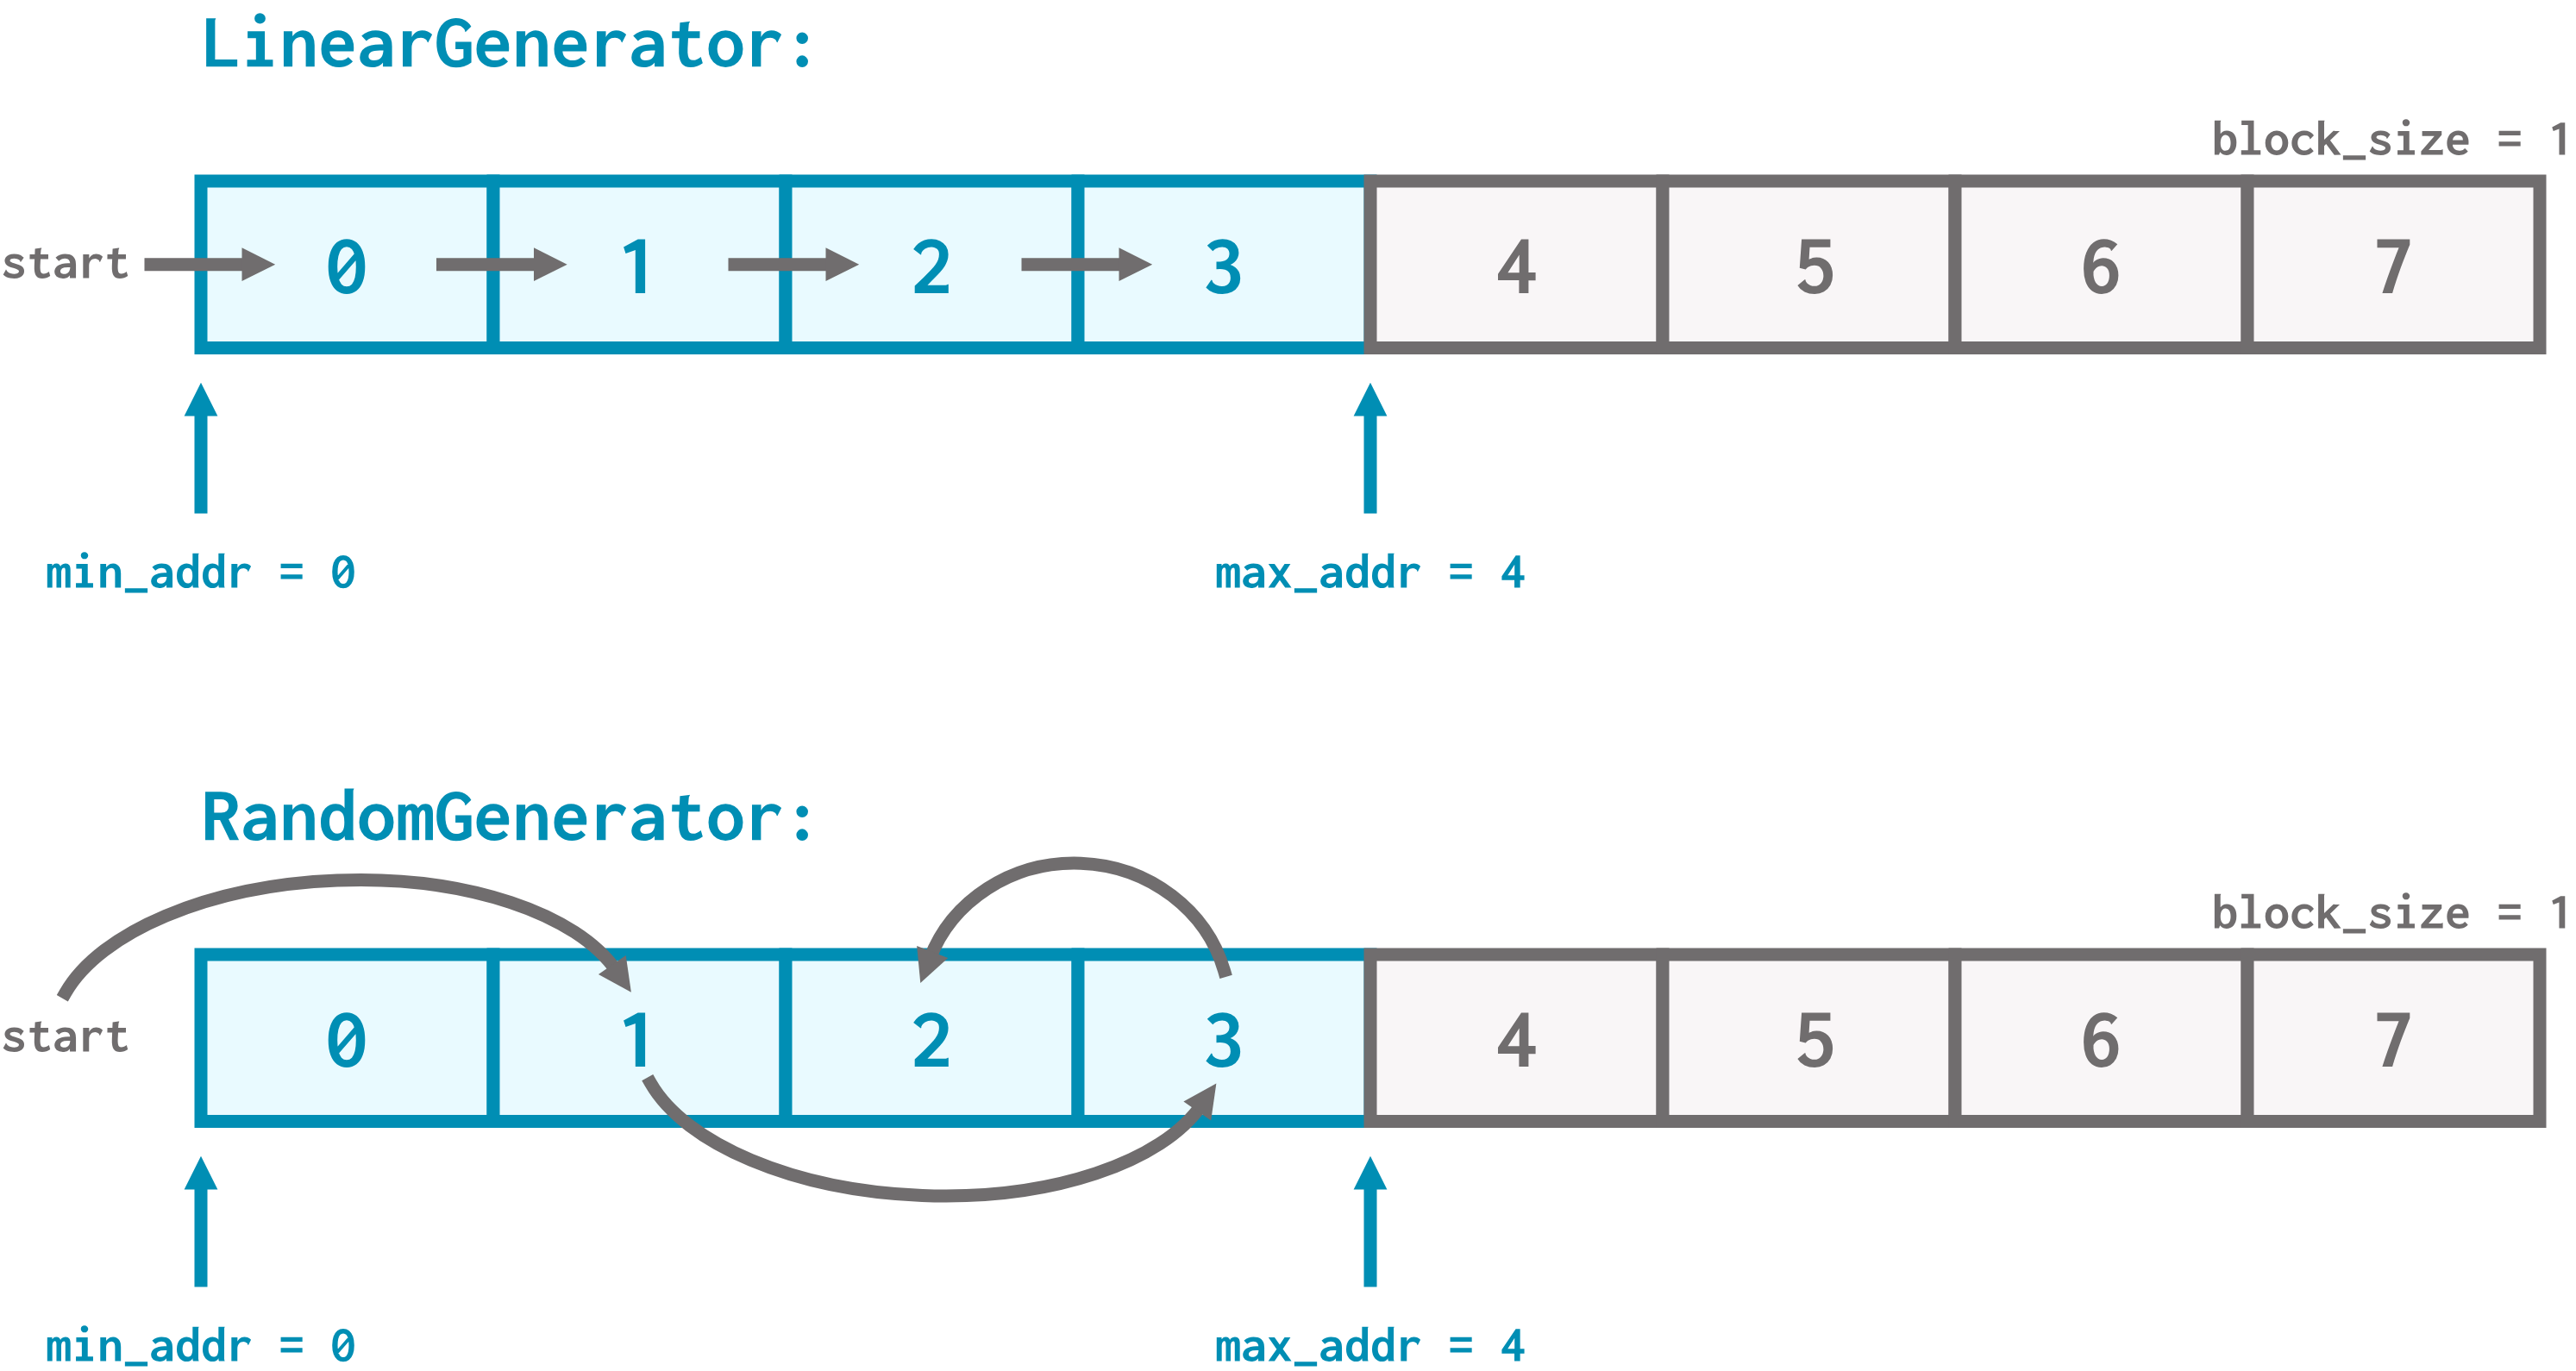
Two common generator types are linear generators (LinearGenerator) and random generators (RandomGenerator). A linear generator accesses memory in a linear fashion starting from a given minimum address and increasing up to a maximum address. A random generator accesses addresses within a range randomly.
Here are the parameters you can control for linear and random generators:
num_cores: How many cores should the generator have?duration: How long (number of ticks) should traffic be generated?rate: How frequently (bytes/second) should the generator send out requests to memory?- Note that this is not the rate at which memory will respond! The generator might be forced to slow down if memory cannot respond fast enough. This means that
rateindicates the maximum outgoing request rate.
- Note that this is not the rate at which memory will respond! The generator might be forced to slow down if memory cannot respond fast enough. This means that
block_size: how many bytes should the generator request to access with each read/write request?min_addr: What’s the lowest memory address this generator should access?max_addr: What’s the highest memory address this generator should access?rd_perc: What percent of the generated accesses should be reads?data_limit: What is the maximum cumulative number of bytes that the generator can access? Once this number is reached, the generator will stop.- If you don’t want such a limit, you can set
data_limitto 0.
- If you don’t want such a limit, you can set
This means that the access patterns of linear and random generators look something like this:
Using standard library generators
Let’s explore the performance of gem5’s memory models using different traffic generators! We’ll be:
1) Setting up a system with a SingleChannelSimpleMemory unit and a PrivateL1CacheHierarchy, 2) Testing the system with a LinearGenerator, 3) Swapping out the LinearGenerator for a RandomGenerator.
Open traffic_gen.py to get started. Our first step is to pick a system to evaluate.
You’ll notice that
traffic_gen.pymakes no reference to setting a workload: the usual calls toobtain_resourceandboard.set_workloadare missing! This is because our generators will replace the processor on the board, and generators cannot execute instructions.
Your turn: Fill in
TODO (1)intraffic_gen.pyto fill in the details of our system:1) A
SingleChannelSimpleMemorywith a latency of 20 ns, a bandwidth of 32 GiB/second, latency variance of 0 s, and a size of 1 GiB, 2) APrivateL1CacheHierarchywith an L1 i-cache size of 16 KiB and an L1 d-cache size of 16 KiB.Answer
cache_hierarchy = PrivateL1CacheHierarchy (
  l1i_size = "16KiB",
  l1d_size = "16KiB"
)

memory = SingleChannelSimpleMemory (
  latency = "20ns",
  bandwidth = "32GiB/s",
  latency_var = "0s",
  size = "1GiB"
)
You’ll notice that instead of using a
SimpleBoardlike we’ve been using, we’re using aTestBoard. This is becauseTestBoardis more suitable for using traffic generators (for example, it does not require a cache hierarchy). You can look at more details if you’re curious at theTestBoarddefinition atgem5/src/python/gem5/components/boards/TestBoard.
Linear generator
Now that we have our cache/memory system, we need to configure a linear generator to test it. By default, a LinearGenerator has the following parameters:
num_cores: 1duration: 1 msrate: 100 GiB/sblock_size: 64min_addr: 0max_addr: 32768 ($2^{15}$)rd_perc: 100data_limit: 0 (AKA no data limit)
We can see this in __init__ function in the Python definition for LinearGenerator:
class LinearGenerator(AbstractGenerator):
    def __init__(
        self,
        num_cores: int = 1,
        duration: str = "1ms",
        rate: str = "100GiB/s",
        block_size: int = 64,
        min_addr: int = 0,
        max_addr: int = 32768,
        rd_perc: int = 100,
        data_limit: int = 0,
    ) -> None:
Let’s make our LinearGenerator access data a bit slower than the default: how about 1 GiB/s?
Your turn: Fill in
TODO (2)intraffic_gen.pyto add aLinearGeneratorwith all default parameters other thanrate, which should be"1GiB/s".Answer
generator = LinearGenerator(rate="1GiB/s")
Let’s run this thing! Run the following the command line:
gem5 -re --outdir=linear_traffic --debug-flags=TrafficGen --debug-end=1000000 traffic_gen.py
You might recognize the
-re(output redirection to files) and--debug-flags(enabling some debug prints) from the simulation modes section. We’ll talk more about--debug-flagsand--debug-endlater in the bootcamp.
When you check simout.txt in the linear_traffic output directory, you should see output messages like this:
[...]
59605: board.processor.cores.generator: LinearGen::getNextPacket: r to addr 0, size 64
59605: board.processor.cores.generator: Next event scheduled at 119210
119210: board.processor.cores.generator: LinearGen::getNextPacket: r to addr 0x40, size 64
119210: board.processor.cores.generator: Next event scheduled at 178815
178815: board.processor.cores.generator: LinearGen::getNextPacket: r to addr 0x80, size 64
178815: board.processor.cores.generator: Next event scheduled at 238420
[...]
Let’s break these messages down. They all start with a number: this is the current tick. These memory accesses happen at intervals of 59605 ticks, which, remembering that 1 tick corresponds to 1 picosecond ($10^{-12}$ seconds) by default, this means that we’re making accesses every 59605 picoseconds. This makes sense! Remember that the default block size for LinearGenerator is 64 bytes, meaning that each of these messages signifies a 64-byte access:
Hey, that’s very close to the 1 GiB/s rate we set!
The next part of the messages looks like r to addr <X>, size 64. This means that the generator is simulating a 64-byte read (r) to address <X>. You’ll notice the addresses linearly increase:
These addresses are printed in hex, meaning that the generator is accessing addresses 0x0000, 0x0040, and 0x0080. These addresses are 0x40 = 64 bytes apart! A linear generator will access contiguous and increasing addresses in this format.
Random generator
Let’s follow the same procedure to replace our linear generator with a random generator! Thankfully, RandomGenerator has the same default parameters as LinearGenerator:
class RandomGenerator(AbstractGenerator):
    def __init__(
        self,
        num_cores: int = 1,
        duration: str = "1ms",
        rate: str = "100GiB/s",
        block_size: int = 64,
        min_addr: int = 0,
        max_addr: int = 32768,
        rd_perc: int = 100,
        data_limit: int = 0,
    ) -> None:
Let’s keep everything the same as our LinearGenerator to have a nice, clean comparison.
Your turn: Fill in
TODO (3)intraffic_gen.pyto replace theLinearGeneratorwith aRandomGeneratorwith all default parameters other thanrate, which should be"1GiB/s".Answer
generator = RandomGenerator(rate="1GiB/s")
Let’s rerun the script with our new generator!
gem5 -re --outdir=random_traffic --debug-flags=TrafficGen --debug-end=1000000 traffic_gen.py
You should see the following messages in simout.txt in the random_traffic output directory:
[...]
59605: board.processor.cores.generator: RandomGen::getNextPacket: r to addr 0xf00, size 64
59605: board.processor.cores.generator: Next event scheduled at 119210
119210: board.processor.cores.generator: RandomGen::getNextPacket: r to addr 0x1380, size 64
119210: board.processor.cores.generator: Next event scheduled at 178815
178815: board.processor.cores.generator: RandomGen::getNextPacket: r to addr 0x72c0, size 64
178815: board.processor.cores.generator: Next event scheduled at 238420
[...]
You’ll notice that a few things are the same:
- Accesses are still of size 64,
- Accesses still occur on the same ticks (so at the same 1GiB/s rate),
- Accesses are still all reads.
One thing is different, though: the addresses are all over the place. A RandomGenerator will access aligned addresses (you’ll notice 0xf00, 0x1380, and 0x7260 are all multiples of 64), but the addresses will be chosen randomly.
If you’re curious about how addresses are actually generated for
LinearGeneratorandRandomGenerator, take a look atsrc/cpu/testers/traffic_gen. Heads up: these are C++ files!
Creating a custom traffic generator
Remember that the standard library components LinearGenerator and RandomGenerator both extend a parent class called AbstractGenerator. We can also extend AbstractGenerator to create our own generator with custom behavior! Extending existing Python classes to create custom behavior is something we’ll do a lot in this bootcamp, and it’s a useful tool you might need to use in your research.
LinearGeneratorCoreandRandomGeneratorCorealso extend from the same parent,AbstractGeneratorCore. You can create your own generator cores, too, but this requires some C++ programming to get interesting behavior. We leave this as an exercise for the reader :)
Let’s create a HybridTrafficGenerator that simultaneously generates linear and random traffic.
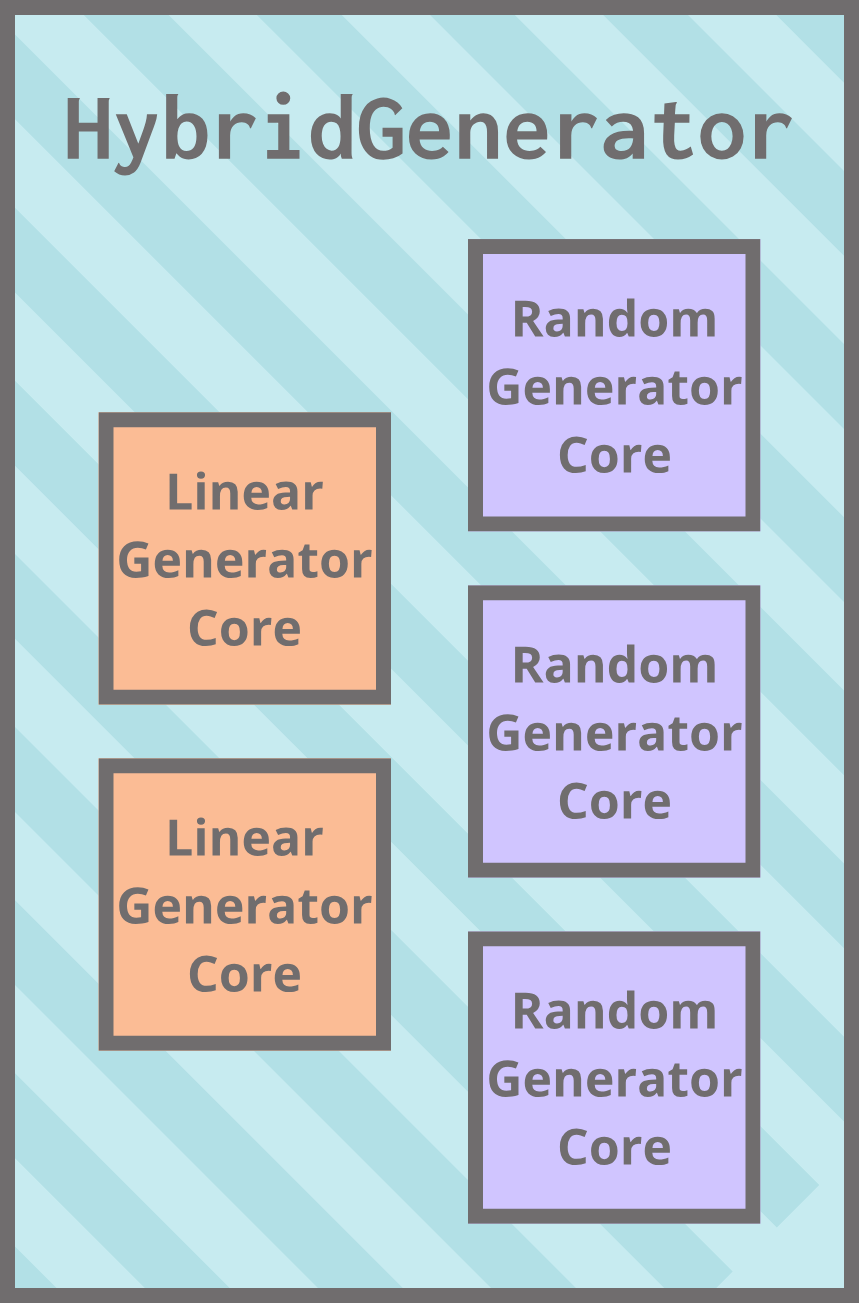
We can achieve this by doing the following:
1) Creating a HybridTrafficGenerator Python class that extends AbstractTrafficGenerator, 2) Partitioning the memory ranges for our cores appropriately, 3) Instantiating an appropriate number of LinearGeneratorCores and RandomGeneratorCores.
The HybridTrafficGenerator class
Open the hybrid_gen.py file to get started. This file will be home to our new HybridTrafficGenerator class. You’ll notice this class extends AbstractGenerator:
class HybridGenerator(AbstractGenerator):
By extending AbstractGenerator, HybridGenerator must implement the start_traffic function. As the name suggests, this function does whatever setup is needed to start generating synthetic traffic for the system. We’ve already filled in the implementation for this function, which simply calls start_traffic on all of the cores:
@overrides(AbstractGenerator)
    def start_traffic(self) -> None:
        for core in self.cores:
            core.start_traffic()
We can now point our attention to the constructor:
def __init__(
        self,
        num_cores: int = 2,
        duration: str = "1ms",
        rate: str = "1GiB/s",
        block_size: int = 8,
        min_addr: int = 0,
        max_addr: int = 131072,
        rd_perc: int = 100,
        data_limit: int = 0,
    ) -> None:
        if num_cores < 2:
            raise ValueError("num_cores should be >= 2!")
        super().__init__(
            cores=self._create_cores(
                num_cores=num_cores,
                duration=duration,
                rate=rate,
                block_size=block_size,
                min_addr=min_addr,
                max_addr=max_addr,
                rd_perc=rd_perc,
                data_limit=data_limit,
            )
        )
The default parameters we chose to use should look familiar: they’re mostly the same as the ones from LinearGenerator and RandomGenerator. Some differences are the block size, which we reduced to 8, and num_cores, which we set to 2 instead of 1. It really isn’t much of a hybrid generator if it only has 1 core!
The AbstractGenerator’s __init__ function requires a list of cores to instantiate, so we need to create that list. We do this with a helper function called _create_cores, which you’ll also see declared in other children of AbstractGenerator (including LinearGenerator and RandomGenerator): this is a convention in gem5. We’ll fill in the implementation of this function soon; for now, we can treat it as a black box that takes all of our parameters and returns a list of cores.
Partitioning memory
Our HybridGenerator class might have multiple LinearCores. If we instantiate these cores with the same min_addr and max_addr values, they’ll just access the same addresses at the same time! What we need to do instead is give them equal spans of the range defined by min_addr and max_addr.
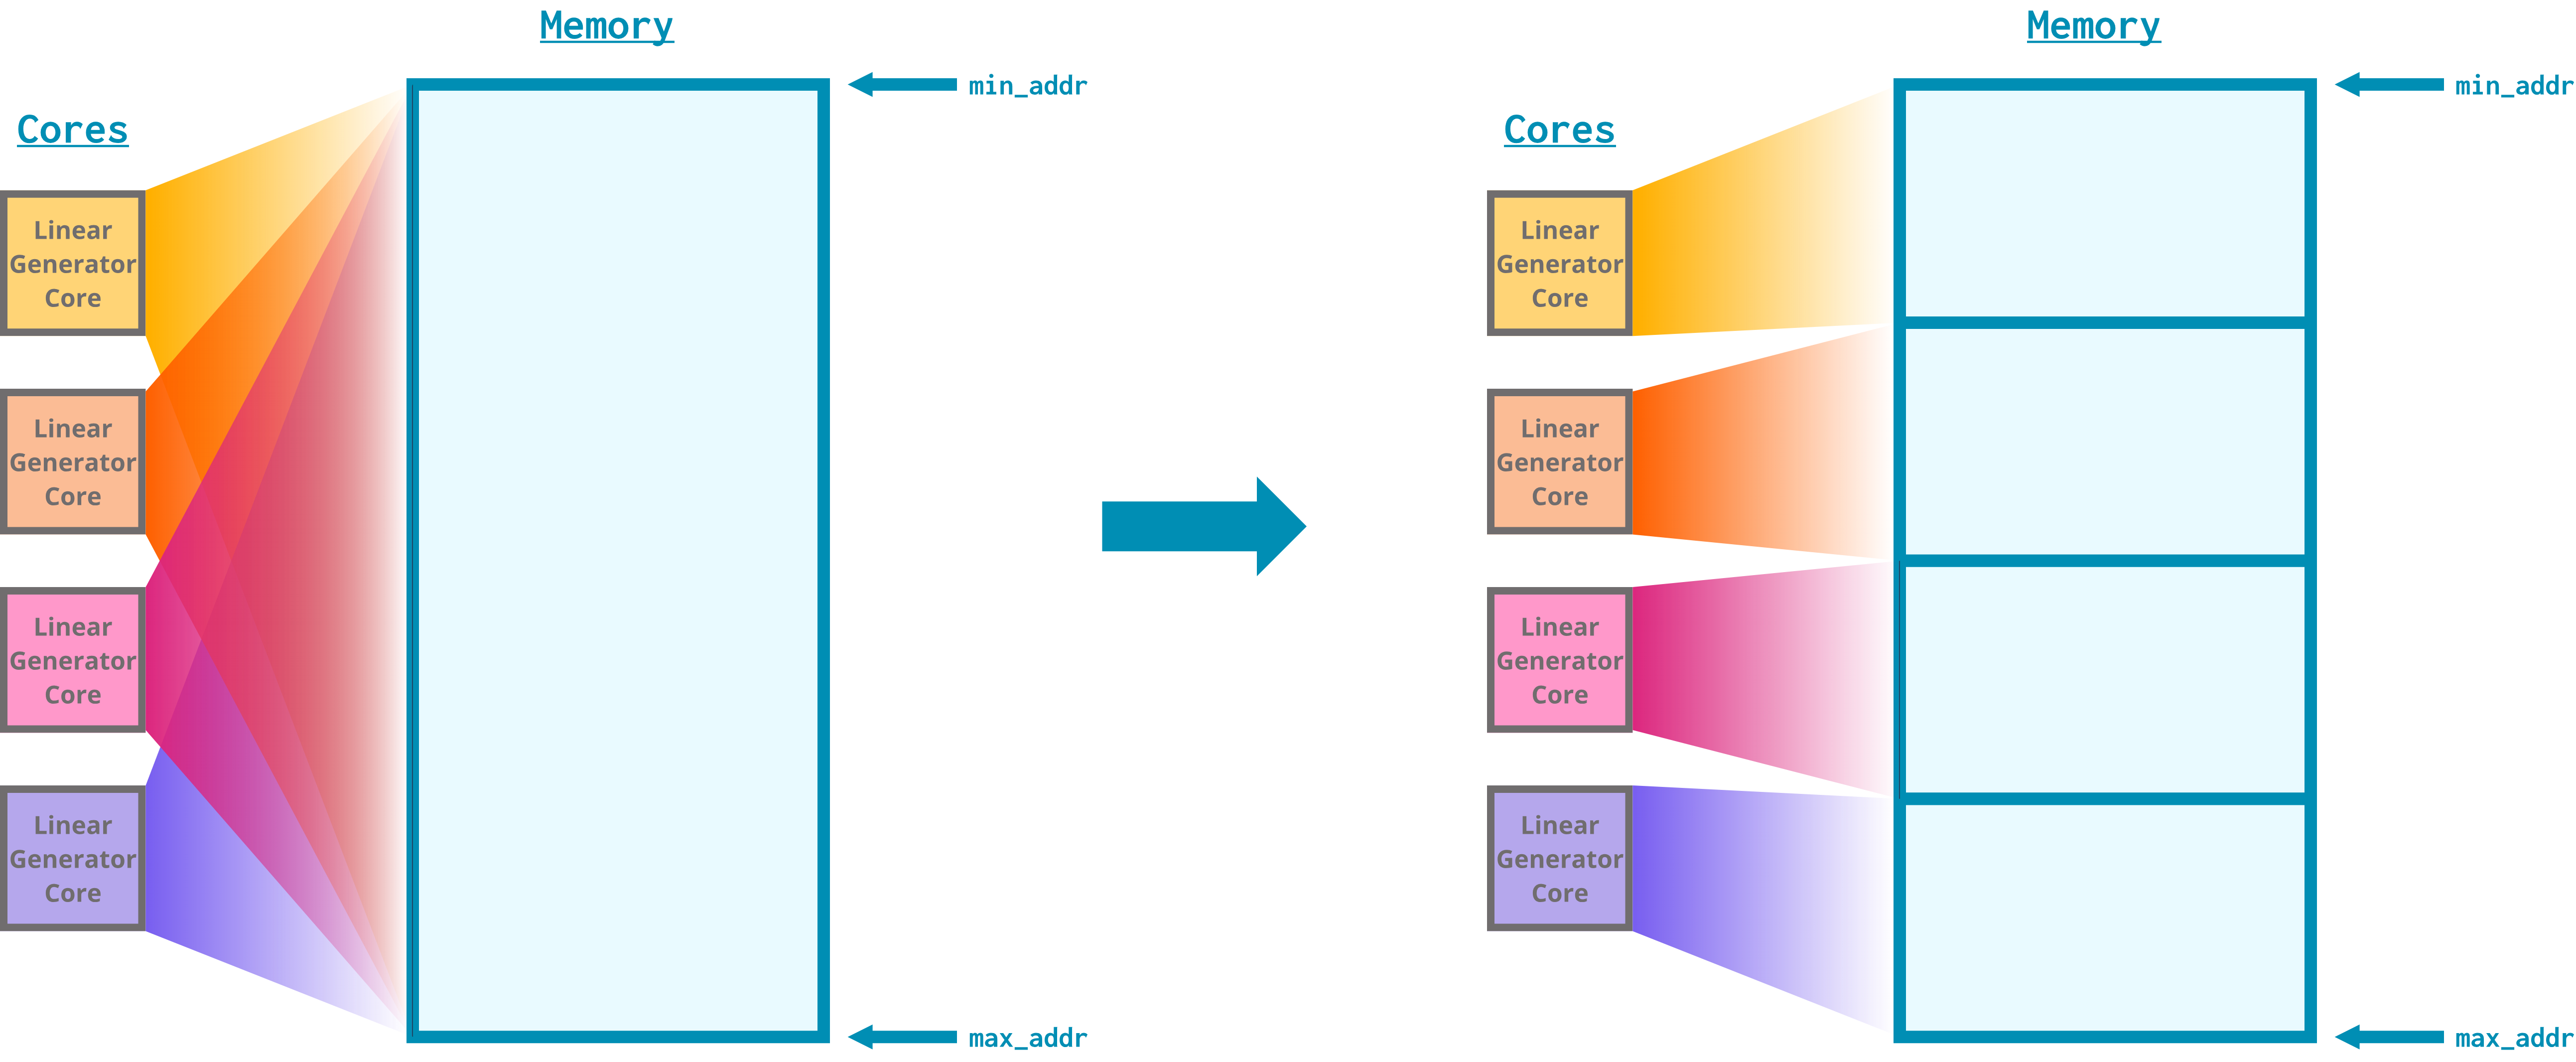
You might ask yourself: do we need to do this same partitioning for our random cores? As it turns out, no we don’t! Since our random cores will access addresses randomly, it’s completely fine that their range overlaps, as the chances that any two cores will randomly pick the same address at the same time are pretty slim. Here’s how we’ll end up splitting memory:
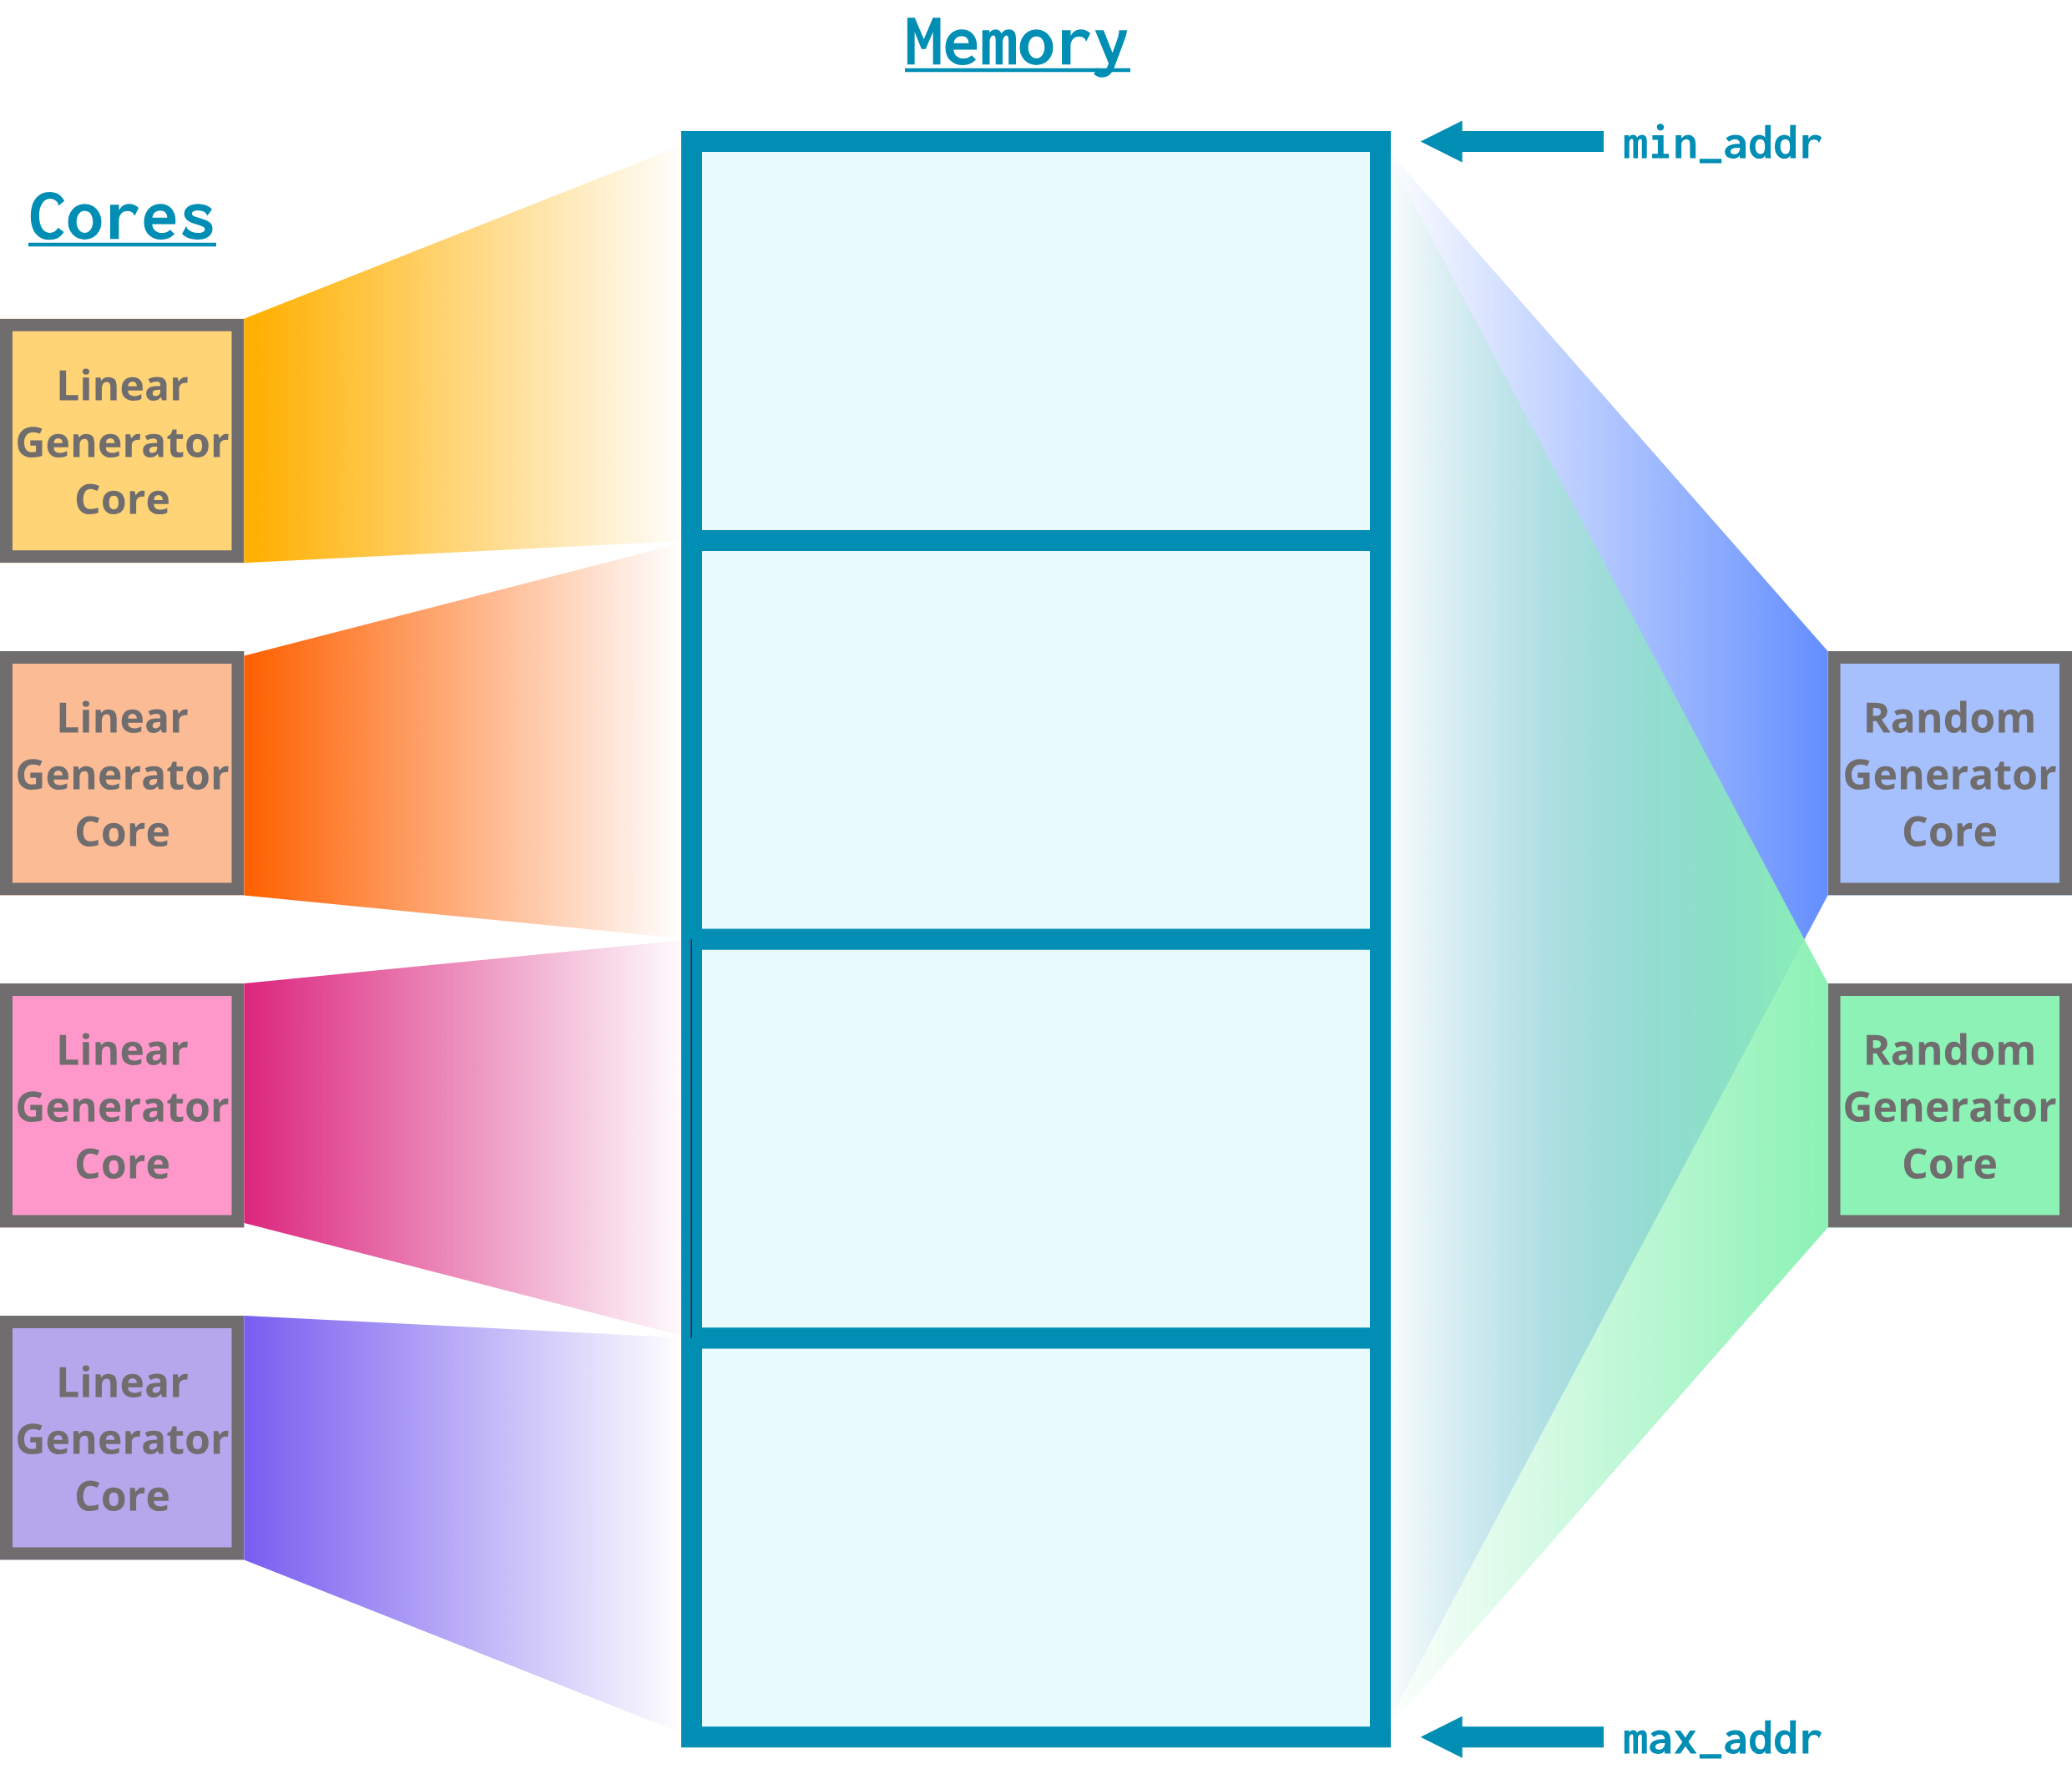
We can do this in our code using the partition_range function, defined in src/python/gem5/components/processors/abstract_generator.py. This function takes the following parameters:
min_addr: what’s the minimum address to partition from?max_addr: what’s the maximum address to partition to?num_partitions: how many partitions should we create?
The function returns a list of tuples representing the start and end of each partition.
For example, if we call
partition_range(0, 9, 3), we’ll get back[<0, 3>, <3, 6>, <6, 9>].
Implementing _create_cores
Let’s add this functionality to _create_cores! The first thing we need to do here is decide how many linear and random cores we’ll have based on num_cores. A natural choice for the number of linear cores is some power of 2; this way, we can easily divide memory (the size of which is a power of 2) into equally-sized spans for each core. We still want to leave some room for random cores, though, so let’s pick a number that is always strictly smaller than num_cores.
We implement this using the get_num_linear_cores function, which is already written for you. This function returns the largest power of 2 that is smaller than num_cores:
def get_num_linear_cores(num_cores: int):
            if num_cores & (num_cores - 1) == 0:
                return num_cores // 2
            else:
                return 2 ** int(log(num_cores, 2))
This way, we have a nice power of 2 for our linear cores and at least 1 random core.
Let’s initialize some variables! You’ll notice we’ve already created a core_list variable that will store all of our cores. We return this variable at the end of the function.
Your turn: Fill in
TODO (1)inhybrid_generator.pyto initialize the variablesnum_linear_coresandnum_random_coreswith the appropriate number of cores.Answer
num_linear_cores = get_num_linear_cores(num_cores
num_random_cores = num_cores - num_linear_cores
Next, we should figure out the address ranges for all of our linear generator cores.
Your turn: Fill in
TODO (2)inhybrid_generator.pyto create anaddress_rangesvariable that stores the ranges for our linear cores. Rememberpartition_range!Answer
addr_ranges = partition_range(min_addr, max_addr, num_linear_cores)
Great, now we can assign these partitions to each one of our linear cores! What we need to do is loop through every linear core we want to create. For each of these cores, we should:
1) Figure out what its min_addr and max_addr values are using our address_ranges variable, 2) Instantiate a LinearGeneratorCore with all of the parameters passed into the _create_cores function.
We can do this with the following loop (you can try this yourself or look at the code in the dropdown for the answer):
The loop:
for i in range(num_linear_cores):
    core_list.append(
        LinearGeneratorCore(
            duration=duration,
            rate=rate,
            block_size=block_size,
            min_addr=addr_ranges[i][0],
            max_addr=addr_ranges[i][1],
            rd_perc=rd_perc,
            data_limit=data_limit,
        )
    )
Now that we have all of our linear core set up, we only need to append random cores to our core list. Remember that these are not partitioned in the same way as the linear cores!
Your turn: Fill in
TODO (4)inhybrid_generator.pyto add all of our random cores.Answer
for i in range(num_random_cores):
    core_list.append(
        RandomGeneratorCore(
            duration=duration,
            rate=rate,
            block_size=block_size,
            min_addr=min_addr,
            max_addr=max_addr,
            rd_perc=rd_perc,
            data_limit=data_limit,
        )
    )
Congratulations! You’ve now created a hybrid generator that generates traffic using both linear and random cores. Let’s try it out!
Using our custom traffic generator
We can now go back to traffic_gen.py and use our HybridGenerator instead of LinearGenerator or RandomGenerator!
The first thing we need to do is import our new component:
from hybrid_generator import HybridGenerator
Now we can assign our generator a HybridGenerator.
Your turn: Fill in
TODO (4)intraffic_gen.pyto assign thegeneratorvariable aHybridGeneratorwith all default parameters except for the number of cores: let’s give it 6 cores instead.Answer
generator = HybridGenerator(num_cores=6)
You can now run this with the following command:
gem5 -re --outdir=hybrid_traffic --debug-flags=TrafficGen --debug-end=1000000 traffic_gen.py
When you do, you should see the following output in simout.txt in the hybrid_traffic output directory:
[...]
402354: board.processor.cores0.generator: LinearGen::getNextPacket: r to addr 0x1a8, size 8
402354: board.processor.cores0.generator: Next event scheduled at 409805
402354: board.processor.cores1.generator: LinearGen::getNextPacket: r to addr 0x81a8, size 8
402354: board.processor.cores1.generator: Next event scheduled at 409805
402354: board.processor.cores2.generator: LinearGen::getNextPacket: r to addr 0x101a8, size 8
402354: board.processor.cores2.generator: Next event scheduled at 409805
402354: board.processor.cores3.generator: LinearGen::getNextPacket: r to addr 0x181a8, size 8
402354: board.processor.cores3.generator: Next event scheduled at 409805
402354: board.processor.cores4.generator: RandomGen::getNextPacket: r to addr 0x1ee88, size 8
402354: board.processor.cores4.generator: Next event scheduled at 409805
402354: board.processor.cores5.generator: RandomGen::getNextPacket: r to addr 0x1ee88, size 8
402354: board.processor.cores5.generator: Next event scheduled at 409805
[...]
As you can see, we have 6 memory requests happening on the same tick! system.processor.cores0.generator through system.processor.cores3.generator are our linear cores (you can tell by the nice addresses and the reference to LinearGen::getNextPacket), and system.processor.cores4.generator and system.processor.cores5.generator are our random cores.
Comparing statistics
Let’s use our hybrid generator’s simulation statistics to compare the cache behavior of linear and random cores. We can do this by searching for all overall cache miss rate statistics in stats.txt in the hybrid_traffic output directory:
grep 'overallMissRate::processor.cores' hybrid_traffic/stats.txt
You should get the following lines:
board.cache_hierarchy.l1dcaches0.overallMissRate::processor.cores0.generator     0.011802
board.cache_hierarchy.l1dcaches1.overallMissRate::processor.cores1.generator     0.010133
board.cache_hierarchy.l1dcaches2.overallMissRate::processor.cores2.generator     0.011624
board.cache_hierarchy.l1dcaches3.overallMissRate::processor.cores3.generator     0.011810
board.cache_hierarchy.l1dcaches4.overallMissRate::processor.cores4.generator     0.873862
board.cache_hierarchy.l1dcaches5.overallMissRate::processor.cores5.generator     0.873840
As a reminder, cores 0-3 are our linear cores, while cores 4 and 5 are the random cores. You’ll notice that the private L1 caches of the linear cores have a much lower miss rate (around 1.2%) compared to the random cores (around 87%). This makes sense considering that linear accesses with a stride of 8 bytes exhibit much better spatial locality than random accesses. While a linear core is guaranteed to repeatedly make use of the same cache block, a random core might touch a block once then never again!
Overall, generators, especially custom generators, can help evaluate a memory system under controlled conditions. Just remember that since a generator replaces a processor on a simulation board, you cannot use workloads in conjunction with a generator!