Revisiting gem5 resources
Now that you’ve had the time to get familiar with gem5, let’s talk in a bit more detail about gem5 resources and how you can use them.
By the end of this section, you will be able to:
- Use a variety of existing gem5 resources, including binaries, workloads, and suites.
- Create a local gem5 resource and use it in a simulation.
- Explain what gem5 resources are available and what categories they fall into.
Beyond obtain_resource()
When we introduced the obtain_resource() function, we mentioned it was used to grab gem5 resources. Since then, we’ve used obtain_resource() to acquire workloads for our boards. As it turns out, gem5 resources are a lot more diverse than that!
As a reminder, gem5 resources are prebuilt artifacts that can be used to run gem5 simulations. Each gem5 resource supports one of 6 ISAs, and there are 15 categories of gem5 resources. Below are 9 important categories you should know about:
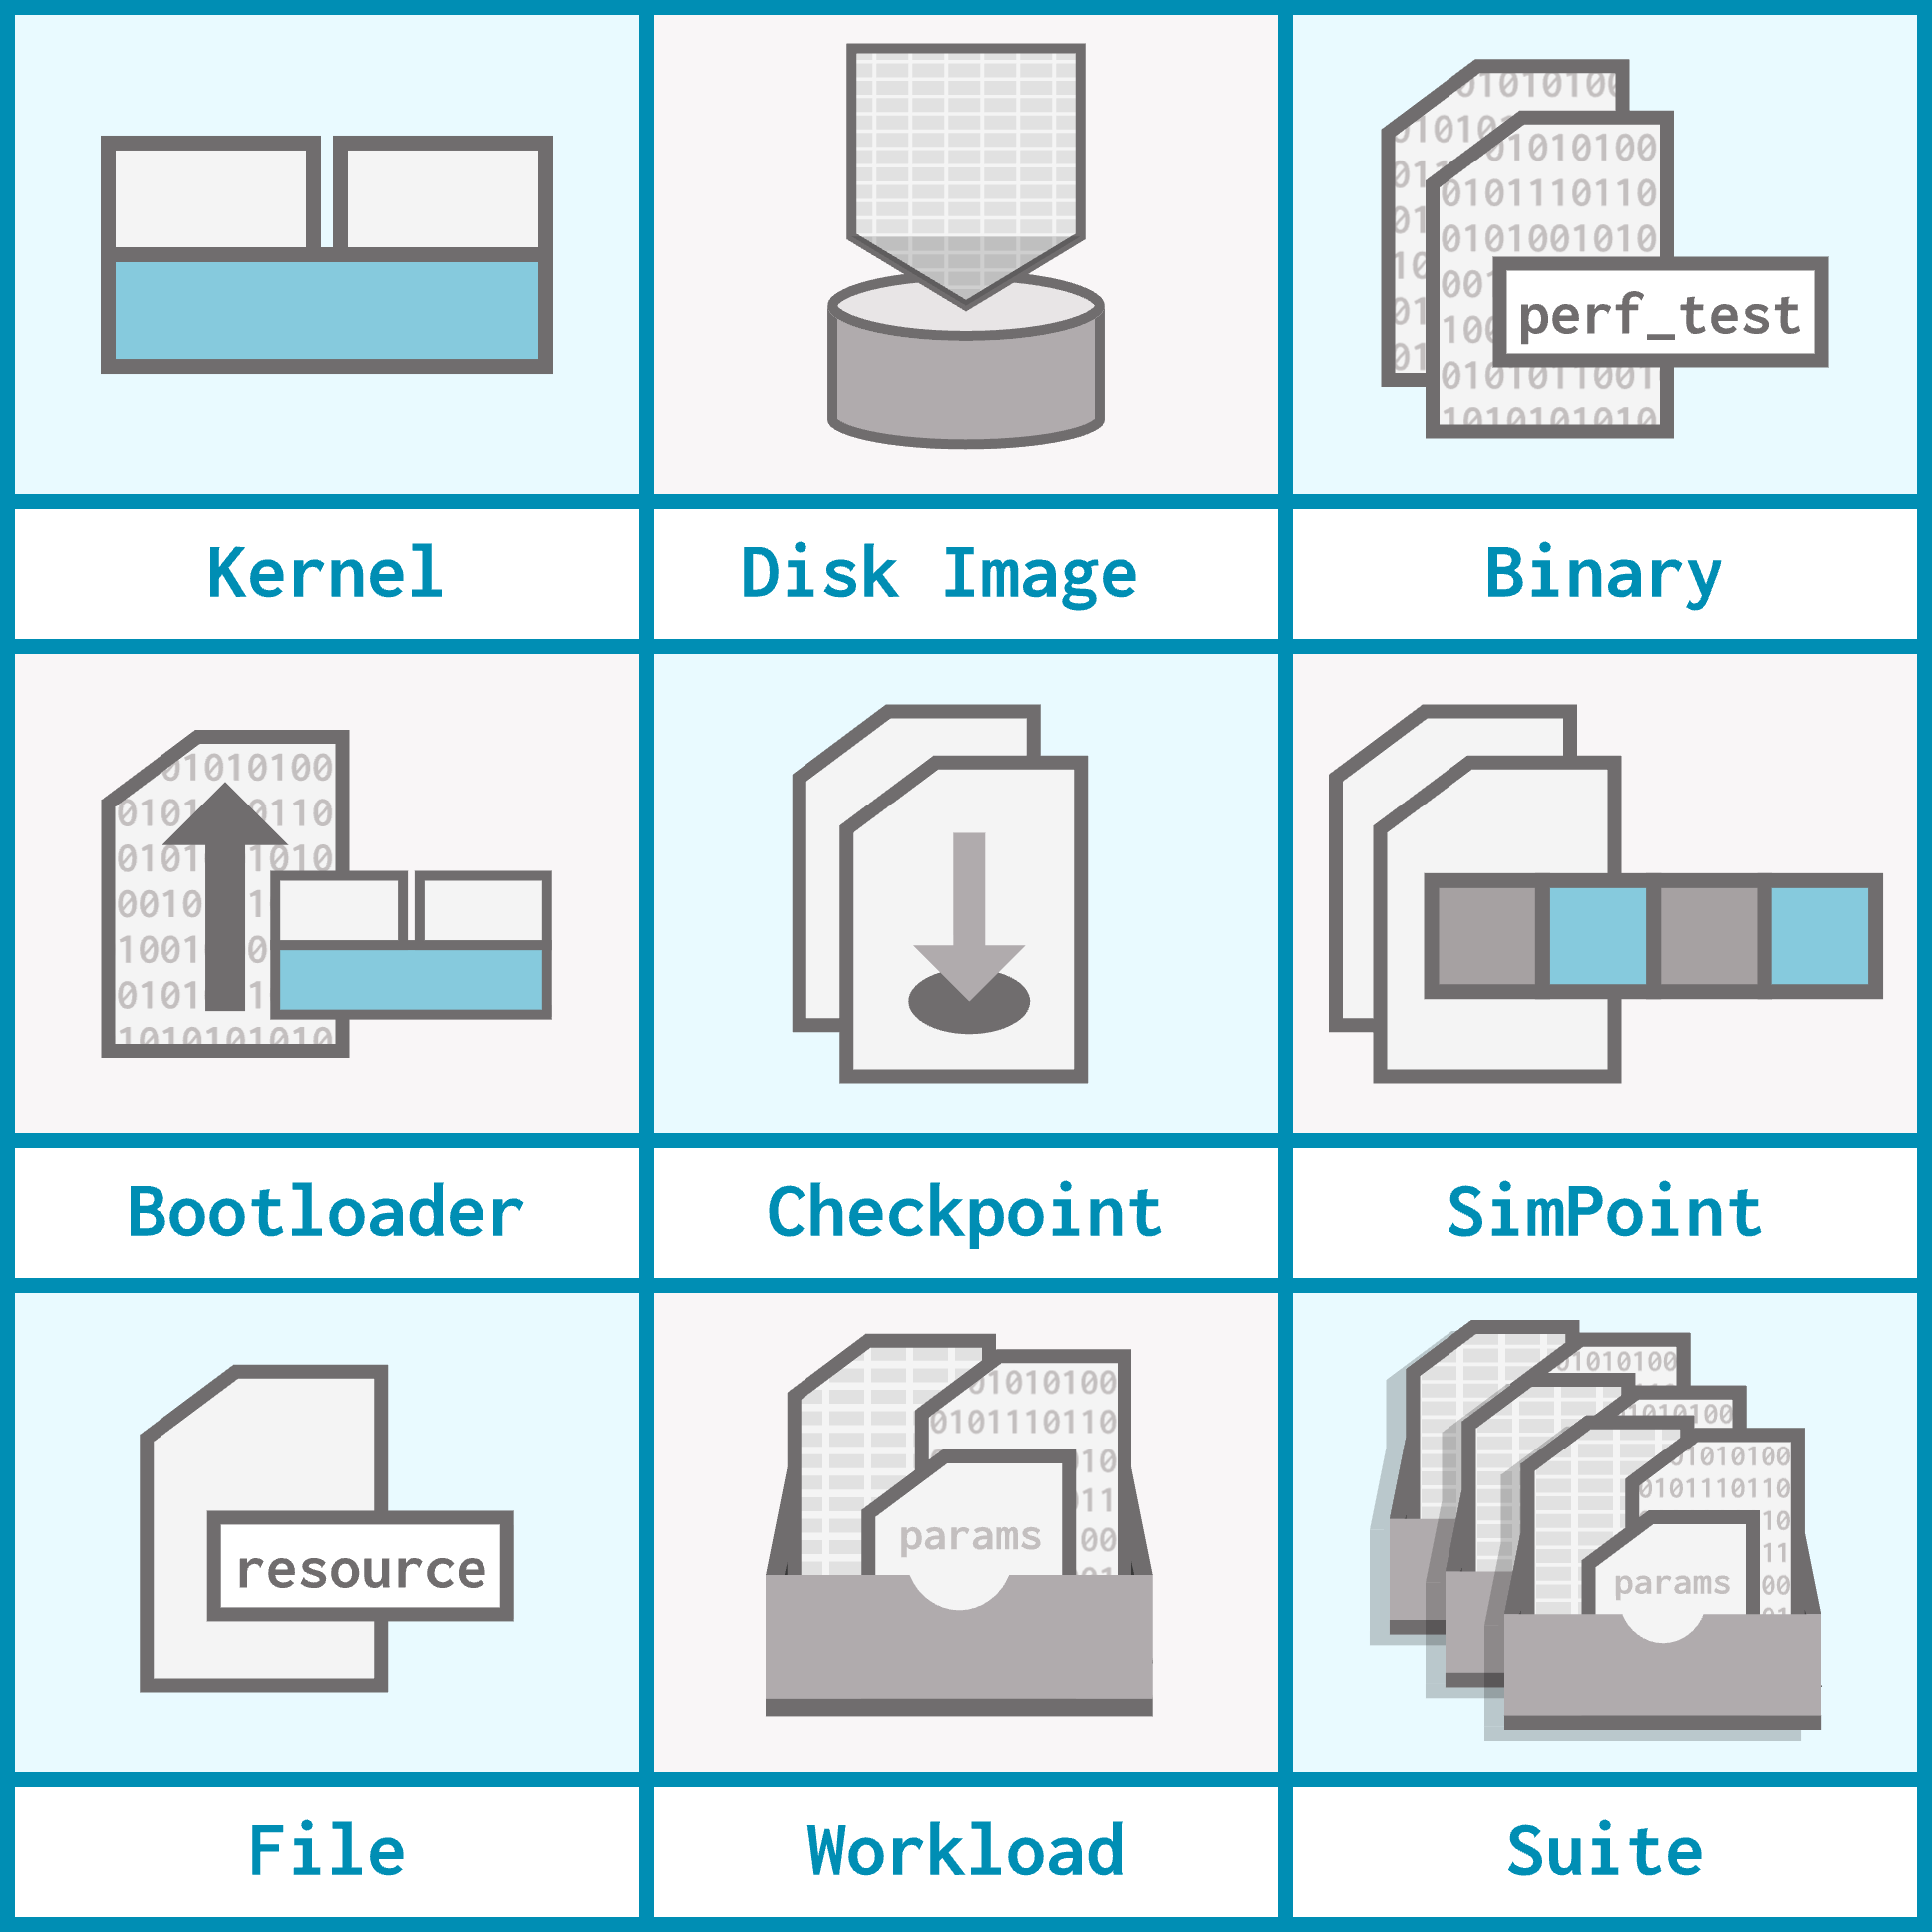
- Kernel: A computer program that acts as the core of an operating system by managing system resources.
- An example of a kernel resource is
x86-linux-kernel-5.15.180, which is a Linux kernel.
- An example of a kernel resource is
- Disk image: An exact copy of the data stored on disk. We use disk images as part of simulating a full operating system.
- An example of a disk image resource is
x86-ubuntu-24.04-gapbs-img, which is a disk image containing the GAPBS benchmarks for Ubuntu 24.04 for x86.
- An example of a disk image resource is
- Binary: A compiled program that can run directly on a simulated system.
- An example of a binary resource is
x86-bubblesort, which is an implementation of BubbleSort compiled into x86.
- An example of a binary resource is
- Bootloader: A small program responsible for loading the operating system into memory when a computer starts up.
- An example of a bootloader is
arm64-bootloader, which can be used for any arm64 Linux kernel resources.
- An example of a bootloader is
- Checkpoint: A saved snapshot of a simulation (we’ll talk more about using checkpoints in the advanced topics unit).
- An example of a checkpoint is
x86-hello-test-checkpoint, which is used for testing checkpoints on x86.
- An example of a checkpoint is
- SimPoint: Stores all information used to create and restore a SimPoint, which is a tool for simulation sampling (we’ll also discuss SimPoints in the advanced topics unit).
- An example of a SimPoint is
x86-print-this-1500-simpoints, which contains the set of all SimPoints for another resource (a binary) namedx86-print-this.
- An example of a SimPoint is
- File: A single file.
- An example of a file is
llvm-minisat-cnf-input, which is used as input for another resource (a binary), namedx86-llvm-minisat.
- An example of a file is
- Workload: A bundle of resources and input parameters that can be run directly in a simulated system.
- An example of a workload is
86-ubuntu-24.04-boot-no-systemd(you may recognize it fromhello_world.py), which is used to boot Ubuntu 24.04. It contains the kernel, the disk image, and the needed parameters.
- An example of a workload is
- Suite: A collection of workloads.
- An example of a suite is
gapbs-benchmark-suite, which contains a workload for each benchmark in the GAPBS suite.
- An example of a suite is
Resource versioning
As you’ve likely noticed, all gem5 resources have an id (this is the same as what we’ve referred to as the resource’s name, for example, x86-ubuntu-24.04-boot-no-systemd). They also have a resource_version, which starts at 1.0.0. Every time the resource is updated, the resource_version is updated, but the id stays the same. A resource also maintains a gem5_versions field, which dictates which releases of gem5 the resource is compatible with. The compatible gem5 versions might change with new resource versions!
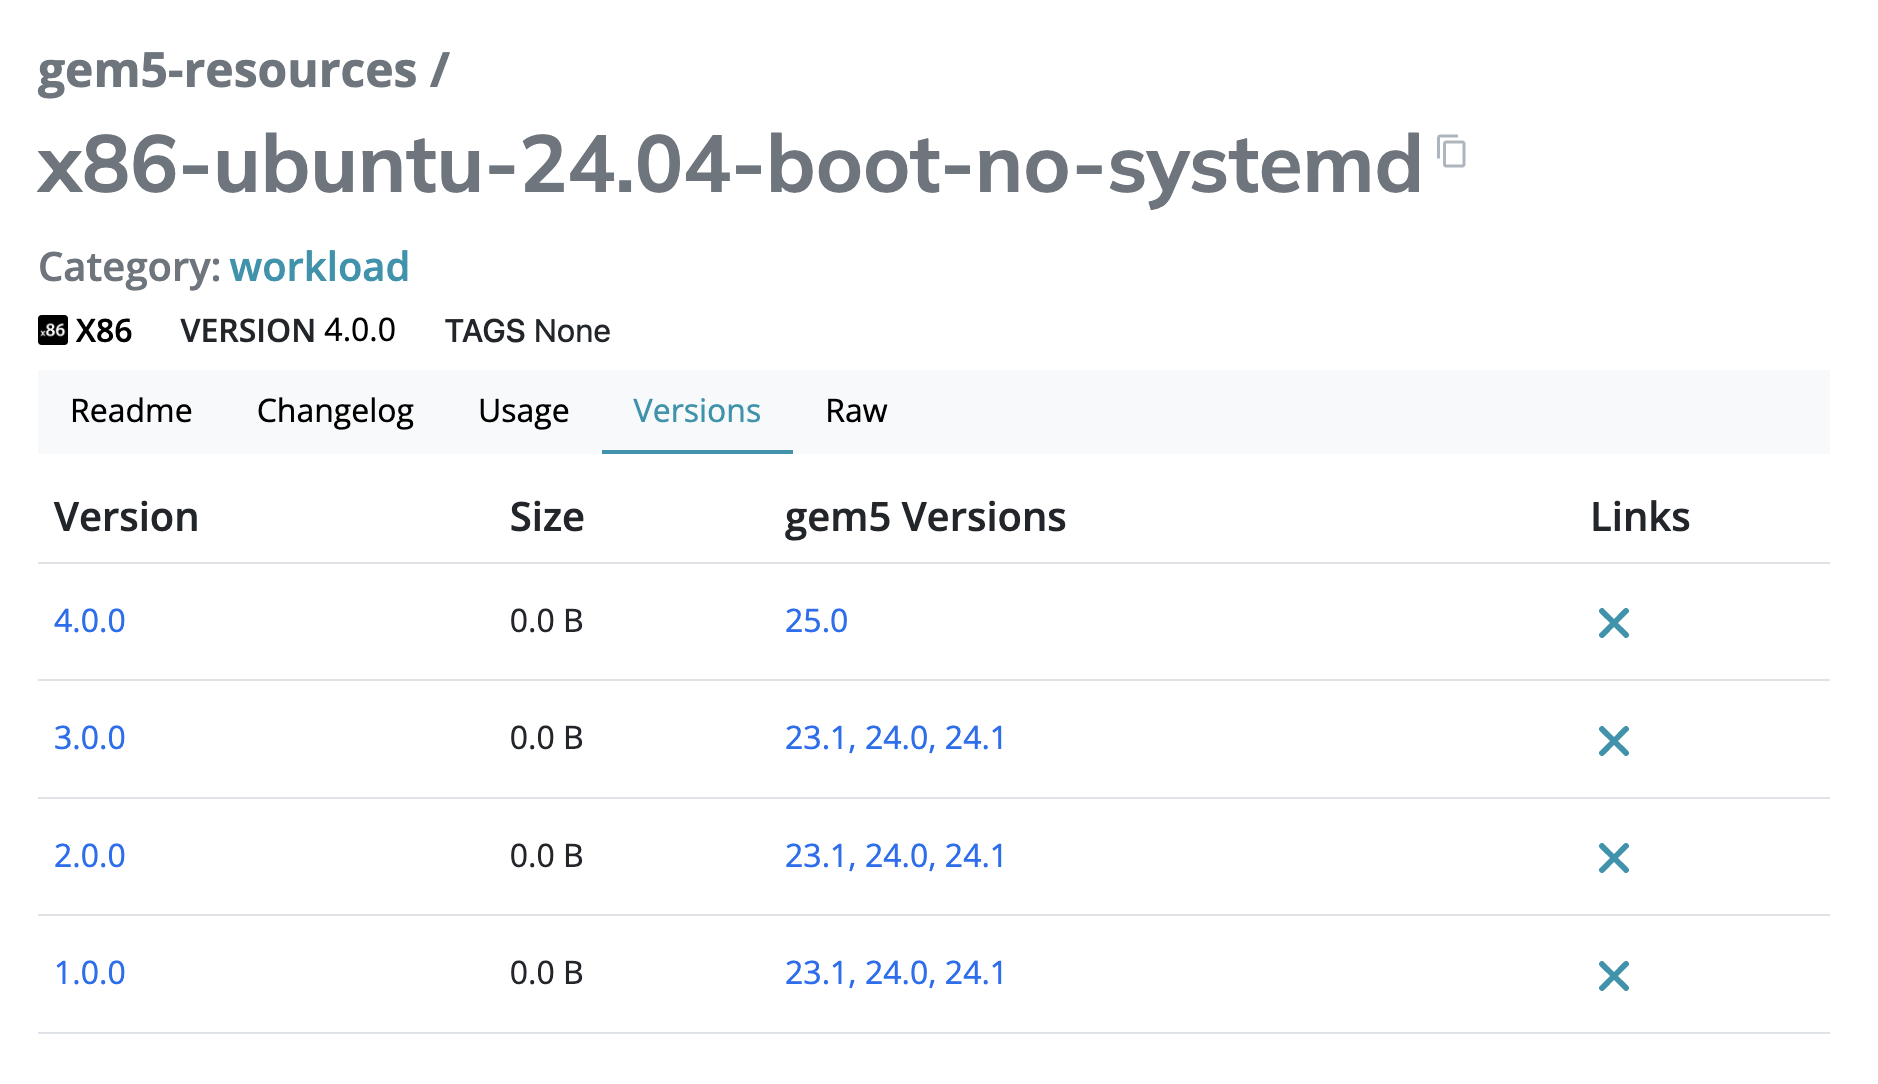
By default, obtain_resource will acquire the most recent (and compatible!) version of the resource with the provided resource_id. If you want a different version, you can pass it into the resource_version parameter like this:
obtain_resource(
  resource_id="x86-ubuntu-24.04-boot-no-systemd",
  resource_version="2.0.0"
)
Setting workloads
It’s important to differentiate between the more general use of the word “workload” as “the code the simulated hardware is tasked with running” and the more specific definition of the workload resource as “a bundle of resources and parameters that sets up a simulated system to run code”. We can have workloads that do not originate from a workload resource!
Let’s go over all the ways in which we can set workloads (not workload resources) on boards in gem5:
set_se_binary_workload(): this function takes a binary resource and sets it as the board’s workload in SE mode.- Since binary resources on their own don’t include all of the details necessary to boot up a full operating system, they can only be set as a board’s workload in SE mode.
set_kernel_disk_workload(): this function takes a kernel resource and a disk image resource and sets up a full-system mode simulation.set_se_simpoint_workload(),set_se_looppoint_workload()andset_se_elfie_workload()all work with sampling techniques within gem5.- We’ll discuss these sampling techniques in more detail in the advanced topics unit!
- For now, all you need to know is that these functions set a board’s workload using SimPoint-, LoopPoint-, and ELFie-related gem5 resources.
Using a binary resource
All of the functions above are member functions of boards in gem5.
The SE mode functions are supported on
SimpleBoard(and any other boards you might create that extend theSEBinaryWorkloadclass).
set_kernel_disk_workload()is supported onX86Board,RiscvBoard, andArmBoard(and any other boards you might create that extend theKernelDiskWorkloadclass).
Let’s look at how we can use set_se_binary_workload() with a binary resource in gem5. Open binary_example.py to get started. Currently, this configuration script just defines a board. Our goal is to:
1) Use the riscv-gapbs-bfs binary resource as the workload for this board. This resource is the GAPBS BFS (Breadth-First Search) benchmark compiled to RISC-V. 2) Pass in the arguments -g 10 and -n 10 to the binary. -g 10 generates the benchmark’s graph with $2^{10}$ nodes, and -n 10 runs the benchmark for 10 iterations.
First, let’s grab the binary resource with our trusty obtain_resource():
binary_resource = obtain_resource("riscv-gapbs-bfs")
Next, let’s set the board’s workload:
board.set_se_binary_workload(
  binary=binary_resource,
  arguments=["-g", 10, "-n", 10]
)
We pass in arguments to the binary using the arguments optional parameter in set_se_binary_workload().
We can now run the simulation with:
gem5 binary_example.py
When you do, you’ll see this output in stdout (alongside the normal simulation output):
Generate Time:       0.00426
Build Time:          0.00071
Graph has 1024 nodes and 10496 undirected edges for degree: 10
Trial Time:          0.00008
Trial Time:          0.00006
Trial Time:          0.00005
Trial Time:          0.00006
Trial Time:          0.00006
Trial Time:          0.00006
Trial Time:          0.00005
Trial Time:          0.00005
Trial Time:          0.00005
Trial Time:          0.00006
Average Time:        0.00006
You’ll notice that the generated graph has 1024 ($2^{10}$) nodes and that 10 “Trial Time” lines are printed out (signifying 10 iterations of the algorithm), just like we specified with our -g and -n flags in the arguments parameter to set_se_binary_workload().
What about set_workload()?
The set_workload() function, which we’ve used many times already throughout the bootcamp, can (clearly) also be used to set a board’s workload. set_workload() requires a workload resource.
Each workload resource specifies a function to call on the board, which will be one of the workload-setting functions we discussed above (set_se_binary_workload(), set_kernel_disk_workload(), set_se_simpoint_workload(), set_se_looppoint_workload(), or set_se_elfie_workload()). Workload resources also specify the values of the function’s arguments in the form of text or other gem5 resources. The set_workload() function then calls the specified function with the specified arguments.
Using a workload resource
Let’s see this in action with the riscv-gapbs-bfs-run workload, which just so happens to run the riscv-gapbs-bfs binary we just used in the previous example. Open workload_example.py, which is currently just a copy of the same system from binary_example.py. Our goals for this example are the same as the goals from before:
1) Use the riscv-gapbs-bfs binary resource as the workload for this board, 2) Pass in the arguments -g 10 and -n 10 to the binary.
Let’s read the description of riscv-gapbs-bfs-run from its gem5 resources page:
This workload is used to tun the gapbs-bfs binary in SE mode. The arguments are -g 10 means that the graph is generated with 2^10 nodes and -n 10 that there are 10 iterations.
Hey, that’s exactly what we want! This means we can use this workload to achieve the same behavior that we did for binary_example.py.
![An illustration of how a workload corresponds to a board function. A workload has a function, resources, and additional_parameters. The function is defined as "set_se_binary_workload", the resources are defined as "binary: riscv-gapbs-bfs, version 1.0.0", and the additional_parameters are defined as "arguments: ["-g", 10, "-n", 10]. That workload corresponds to "board.set_se_binary_workload(binary=obtain_resource("riscv-gapbs-bfs"), arguments=["-g", 10, "-n", 10]).](img/workload_anatomy.png)
First, we obtain the workload resource:
workload_resource = obtain_resource("riscv-gapbs-bfs-run")
Then, we set it on our board:
board.set_workload(workload_resource)
…and that’s it! The workload handles grabbing the appropriate binary resource and passing in the appropriate arguments. Let’s prove it by running the thing:
gem5 workload_example.py
You’ll notice that the exact same simulation output shows up in stdout:
Generate Time:       0.00426
Build Time:          0.00071
Graph has 1024 nodes and 10496 undirected edges for degree: 10
Trial Time:          0.00008
Trial Time:          0.00006
Trial Time:          0.00005
Trial Time:          0.00006
Trial Time:          0.00006
Trial Time:          0.00006
Trial Time:          0.00005
Trial Time:          0.00005
Trial Time:          0.00005
Trial Time:          0.00006
Average Time:        0.00006
We achieved the exact same final result using set_workload() and a workload resource instead of set_se_binary_workload(), a binary resource, and arguments!
In essence, workload resources are wrappers around other kinds of resources to make them easier to run. This means that we can set resources (for example, binaries) directly using their corresponding function (for example, set_se_binary_workload()), or we can use workloads that bundle these resources for us and use set_workload(). Either way is completely fine!
Anatomy of a workload
All resources pages on gem5 resources include the “Raw” tab, which shows how the resource is made in JSON format. Let’s look at how a workload is defined using this format. The JSON for riscv-gapbs-bfs-run looks like this:
{
    "category": "workload",
    "id": "riscv-gapbs-bfs-run",
    "description": "This workload is used to tun the gapbs-bfs binary in SE mode. The arguments are -g 10 means that the graph is generated with 2^10 nodes and -n 10 that there are 10 iterations.",
    "function": "set_se_binary_workload",
    "resources": {
        "binary": {
            "id": "riscv-gapbs-bfs",
            "resource_version": "1.0.0"
        }
    },
    "additional_params": {
        "arguments": [
            "-g",
            10,
            "-n",
            10
        ]
    },
    "architecture": "RISCV",
    "size": 0,
    "tags": [
        "gapbs",
        "bfs",
        "se"
    ],
    "license": "BSD-3-Clause",
    "author": [
        "Scott Beamer",
        "David Patterson",
        "Krste Asanović"
    ],
    "source_url": "",
    "resource_version": "1.0.0",
    "gem5_versions": [
        "23.1",
        "24.0",
        "24.1"
    ],
    "example_usage": "obtain_resource(\"riscv-gapbs-bfs-run\")"
}
Let’s go through some important fields:
categoryandidare relatively straightforward: this resource is a workload (as opposed to a binary, a suite, a bootloader, etc.), and it has the idriscv-gapbs-bfs-run.descriptionis a space to explain what the resource is used for and what it provides. The description here helps us identify how the GAPBS BFS benchmark will be run.functionhas the name of the function that this workload calls on the board; as we can see, the function being called behind the scenes isset_se_binary_workload(), which is exactly the function we used when we replicated this workload’s behavior inbinary_example.py.resourcescontains the gem5 resources this workload passes into its function. In this case, there is only one:riscv-gapbs-bfs.- Resources are referred to by their
idandresource_version. - As we saw in
binary_example.py,set_se_binary_workload()requires a binary resource namedbinary, so we provide it!
- Resources are referred to by their
additional_paramsare optional non-resource parameters we want to use for the function call. As we saw, this workload includes a value for the optionalargumentsparameter toset_se_binary_workload().architecturespecifies which ISA the workload is built for, in this case RISC-V.- We discussed
resource_versionandgem5_versionsabove, and here they are in JSON form!
A workload is only guaranteed to work with a version of gem5 specified in the
gem5_versionsfield, so be conscious when updating!
Using suites
While workloads are collections of resources and parameters required to run a single gem5 simulation, suites are collections of workloads that can be used to run multiple simulations.
Suites are perfect for running simulations concurrently using multiprocessing! We’ll discuss this in depth in our multisim section in the advanced topics unit.
Let’s look into how we can use suites in our gem5 configuration scripts. Open suite_example.py, which currently only sets up a board with no workload.
The SuiteResource class
SuiteResource is a class that acts as a generator for the suite’s workloads. When we use obtain_resource() to obtain a suite, the result is an instance of SuiteResource. We can iterate through a SuiteResource like any other generator!
Let’s obtain x86-getting-started-benchmark-suite. This suite contains a series of common benchmarks compiled for x86:
getting_started_suite = obtain_resource("x86-getting-started-benchmark-suite")
Let’s print out all of the workloads in x86-getting-started-benchmark-suite. After obtaining the resource, add the following to print out every included workload:
for workload in getting_started_suite:
  print(f"Workload ID: {workload.get_id()}")
  print(f"Workload version: {workload.get_resource_version()}")
  print("===================================")
When we run:
gem5 suite_workload_example.py
we should see:
Workload ID: x86-llvm-minisat-run
Workload version: 1.0.0
===================================
Workload ID: x86-gapbs-bfs-run
Workload version: 1.0.0
===================================
Workload ID: x86-gapbs-tc-run
Workload version: 1.0.0
===================================
Workload ID: x86-npb-is-size-s-run
Workload version: 1.0.0
===================================
Workload ID: x86-npb-lu-size-s-run
Workload version: 1.0.0
===================================
Workload ID: x86-npb-cg-size-s-run
Workload version: 1.0.0
===================================
Workload ID: x86-npb-bt-size-s-run
Workload version: 1.0.0
===================================
Workload ID: x86-npb-ft-size-s-run
Workload version: 1.0.0
===================================
Workload ID: x86-matrix-multiply-run
Workload version: 1.0.0
===================================
This particular suite contains 9 workloads.
Suite input_groups
Each workload in a suite is a member of one or more input_groups that we can filter by. Let’s print all of the input_groups for this suite using SuiteResource’s get_input_groups() function. We can also print which workloads are in each input group using SuiteResource’s with_input_group() function. with_input_group() returns a new SuiteResource object with only the workloads in that input group.
print("\nInput groups in the suite:")
input_groups = getting_started_suite.get_input_groups()
for group in input_groups:
  print(f"Group: {group}")
  workloads = getting_started_suite.with_input_group(group)
  for workload in workloads:
    print(f"Workload ID: {workload.get_id()}, version {workload.get_resource_version()}")
  print("===================================")
Let’s run it again and take a look:
gem5 suite_workload_example.py
Below the output from the previous part, you should see:
Input groups in the suite:
Group: matrix-multiply
Workload ID: x86-matrix-multiply-run, version 1.0.0
===================================
Group: is
Workload ID: x86-npb-is-size-s-run, version 1.0.0
===================================
Group: llvm
Workload ID: x86-llvm-minisat-run, version 1.0.0
===================================
Group: npb
Workload ID: x86-npb-is-size-s-run, version 1.0.0
Workload ID: x86-npb-lu-size-s-run, version 1.0.0
Workload ID: x86-npb-cg-size-s-run, version 1.0.0
Workload ID: x86-npb-bt-size-s-run, version 1.0.0
Workload ID: x86-npb-ft-size-s-run, version 1.0.0
===================================
Group: bt
Workload ID: x86-npb-bt-size-s-run, version 1.0.0
===================================
Group: ft
Workload ID: x86-npb-ft-size-s-run, version 1.0.0
===================================
Group: se
Workload ID: x86-gapbs-bfs-run, version 1.0.0
Workload ID: x86-gapbs-tc-run, version 1.0.0
Workload ID: x86-npb-is-size-s-run, version 1.0.0
Workload ID: x86-npb-lu-size-s-run, version 1.0.0
Workload ID: x86-npb-cg-size-s-run, version 1.0.0
Workload ID: x86-npb-bt-size-s-run, version 1.0.0
Workload ID: x86-npb-ft-size-s-run, version 1.0.0
Workload ID: x86-matrix-multiply-run, version 1.0.0
===================================
Group: tc
Workload ID: x86-gapbs-tc-run, version 1.0.0
===================================
Group: minisat
Workload ID: x86-llvm-minisat-run, version 1.0.0
===================================
Group: gapbs
Workload ID: x86-gapbs-bfs-run, version 1.0.0
Workload ID: x86-gapbs-tc-run, version 1.0.0
===================================
Group: lu
Workload ID: x86-npb-lu-size-s-run, version 1.0.0
===================================
Group: bfs
Workload ID: x86-gapbs-bfs-run, version 1.0.0
===================================
Group: cg
Workload ID: x86-npb-cg-size-s-run, version 1.0.0
===================================
You’ll notice that the groups are not disjoint: some workloads are in more than one group. For example, we can see our old friend x86-gapbs-bfs-run in the se, gapbs, and bfs groups.
Running a workload from the suite
Looking at the input groups output, we can see that the is input group only contains one workload, x86-npb-is-size-s-run. Let’s run this workload out of the suite!
npb_is_workload = list(getting_started_suite.with_input_group("is"))[0]
board.set_workload(npb_is_workload)

simulator = Simulator(board=board)
simulator.run()
We turn the SuiteResource returned from with_input_group() into a list of workload resources, then take its first (and only) element, the x86-npb-is-size-s-run workload.
One last time, let’s run this:
gem5 suite_workload_example.py
Now, under our mountain of print statements, you’ll see the simulation output:
NAS Parallel Benchmarks (NPB3.3-SER) - IS Benchmark

Size:  65536  (class S)
Iterations:   10


IS Benchmark Completed
Class           =                        S
Size            =                    65536
Iterations      =                       10
Time in seconds =                     0.01
Mop/s total     =                    57.47
Operation type  =              keys ranked
Verification    =               SUCCESSFUL
Version         =                    3.3.1
Compile date    =              13 Feb 2024

Compile options:
  CC           = gcc
  CLINK        = $(CC)
  C_LIB        = (none)
  C_INC        = (none)
  CFLAGS       = -O3 -mcmodel=medium
  CLINKFLAGS   = -O3 -mcmodel=medium -static


Please send all errors/feedbacks to:

NPB Development Team
npb@nas.nasa.gov
Local resources
If none of the available gem5 resources suit your needs, you can also make your own local resources! These can either be truly local or, with a bit more setup, more shareable. Let’s create a local binary resource and use both methods to add it to our simulation.
Take a look at pattern.c, which prints out a simple triangle pattern. We’ve already compiled pattern.c into an ARM executable, pattern, which we’ll use in this section.
If you choose to compile your own executable, be aware of your glibc version! Some later versions are not supported in gem5.
Using local paths
First, let’s use a simple method to directly link our custom resource to a configuration script using its local path. Open local_path.py to get started.
A BinaryResource (the same object we get when we use obtain_resource() to grab a binary resource) can be instantiated using a local path. Add the following to local_path.py:
binary = BinaryResource(local_path="./pattern")
We can now run our simulation with this binary!
gem5 local_path.py
When we do, we can see the printed output of pattern.c in stdout:
Hello, gem5!
*
**
***
****
*****
******
*******
********
*********
**********
This method works well, but it’s not very reproducible or consistent. If this resource is an important part of our code that will stick around for a while, we want to give it a permanent home and use obtain_resource to acquire it.
Using JSON resources
We can set up our resource by creating a JSON file for it. Open local_resources.json to take a look at the JSON format for pattern:
{
    "category": "binary",
    "id": "arm-pattern-print",
    "description": "A simple ARM binary that prints a pattern",
    "architecture": "ARM",
    "size": 1,
    "tags": [],
    "is_zipped": false,
    "md5sum": "93c09562c9eee7cdf781b5fb77f3c138",
    "source": "",
    "url": "file://<PATH-TO-PATTERN-EXECUTABLE>",
    "code_examples": [],
    "license": "",
    "author": [
        "Harshil Patel"
    ],
    "source_url": "",
    "resource_version": "1.0.0",
    "gem5_versions": [
        "23.0",
        "23.1",
        "24.0",
        "25.0"
    ],
    "example_usage": "obtain_resource(resource_id=\"arm-pattern-print\")"
}
Note the category (binary) and the name we’ve given our resource (arm-pattern-print). If we ever make any more custom resources, we can add them to this JSON file below this one.
If you compiled your own
patternexecutable, be sure to update themd5sumfield with the output of themd5sum patternbash command.
Replace <PATH-TO-PATTERN-EXECUTABLE> (including the angle brackets) in the url line to match the absolute path of the pattern executable, which you can get by navigating to the 02-gem5-resources directory and running pwd. Don’t forget to add the file name (pattern) to the end of the path!
We can change this URL to reflect a more permanent hosting place for this resource if we choose to share it.
Now, open json_resource.py. Let’s use obtain_resource() to grab this resource:
binary = obtain_resource("x86-pattern-print")
Now, in order for gem5 to be able to find our local resource, we need to add the resource’s JSON file to the gem5 command. We do this by setting the GEM5_RESOURCE_JSON_APPEND environment variable. Modify its value and run the simulation with the following command:
GEM5_RESOURCE_JSON_APPEND=local_resources.json gem5 json_resource.py
When you do, you’ll see the exact same output as before:
Hello, gem5!
*
**
***
****
*****
******
*******
********
*********
**********
If you are only using local resources in a simulation, you can set the
GEM5_RESOURCE_JSONenvironment variable instead of theGEM5_RESOURCE_JSON_APPENDvariable, but this will prevent gem5 from finding resources anywhere else!
To more permanently set up the use of local and global resources at the same time, you’ll need to create a JSON file that points to both the local resources (
local_resources.json) and the remote resources (the gem5-resources database), then set theGEM5_CONFIGenvironment variable to that file’s path. That JSON file might look something like this:{ "sources": { "my-workloads": { "url": "/path/to/my/json.json", "isMongo": false }, "gem5_resources": { "url": "https://api.gem5.org/api/resources", "isMongo": true, "dataSource": "gem5-vision", "database": "gem5-vision", "collection": "resources" } } }
Though we won’t be making extensive use of custom resources in this bootcamp, creating local gem5 resources is an immensely useful skill to have in your toolbox.