SimObjects
Let’s get specific about gem5 models.
By the end of this section, you will be able to:
- Create a simple SimObject (with a constructor and parameters) from scratch by creating the appropriate Python, C++, and SConscript files.
- Build gem5 using SCons.
- Apply gem5 code conventions such as naming conventions, include guards, and best practices when creating new SimObjects.
- Write simple configuration scripts without the
Simulatorobject usingm5.
What’s a SimObject?
We’ve talked about gem5 simulation models: C++ classes that make up gem5’s backend. So far in the bootcamp, we’ve used models for processor cores (O3CPU), caches (Cache), and memory (ChanneledMemory) when creating our own standard library components. These models are the backbone of simulation, and in gem5, they are all SimObjects.
The SimObject class is the parent C++ class for all gem5 SimObjects. It (and its children, such as ClockedObject) facilitates:
- Defining a model (ex: a CPU core),
- Parameterizing a model (ex: fetch width, number of reorder buffers),
- Gathering statistics (ex: number of instructions executed)
Many SimObjects work in concert to simulate an entire system. In this section, we’ll create a basic SimObject and see it in simulation.
Writing SimObjects
SimObjects in code
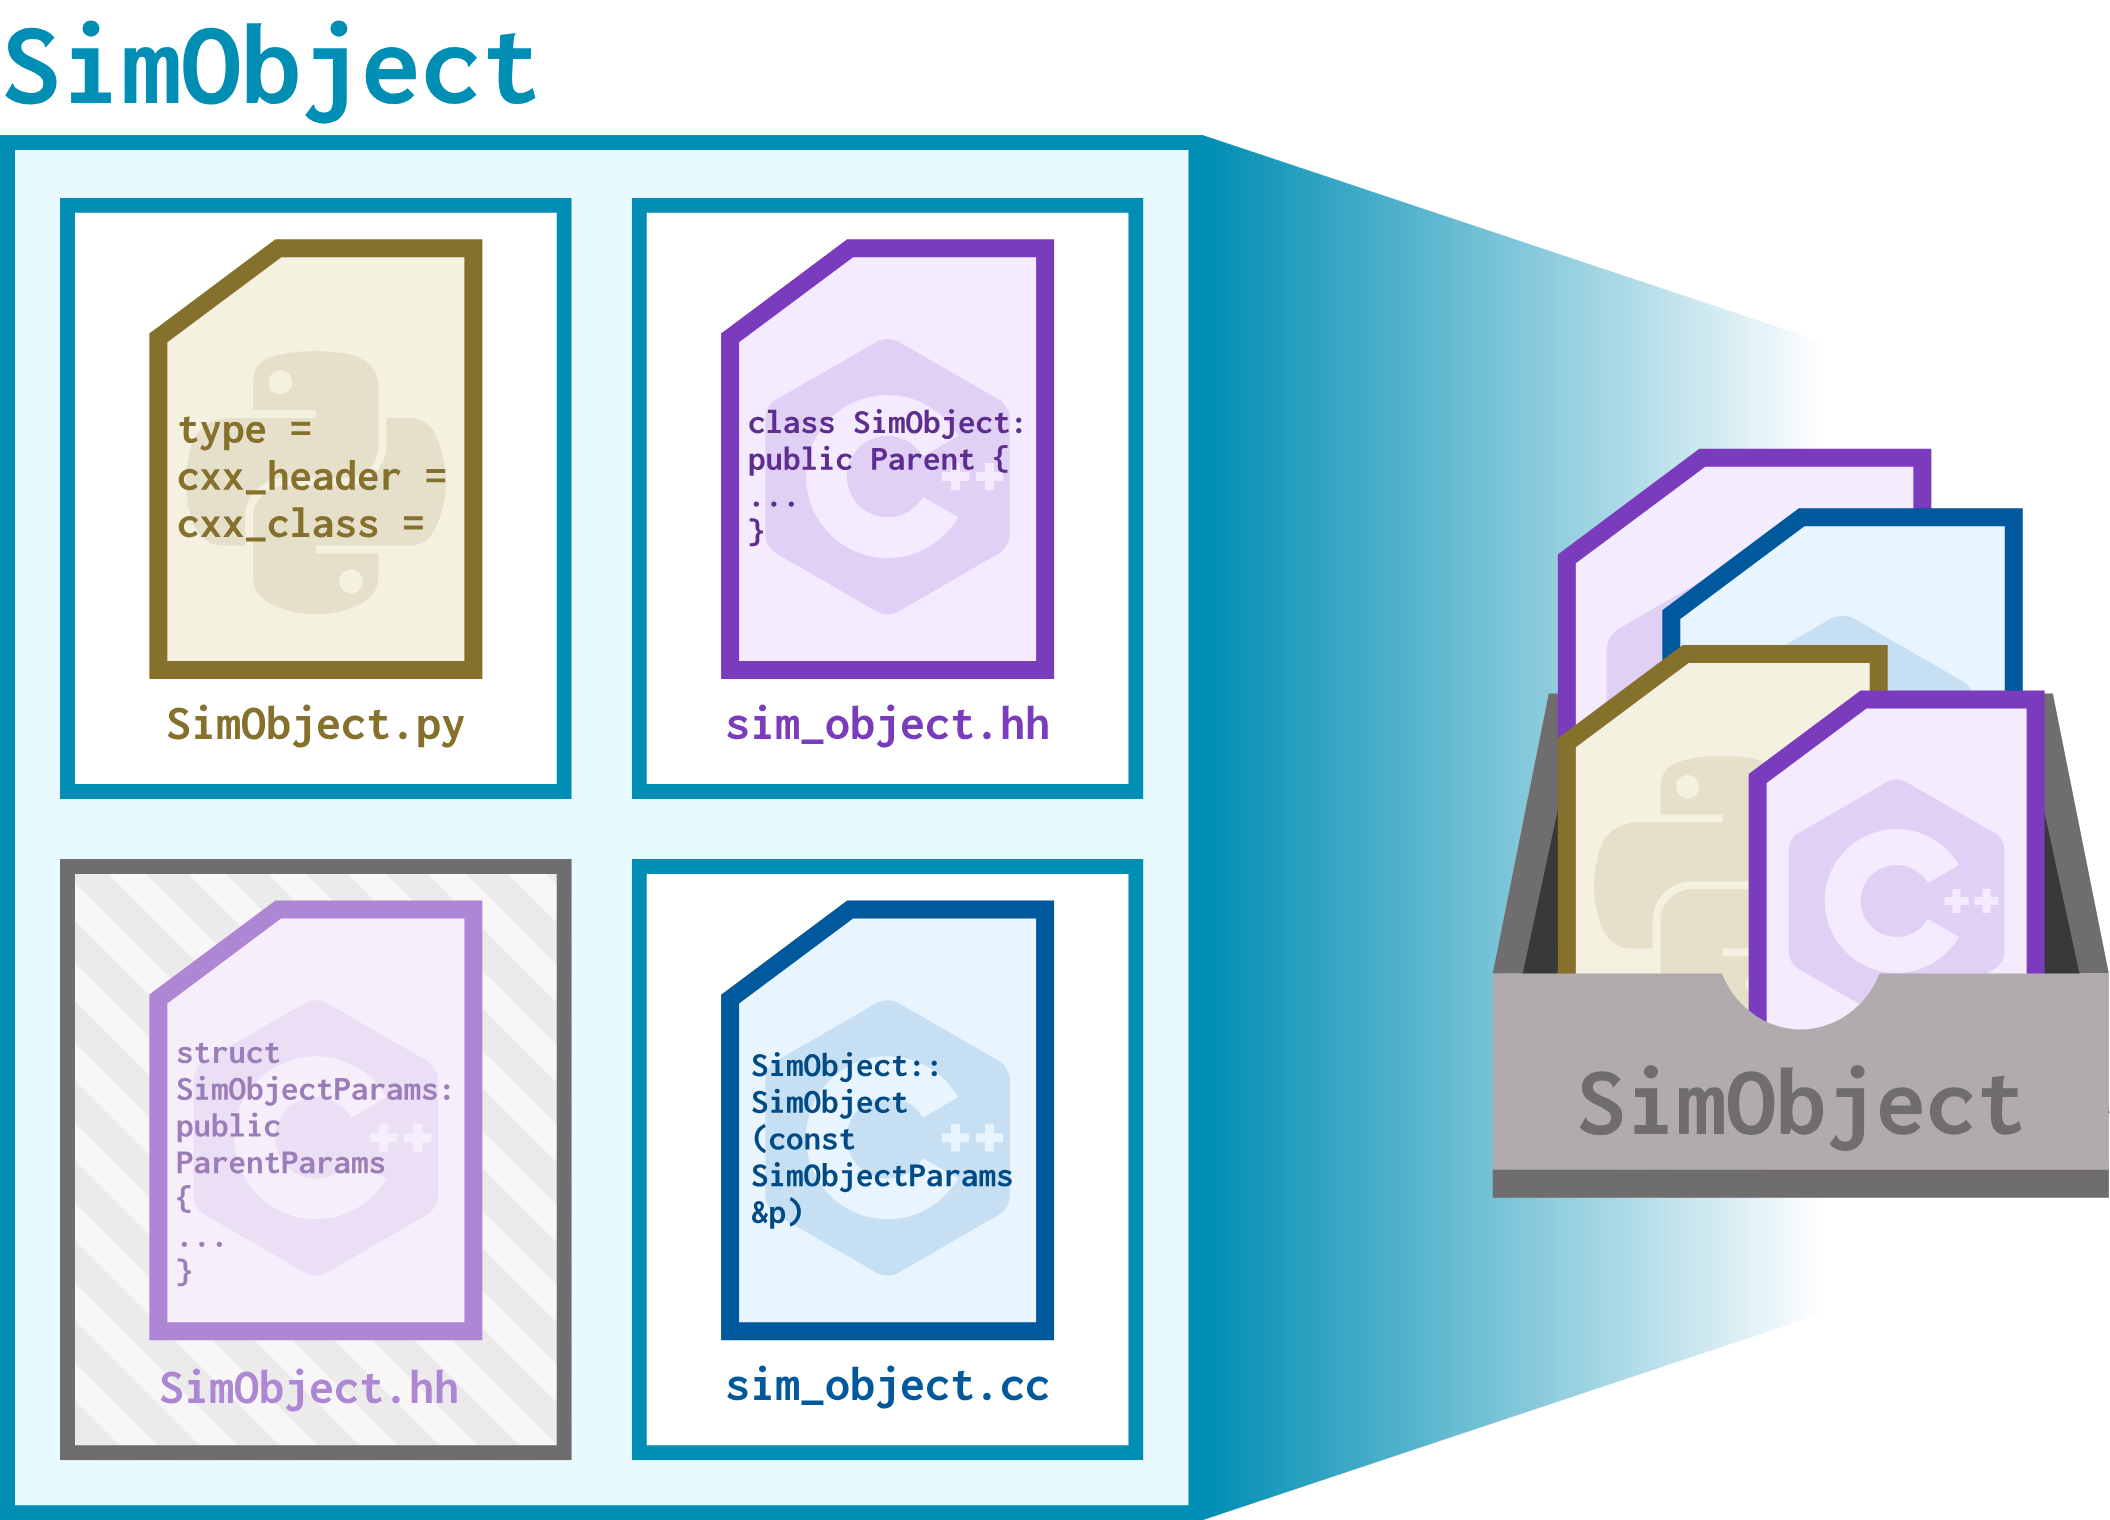
Each SimObject is made up of 4 basic files:
- Declaration file (
.py):- This file represents the model at the highest level. It allows for the instantiation of the model and for interfacing with the C++ backend. It defines the sets of parameters for the model.
- This file determines the name of the model that will be used in Python files.
- Header file (
.hh):- Like a traditional header file, this file declares the SimObject and all its functions, to be instantiated in the source file.
- Source file (
.cc):- This file implements the SimObject’s functionality!
Paramsheader file (.hh):- This file declares a C++ struct that stores all parameters for the SimObject.
- This file is auto-generated based on the other three files, meaning you don’t have to write it yourself!
Overall, this means you need to write 3 files to create a new SimObject!
Peek at a CPU SimObject
Let’s look at an example of an existing CPU SimObject and all its files. AtomicSimpleCPU is a model for a simple core with atomic memory accesses, and it has 4 files.
Don’t worry too much about understanding every line of code in this example just yet. This is a sneak peek!
Declaration file: gem5/src/cpu/simple/BaseAtomicSimpleCPU.py
Looking into this file, we see it looks like this:
class BaseAtomicSimpleCPU(BaseSimpleCPU):
    type = "BaseAtomicSimpleCPU"
    cxx_header = "cpu/simple/atomic.hh"
    cxx_class = "gem5::AtomicSimpleCPU"

    ...
This format is followed by other declaration files; they indicate the type of the SimObject (the name of its Python class that can be used in Python simulation files, also often the name of the .py file), the locations of the corresponding header and source file, and any parameters (omitted here).
You might be wondering why we aren’t looking at
AtomicSimpleCPU.pyinstead. CPU models in gem5 work a bit differently due to them being ISA-specific.The
AtomicSimpleCPU.pyfile (gem5/src/cpu/simple/AtomicSimpleCPU.py) looks at the ISA being used and imports the appropriate version ofAtomicSimpleCPU, all of which inherit fromBaseAtomicSimpleCPU. The same pattern holds for all other CPUs in gem5.
Header file: gem5/src/cpu/simple/atomic.hh
Looking into this file, we see:
namespace gem5
{
class AtomicSimpleCPU : public BaseSimpleCPU
{
public:
AtomicSimpleCPU(const BaseAtomicSimpleCPUParams ¶ms);
virtual ~AtomicSimpleCPU();
void init() override;
...
Header files declare the class name and include all method signatures for the C++ class, including the constructor (which you see here). The constructor always takes the corresponding Params struct (which we’ll see in a moment!). We can see this class also has an init() function.
Source file: gem5/src/cpu/simple/atomic.cc
namespace gem5
{

void
AtomicSimpleCPU::init()
{
    BaseSimpleCPU::init();

    int cid = threadContexts[0]->contextId();
    ifetch_req->setContext(cid);
    data_read_req->setContext(cid);
    data_write_req->setContext(cid);
    data_amo_req->setContext(cid);
}

AtomicSimpleCPU::AtomicSimpleCPU(const BaseAtomicSimpleCPUParams &p)
    : BaseSimpleCPU(p),
      tickEvent([this]{ tick(); }, "AtomicSimpleCPU tick",
                false, Event::CPU_Tick_Pri),
      width(p.width), locked(false),

      ...
Source files contain the SimObject’s functionality. We can see the implementation of the init() function we saw declared in the header file, followed by the beginning of the constructor (remember C++ initialization lists?).
Params header file: gem5/build/ALL/params/BaseAtomicSimpleCPU.hh
If we look in this file, we can see:
...

namespace gem5
{
struct BaseAtomicSimpleCPUParams
    : public BaseSimpleCPUParams
{
    gem5::AtomicSimpleCPU * create() const;
    bool simulate_data_stalls;
    bool simulate_inst_stalls;
    int width;
};

...
This is the auto-genrated Params struct! You’ll notice its name matches the argument of BaseAtomicSimpleCPU’s constructor (declared in the header file and implemented in the source file). Looks like BaseAtomicSimpleCPU takes three parameters.
Since the
Paramsfile is auto-generated, it lives in thebuildfolder, and it will only be auto-generated as part of the build process (more on that in a second). Its name matches the type declared in the .py declaration file withParamsappended to the end.
Let’s make a SimObject!
Before we graduate to making helpful SimObjects, let’s get a hang of how all of the files work together by making a simple SimObject called HelloSimObject. All this object will do is print out a “hello” message as it’s being created!
To get this off the ground, we need to do the following:
- Write the basic SimObject files:
- The declaration file,
HelloSimObject.py - The header file,
hello_sim_object.hh - The source file,
hello_sim_object.cc
- The declaration file,
- Re-build gem5, which will generate the 4th basic SimObject file,
HelloSimObject.hh, containing theHelloSimObjectParamsstruct, - Write a configuration script that makes use of
HelloSimObject, - Run the simulation!
Basic SimObject files
So far, we put all of our files inside of the workspace directory. Since SimObject source files interact with gem5’s build system, we’ll be working in a new directory under gem5/src for this unit. Create a folder called bootcamp under gem5/src and copy over the hello-sim-object folder from the workspace directory into the newly-created bootcamp directory.
This means that the path of your working directory should be
gem5/src/bootcamp/hello-sim-object.
The declaration file
Open HelloSimObject.py to get started. Currently, this file is empty. We’ll fill it in with the declaration for HelloSimObject.
The first thing we need to do is import the parent class of HelloSimObject. When making SimObjects for simulation, we’d select a relevant base class (for example, when creating a new branch predictor, we can use the existing BranchPredictor SimObject). Since HelloSimObject is very simple and doesn’t need functionality from any other class, we’ll just import the SimObject class:
from m5.objects.SimObject import SimObject
Next, let’s write the declaration as a Python class:
class HelloSimObject(SimObject):
    type = "HelloSimObject"
    cxx_header = "bootcamp/hello-sim-object/hello_sim_object.hh"
    cxx_class = "gem5::HelloSimObject"
First, you’ll notice that HelloSimObject inherits from SimObject, just like we discussed above. Let’s look at all of the fields we defined:
type: the name of this SimObject. By convention, this matches the name of the declaration.pyfile (this file).-
cxx_header: the path to the header file (which we haven’t written yet). This path is relative to thegem5/srcdirectory.-
If your
hello-sim-objectdirectory is in a different location, be sure to updatecxx_headerto match!
-
cxx_class: the name of the C++ class for this SimObject.
All of these fields are keywords defined in the
MetaSimObjectmetaclass (found ingem5/src/python/m5/SimObject.py). There are many other keywords to define, but they are all optional; a minimal SimObject should have at leasttype,cxx_header, andcxx_classdefined.
That’s it for the declaration file! Let’s start writing some C++.
The header file
Let’s now move to hello_sim_object.hh, which is also empty. Note that this file is at the path we defined as cxx_header in the declaration file.
First, we write some include guards:
#ifndef __BOOTCAMP_HELLO_SIM_OBJECT_HELLO_SIM_OBJECT_HH__
#define __BOOTCAMP_HELLO_SIM_OBJECT_HELLO_SIM_OBJECT_HH__
These help us prevent double or cyclical includes. By convention, they’re named with the relative path from gem5/src (a reminder that the path to this file is gem5/src/bootcamp/hello-sim-object/hello_sim_object.hh).
Next, we include the relevant header files:
#include "params/HelloSimObject.hh"
#include "sim/sim_object.hh"
In this case, we only need the SimObject C++ class and the HelloSimObjectParams struct (which doesn’t actually exist yet, but it will after we build!).
Alright, let’s write this thing:
namespace gem5
{

class HelloSimObject: public SimObject
{
  public:
    HelloSimObject(const HelloSimObjectParams& params);
};

} // namespace gem5

#endif // __BOOTCAMP_HELLO_SIM_OBJECT_HELLO_SIM_OBJECT_HH__
This file defines the C++ class for HelloSimObject. The name of the class should match the value of cxx_source in the declaration file, and it should inherit from the same SimObject parent as the declaration file. Since the Python class in the declaration file inherits from the Python SimObject class, the C++ class should inherit from the C++ SimObject class, too.
The same is true for the auto-generated
HelloSimObjectParamsclass! It will inherit fromSimObjectParams.
You’ll notice we are using the gem5 namespace. Every SimObject should use this namespace, and may also use a more specific namespace (for example, namespace branch_prediction for branch predictors). For now, the only class we declare in HelloSimObject is its constructor. Every SimObject in gem5 is required to have a single-argument constructor, with that argument being a constant reference to that SimObject’s Params struct.
We’ll define this constructor in the source file next!
The source file
Time for hello_sim_object.cc, which is… empty. First, let’s include our header file as well as <iostream> for printing things to the console:
#include "bootcamp/hello-sim-object/hello_sim_object.hh"

#include <iostream>
By convention, we order #include statements as follows:
- The SimObject’s header file,
- Any C++ libraries (in alphabetical order),
- Other gem5 headers (also in alphabetical order).
Note once again that gem5 paths are relative to
gem5/src!
Next, let’s write our class:
namespace gem5
{

HelloSimObject::HelloSimObject(const HelloSimObjectParams& params):
    SimObject(params)
{
    std::cout << "Hello from HelloSimObject's constructor!" << std::endl;
}

} // namespace gem5
Just like its header file, we use the gem5 namespace. We also define the constructor that was declared in the header file. We call the constructor of our parent class (SimObject) in the initialization list, then simply print out a little “hello” message in the body. When HelloSimObject is instantiated for simulation, this message will print to the console.
We’ve now written all of the code needed to define HelloSimObject! Let’s build gem5 so that we can use it.
Rebuilding gem5
Every time we write a new SimObject (or modify an existing one), we need to rebuild gem5.
SConscript
gem5’s build system uses the build tool SCons, which uses two major types of files:
SConstruct: Contains definitions and files of build targets. AllSConstructfiles are executed first. In most cases, there is no need to write or modify anySConstructfiles.SConscript: Contains the build instructions for a file by defining which C++ files need to be compiled. When creating new SimObjects, you will need to write or modifySconscriptfiles.
Note that since gem5’s build system is highly customized, the SCons documentation may not be as helpful!
As part of the building process, SCons looks for any files named Sconscript for instructions on what to build. Let’s create a SConscript for HelloSimObject! Open Sconscript to get started.
This file is very short. All we need to add is:
Import("*")

SimObject("HelloSimObject.py", sim_objects=["HelloSimObject"])

Source("hello_sim_object.cc")
The SimObject(...) line registers HelloSimObject as a SimObject. The first argument is the name of the Python submodule that will be created, and the second is a list of SimObject names.
In this case, we choose to just add
HelloSimObject, but it’s possible to add more than oneSimObjectin a singleSConscript.
The HelloSimObject submodule will be created under m5.objects, where all SimObject submodules are created. We will be able to find HelloSimObject in our configuration scripts by importing m5.objects.HelloSimObject.HelloSimObject.
You may remember importing
X86O3CPUfromm5.objects.X86CPUwhen you created the customBigO3andLittleO3components in Unit II, Section II:from m5.objects.X86CPU import X86O3CPUWe’re setting that up for
HelloSimObjecthere!
The Source(...) line adds the source file for HelloSimObject, hello_sim_object.cc, as a C++ source file to be compiled.
Let’s build!
We’re finally ready to go! Move to the gem5 directory and run:
scons build/ALL/gem5.opt -j$(nproc)
This is the exact same command we used at the beginning of the bootcamp! This might take a while.
Simulating without a Simulator
You may wonder how we can instantiate our HelloSimObject when every configuration script we’ve written has relied on the Simulator object (which takes a board) to start simulation. As it turns out, the Simulator class makes use of the m5 class, which instantiates SimObjects directly. Let’s do away with Simulator for now and write a config script using m5.
Open hello_sim_object_config.py to get started!
Like all the rest of our configuration scripts, you can keep this file in the
workspacedirectory.
For now, all this file does is import m5. Let’s add another import to the mix:
from m5.objects.Root import Root
Every gem5 simulation starts with a Root object. This object represents the root of the device tree of the simulated computer system. We’ll also want to import our brand-new SimObject:
from m5.objects.HelloSimObject import HelloSimObject
Remember, we know we can find
HelloSimObjectin this submodule because we defined it as such inSConsript!
Now that we have all of our imports, we can build up our (very, very simple) device tree:
root = Root(full_system=False)
root.hello = HelloSimObject()
We instantiate a Root object (as required), then attach a HelloSimObject to it using the . operator. For now, HelloSimObject takes no parameters.
As the name suggests, the
full_systemargument toRootdefines whether we’ll run in FS or SE mode. For this demo, we’re choosing SE mode.
Now all that’s left to do is to instantiate our device tree and simulate! We do that using m5:
m5.instantiate()
exit_event = m5.simulate()
We capture the return value of m5.simulate() in a variable; this gives us information about why the simulation exited. We can print out this reason by adding the following:
print(f"Exited simulation because: {exit_event.getCause()}.")
The return type of
m5.simulate()is aGlobalSimLoopExitEventobject, which has a member function calledgetCause().getCause()returns a descriptive string of the cause of the exit event represented by the object.
…and we’re done! We’re now ready to simulate with HelloSimObject. As always, run the following:
gem5 hello_sim_object_config.py
Alongside the normal gem5 simulation preamble, you should see:
Hello from HelloSimObject's constructor!
Exited simulation because: simulate() limit reached.
The constructor of our brand new SimObject was successfully called!
This call to the constructor happened during
m5.instantiate()whenHelloSimObjectwas created. This means thatHelloSimObjecthas no interesting simulation behavior (or any simulation behavior at all!).
We can also see that the simulation exited due to “simulate() limit reached”; basically, the simulation ran out of things to simulate!
m5.instantiate
Seeing this output, you might be wondering when HelloSimObject’s constructor was actually called. This is the job of m5.instantiate(), which we called in our configuration script after creating the device tree. The full implementation can be found in gem5/src/python/m5/simulate.py, but for now, we’ll focus on the following lines:
root = objects.Root.getInstance()

if not root:
    fatal("Need to instantiate Root() before calling instantiate()")

...

# Initialize the global statistics
stats.initSimStats()

# Create the C++ sim objects and connect ports
for obj in root.descendants():
    obj.createCCObject()
for obj in root.descendants():
    obj.connectPorts()
Here, we can see that each descendant of root is instantiated (has its constructor called), and all SimObjects have their ports connected.
Ports are a way for SimObjects to send each other data. For more on ports, take a look at the memory track!
This means that the constructor for HelloSimObject was called here, and thus this is where the prints we see in the simulation output originate from!
As a fun connection to our tour of
AtomicSimpleCPU, later on, we see this:# Do a second pass to finish initializing the sim > objects for obj in root.descendants(): obj.init()We saw the
init()function implemented inatomic.ccfor the atomic CPU.init()is initially defined in theSimObjectclass, and every SimObject can overrideinit()to perform any initialization tasks that require all other SimObjects to already be instantiated (have had their constructors called).
The rest of m5.instantiate() might look a bit opaque right now, and that’s okay! You may choose to revisit this function after spending more time with SimObjects.
SimObject parameters
gem5’s versatility comes in large part from being able to parameterize our models, and we can do this relatively easily when we write or modify SimObjects.
Parameterizing HelloSimObject
Let’s make our HelloSimObject a little more interesting by adding a num_hellos parameter, which will determine how many lines of output its constructor will print to the console. We’ll have to make a few changes to the declaration and source file to achieve this.
Declaration file
Open HelloSimObject.py again to modify HelloSimObject’s declaration to include parameters.
First, we need to add another import. gem5 defines its own parameter classes under m5.params (found in the file gem5/src/python/m5/params.py), so let’s import them all here:
from m5.params import *
We can now define the parameter for HelloSimObject below the cxx_class field. Since num_hellos represents a number, we’ll use Param.Int.
num_hellos = Param.Int("Number of times to say Hello.")
We pass an argument to Param.Int that describes what this parameter controls. We could optionally pass in a default value as well, but this is strongly discouraged unless absolutely necessary.
This change is what adds a field to the auto-generated
HelloSimObjectParamsstruct!
Source file
Now that we’ve added the parameter, let’s make use of it in HelloSimObject’s constructor. We can access our new parameters by reading its value from the params struct argument. Replace the body of the constructor with the following:
for (int i = 0; i < params.num_hellos; i++) {
        std::cout << "i: " << i << ", Hello from HelloSimObject's constructor!" << std::endl;
}
As you can see, accessing num_hellos is as easy as reading a struct field!
Let’s rebuild
Since we modified SimObject files, we need to rebuild gem5. Let’s do that now:
scons build/ALL/gem5.opt -j$(nproc)
The HelloSimObjectParams struct
Now that HelloSimObjects has a parameter, we should see it in the HelloSimObjectParams struct in the auto-generated gem5/build/ALL/params/HelloSimObject.hh file. Let’s take a look at that file:
/**
 * DO NOT EDIT THIS FILE!
 * File automatically generated by
 *   build_tools/sim_object_param_struct_hh.py:233
 */

#ifndef __PARAMS__HelloSimObject__
#define __PARAMS__HelloSimObject__

namespace gem5 {
class HelloSimObject;
} // namespace gem5
#include <cstddef>
#include "base/types.hh"

#include "params/SimObject.hh"

namespace gem5
{
struct HelloSimObjectParams
    : public SimObjectParams
{
    gem5::HelloSimObject * create() const;
    int num_hellos;
};

} // namespace gem5

#endif // __PARAMS__HelloSimObject__
Pay attention to the struct definition. We can see that it inherits from SimObjectParams (just like HelloSimObject inherits from SimObject in Python and C++) and that it has one field: an int named num_hellos, just like we described in HelloSimObject.py.
Time to simulate
If we try to run our hello_sim_object_config.py now:
gem5 hello_sim_object_config.py
…we’ll run into an issue:
fatal: hello.num_hellos without default or user set value
This error message indicates that num_hellos, HelloSimObject’s new parameter, has no provided value: we didn’t set a value for it in our configuration script, and it has no default value to fall back on. Let’s modify our instantiation of HelloSimObject to add a value for num_hellos:
root.hello = HelloSimObject(num_hellos=4)
We are now ready to run again!
gem5 hello_sim_object_config.py
This time, the simulation runs and we see the following:
i: 0, Hello from HelloSimObject's constructor!
i: 1, Hello from HelloSimObject's constructor!
i: 2, Hello from HelloSimObject's constructor!
i: 3, Hello from HelloSimObject's constructor!
Exited simulation because: simulate() limit reached.
As you can see, we printed out our “hello” message 4 times!
In conclusion
SimObjects are the backbone of simulation in gem5. In this section, we built our very own SimObject and rebuilt gem5 in order to use it in a configuration script. We also saw that the Simulator class used in previous configuration scripts is a wrapper around m5 functionality. Next, we’ll start taking a look at existing SimObjects to extend them with new functionality!