Using ports in gem5
How do we model data requests and interface with the memory system?
By the end of this section, you will be able to:
- Explain at a high level how ports (
RequestPortandResponsePort) and packets facilitate communication in gem5.- Create CPU- and memory-side ports for a
SimObjectand facilitate packet sending and retries between them and their peers.- Simulate port request/response processing and retry latency using events.
- Use sender state to store additional information about packets.
Ports and packets
What are ports and packets?
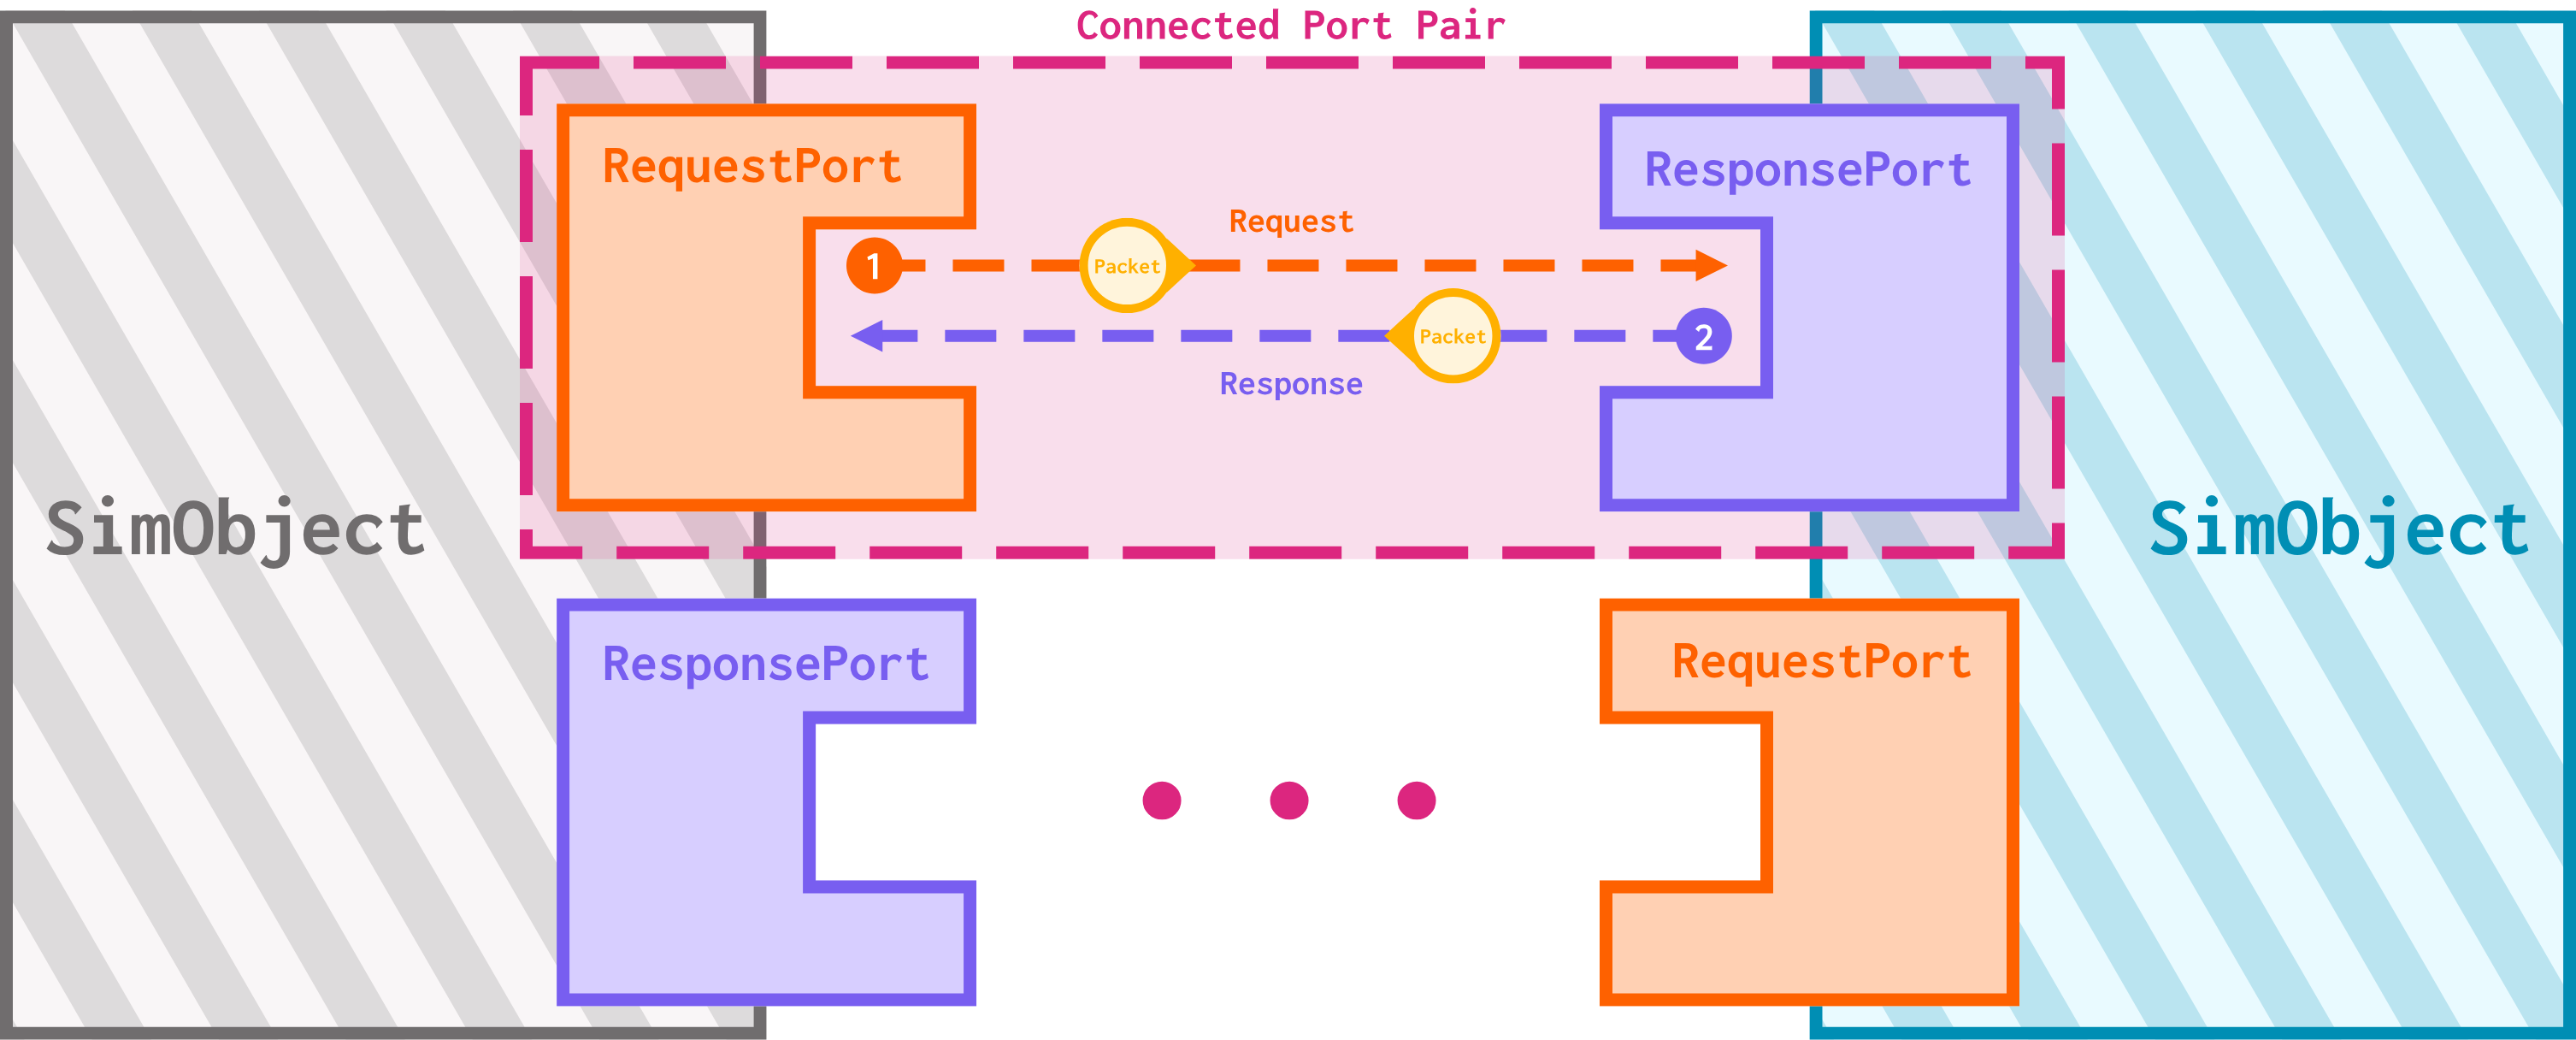
A port is a kind of model used to send and receive data. Ports are the main interface to memory in gem5. There are two different kinds of ports:
- A
RequestPortis used to request data, - A
ResponsePortis used to send data.
Ports communicate using packets. A Packet can either be a request packet or a response packet.
Typically, a
Packetstarts its life as a request packet and is then transformed into a response packet once it is processed to be sent back at its destinationSimObject.
Since packets describe memory accesses, every Packet has the following fields:
addr: the address of the memory location being accessed,data: the data thePacketis carrying (this field can benull),- Each packet can carry a
uint8_t’s worth of data.
- Each packet can carry a
cmd: the specific memory command thePacketrepresents,- For example, whether it represents a request/response,the specific nature of the request/response (read vs. write, error, etc.), and whether it contains a memory payload.
req: a pointer to the original memory request. This field allows us to access the ID of theSimObjectthat made the original request.
Together, ports and packets allow us to implement memory access protocols. Each port can only be connected to one port of the opposite type, and a connected pair can pass Packets between them. A given SimObject can have any number of ports, each connected to a port on any other SimObject.
Peeking into the source code
Let’s take a look at the (partial) declarations of RequestPort and ResponsePort, both of which can be found at gem5/src/mem/port/hh:
class RequestPort {
  ...
  public:
    bool sendTimingReq(PacketPtr pkt);
    virtual bool recvTimingResp(PacketPtr pkt) = 0;
    virtual void sendRetryResp();
   ...
};

class ResponsePort {
  ...
  public:
    bool sendTimingResp(PacketPtr pkt);
    virtual bool recvTimingReq(PacketPtr pkt) = 0;
    virtual void sendRetryReq();
   ...
};
You’ll notice that these functions take a
PacketPtras an argument. This is equivalent to aPacket*, a pointer to aPacket.
We can see here that a RequestPort may only send requests and receive responses; conversely, a ResponsePort may only send responses and receive requests. You may also notice that these functions are pure-virtual; in order to use ports in your SimObjects, you must extend RequestPort and ResponsePort to fit the needs of the model.
Ports and memory access modes
Ports can be used to simulate all three of gem5’s memory access modes.
As a reminder, these three modes are:
- Timing: Timing memory requests affect simulator time. Therefore, their latency can have an impact on the interleaving and processing of requests.
- Atomic: Atomic memory requests happen atomically, meaning they don’t advance simulator time on their own and are not interleaved. It is up to the requestor to advance simulator time if appropriate.
- Functional: Functional memory requests are done through a series of function calls and don’t affect simulator time. Like atomic requests, they are not interleaved.
The most complicated of these to implement are timing memory accesses, since this mode deals with latencies and interleaving. It’s also the only realistic memory access mode! Let’s take a look at how this works in gem5.
Setup
Let’s take a look at two simple SimObjects: Requester has a single RequestPort, and Responder has a single ResponsePort connected to Requestor’s RequestPort:
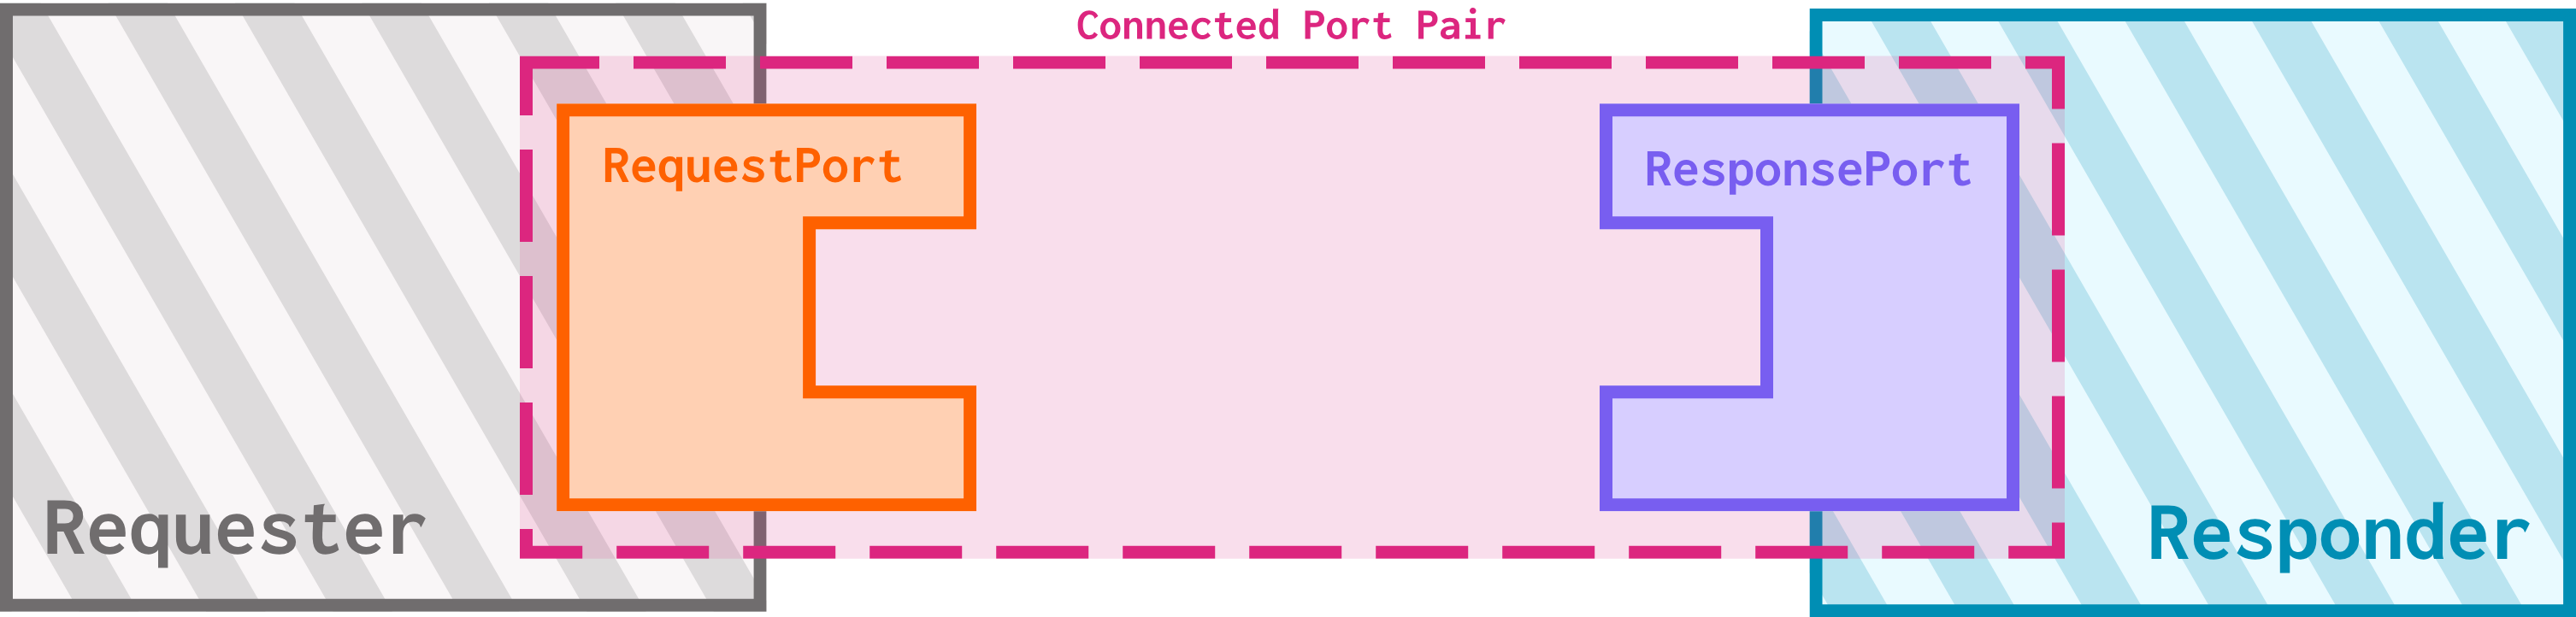
At any given moment, each port can be available (ready to process a request) or busy (unable to process a request). We’ll need to pay attention to those four functions we saw in the above code snippet:
Requests:
Requester::RequestPort::sendTimingReq()- This function attempts to send a timing memory request to the connected
ResponsePort. It callsResponder::ResponsePort::recvTimingReq().
- This function attempts to send a timing memory request to the connected
Responder::ResponsePort::recvTimingReq()- This function returns
trueorfalsebased on whether this port can accept the incoming timing request (true) or not (false).
- This function returns
Responses:
Responder::ResponsePort::sendTimingResp()- This function attempts to send a timing memory response to the connected
ResponsePort. It callsRequester::RequestPort::recvTimingResp().
- This function attempts to send a timing memory response to the connected
Requester::RequestPort::recvTimingResp()- This function returns
trueorfalsebased on whether this port can accept the incoming timing response (true) or not (false).
- This function returns
Everything goes smoothly
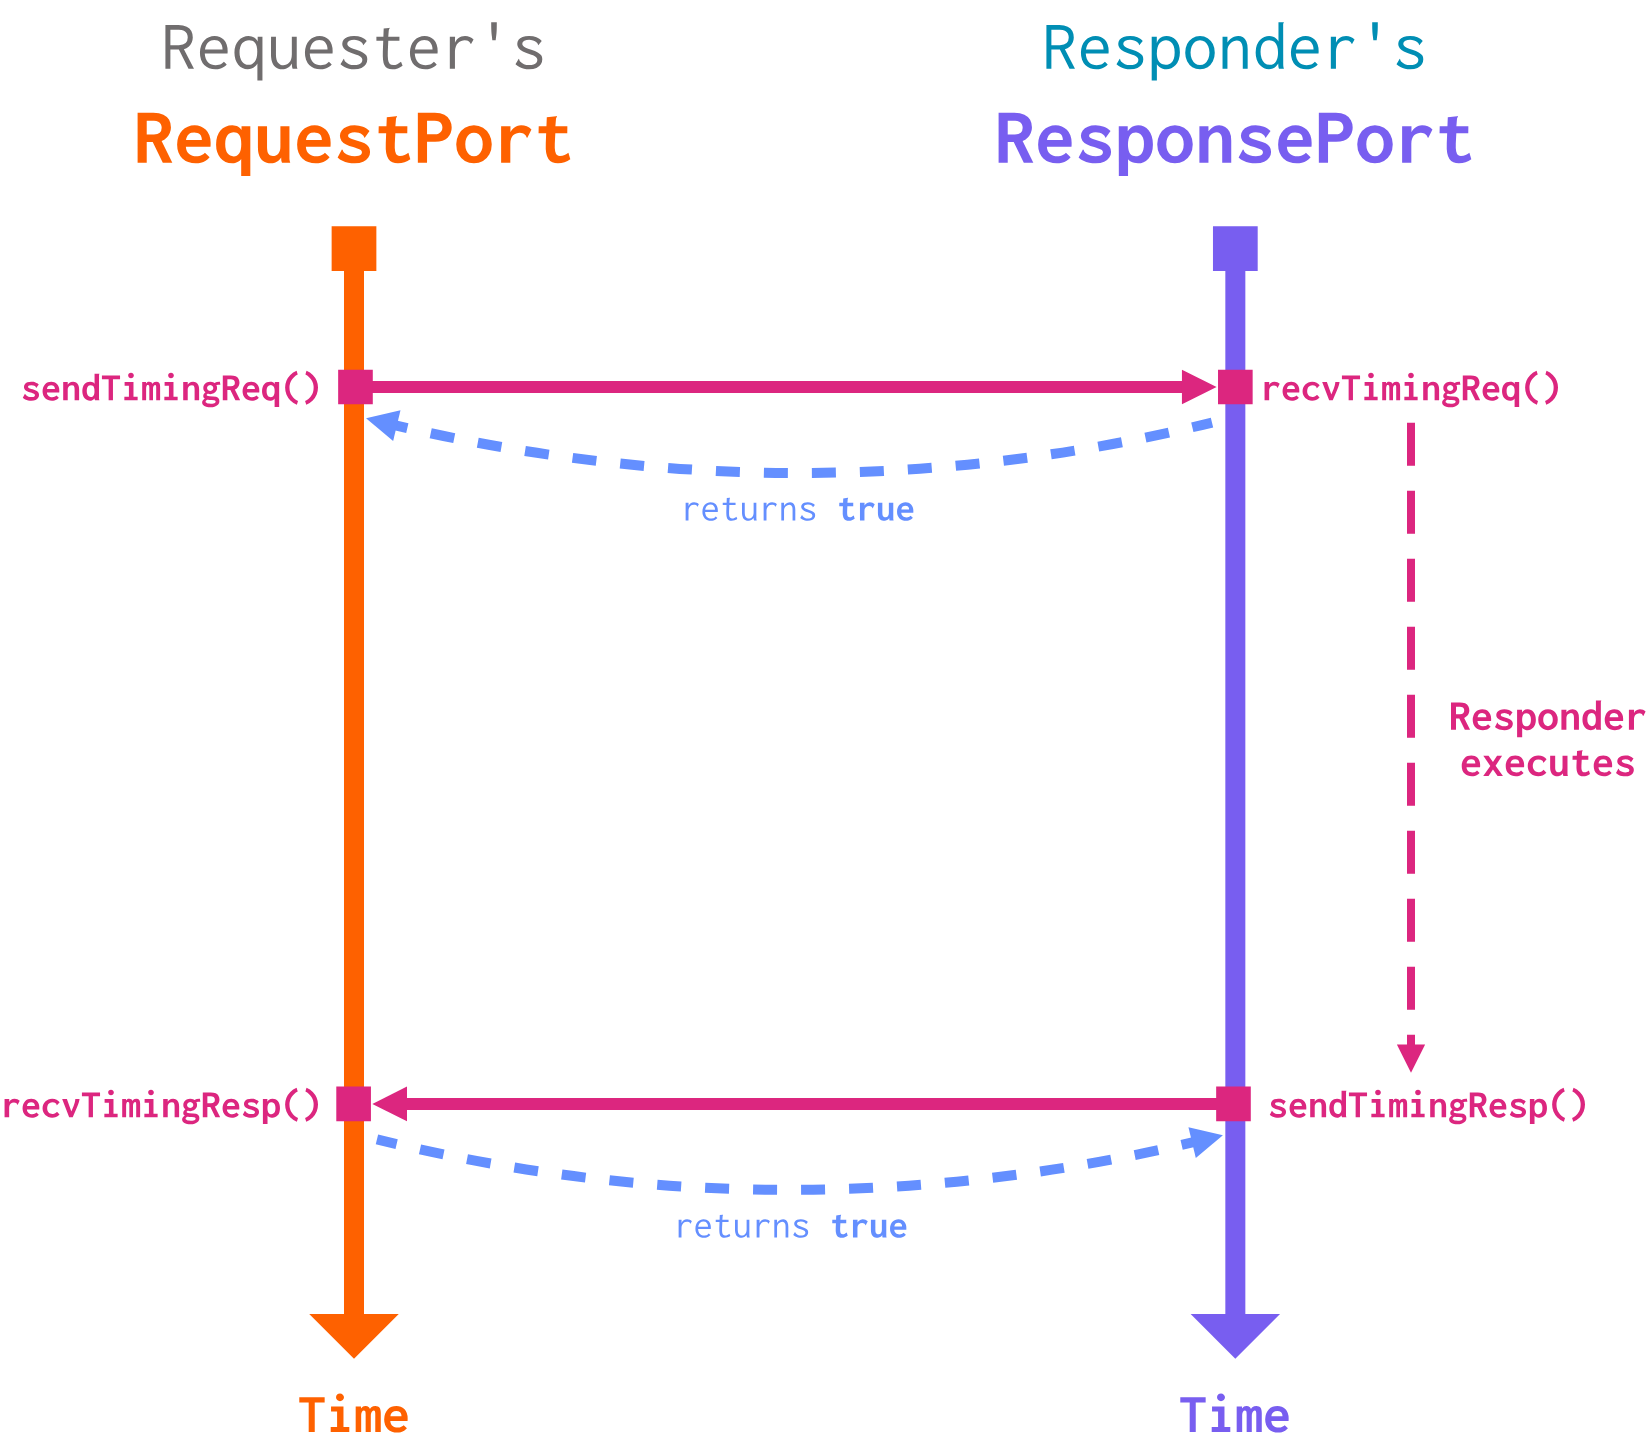
Let’s see what happens when all ports are available and ready to go.
-
Requesterattempts to send a request by callingRequester::RequestPort::sendTimingReq(). This in turn callsResponder::ResponsePort::recvTimingReq(). -
Responderis not busy, so it accepts the request. Thus,Responder::ResponsePort::recvTimingReq()returnstrue. This tellsRequesterthat it can expect to receive a response in the future. -
Simulator time advances, meaning that
RequesterandRespondercontinue execution. WhenResponderhas a response ready, it attempts to send a response by callingResponder::ResponsePort::sendTimingResp(). This in turn callsRequester::RequestPort::recvTimingResp(). -
Requesteris not busy , so it accepts the response. Thus,Requester::RequestPort::recvTimingResp()returnstrue.Respondercan now see that its response was received, and the transaction is complete!
Visually, we can think of it like this:
Responder is busy
Now, let’s consider a situation where Responder is busy when the initial request from Requester comes in. To facilitate this, we need to two additional functions:
Responder::ResponsePort::sendReqRetry()- This function tells the requester to try sending a failed request again. It calls
Requester::RequestPort::recvReqRetry().
- This function tells the requester to try sending a failed request again. It calls
Requester::RequestPort::recvReqRetry()- This function informs the
RequestPortthat it can now retry a failed request.
- This function informs the
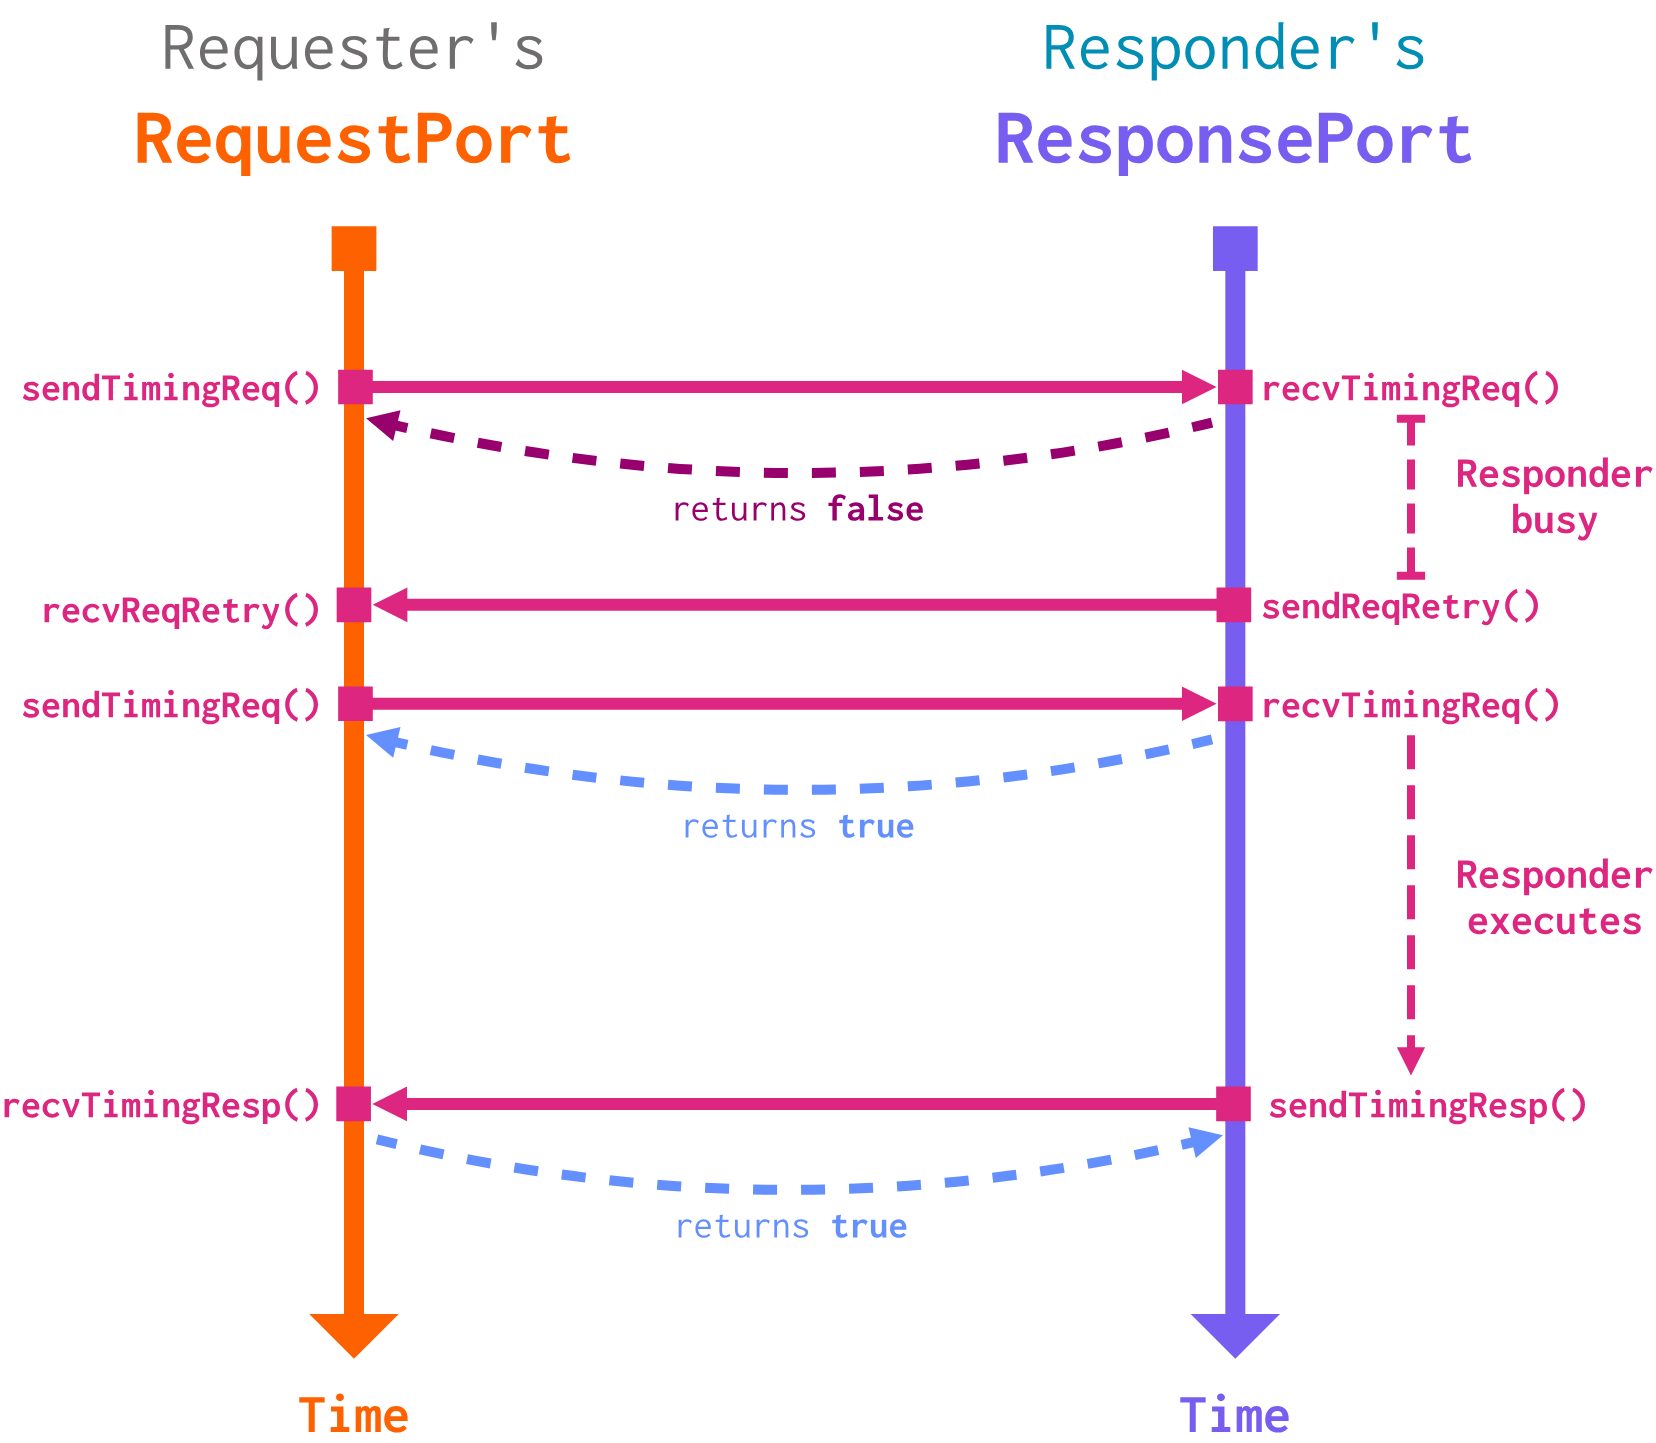
Let’s go through it step-by-step:
-
Requesterattempts to send a request by callingRequester::RequestPort::sendTimingReq(). This in turn callsResponder::ResponsePort::recvTimingReq(). -
Responderis busy, so it rejects the request. Thus,Responder::ResponsePort::recvTimingReq()returnsfalse. This tellsRequesterthat it will not receive a response for this request. -
When
Responderis no longer busy, it tellsRequesterto retry its request by callingResponder::ResponsePort::sendReqRetry(). This in turn callsRequester::RequestPort::recvReqRetry(). -
Now that it knows that it is safe to retry,
Requesterre-sends the request by callingRequester::RequestPort::sendTimingReq()again, which in turn callsResponder::ResponsePort::recvTimingReq(). -
The responder is no longer busy, so it accepts the request this time. This means
Responder::ResponsePort::recvTimingReq()returnstrue. -
Simulator time advances, meaning that
RequesterandRespondercontinue execution. WhenResponderhas a response ready, it attempts to send a response by callingResponder::ResponsePort::sendTimingResp(). This in turn callsRequester::RequestPort::recvTimingResp(). -
Requesteris not busy , so it accepts the response. Thus,Requester::RequestPort::recvTimingResp()returnstrue.Respondercan now see that its response was received, and the transaction is complete!
Visually, this looks like this:
Other scenarios (where
Requesteris busy or both are busy) are technically possible, but they are quite rare.If you design your
SimObjectsin such a way that a requester may returnfalsefromrecvTimingResp(), this could be correct behavior, but you may want to double-check that you are simulating something realistic.
You may start to notice that the latencies inherent to timing memory requests map nicely onto the concept of events discussed in the previous section. We can schedule:
- On acceptance of a request, an event in the future where
Responderfinishes processing the request and callssendTimingResp(), - On rejection of a request, an event in the future where
Responderis no longer busy and callssendReqRetry(). - On receipt of a response, an event in the future where the
Requesterprocesses the data, should adding latency be appropriate in that case.
Ports in CPU models
Let’s look at an example of ports in action in TimingSimpleCPU (gem5/src/cpu/simple/timing.hh). This CPU has two ports: icachePort to communicate with the instruction cache and dcachePort to communicate with the data cache:
 IcachePort icachePort;
 DcachePort dcachePort;
First, you’ll notice these ports are instances of unique classes. Remember that RequestPort and ResponsePort cannot be instantiated directly, so we must extend them into custom port classes:
class IcachePort : public TimingCPUPort
class DcachePort : public TimingCPUPort
Both of these port classes extend TimingCPUPort, which extends RequestPort.
These are both
RequestPorts because the CPU will be making requests of the caches, not serving requests with responses.
TimingCPUPort
class TimingCPUPort : public RequestPort
    {
      public:

        TimingCPUPort(const std::string& _name, TimingSimpleCPU* _cpu)
            : RequestPort(_name), cpu(_cpu),
              retryRespEvent([this]{ sendRetryResp(); }, name())
        { }

      protected:

        TimingSimpleCPU* cpu;

        struct TickEvent : public Event
        {
            PacketPtr pkt;
            TimingSimpleCPU *cpu;

            TickEvent(TimingSimpleCPU *_cpu) : pkt(NULL), cpu(_cpu) {}
            const char *description() const { return "Timing CPU tick"; }
            void schedule(PacketPtr _pkt, Tick t);
        };

        EventFunctionWrapper retryRespEvent;
    };
Let’s break down this class declaration.
- The port keeps track of its name (
_name) and the CPU that owns it (_cpu), - It overrides the original behavior of
retryRespEventwith its own version (sendRetryResp()), - It creates a new event,
TickEvent, to model a tick of the timing CPU (which is different from a single simulation tick!); this event cares about the CPU and the involved packet (which can be null).
This is the port we use as a basis for the icache and dcache ports. For this example, let’s focus on IcachePort.
IcachePort
class IcachePort : public TimingCPUPort
    {
      public:

        IcachePort(TimingSimpleCPU *_cpu)
            : TimingCPUPort(_cpu->name() + ".icache_port", _cpu),
              tickEvent(_cpu)
        { }

      protected:

        virtual bool recvTimingResp(PacketPtr pkt);

        virtual void recvReqRetry();

        struct ITickEvent : public TickEvent
        {

            ITickEvent(TimingSimpleCPU *_cpu)
                : TickEvent(_cpu) {}
            void process();
            const char *description() const { return "Timing CPU icache tick"; }
        };

        ITickEvent tickEvent;

    };
This declaration is structured very similarly to TimingCPUPort, further specifying its members to be icache-specific. Note ITickEvent, the event capturing an icache tick. Also note the two overridden functions: recvTimingResp() and recvReqRetry().
Okay, but how does it work?
Now that we have an idea of what these classes look like, let’s see how
IcachePort icachePort
is used in practice. In gem5/src/cpu/simple/timing.cc, we see that the timing CPU uses the icachePort to make a request when sending a fetch:
void
TimingSimpleCPU::sendFetch(const Fault &fault, const RequestPtr &req, ThreadContext *tc)
{
        ...
        ifetch_pkt = new Packet(req, MemCmd::ReadReq);
        ...

        if (!icachePort.sendTimingReq(ifetch_pkt)) {
            // Need to wait for retry
            _status = IcacheRetry;
        } else {
            // Need to wait for cache to respond
            _status = IcacheWaitResponse;
            // ownership of packet transferred to memory system
            ifetch_pkt = NULL;
        }
    ...
}
This is a partial snippet! The pieces of code dealing with setting up the details of the packet, fault handling, and updating cycle counts have been trimmed out.
Step 1: Make the request
After creating a packet containing the details of the fetch request (a packet containing a ReadReq command), the CPU invokes the icachePort’s sendTimingReq() function.
We’ve seen this one before! This is how the request chain started in our
RequesterandResponderexample above.
You’ll notice that neither IcachePort nor TimingCPUPort override sendTimingReq(); they use the behavior from RequestPort. As we discussed above, this will call the connected ResponsePort’s recvTimingReq() method.
Step 2: Receive the response
Let’s suppose that the request was successfully accepted; that is, that recvTimingReq() on the connected ResponsePort returned true to icachePort’s sendTimingReq() (we’ll circle back to the other case later). All we have to do now is wait for the response message to come in!
As you may recall, the way that icachePort is notified of an incoming response is by having its recvTimingResp() method called by the connected ResponsePort’s sendTimingResp() function. As we see in the IcachePort class declaration, this method is overridden. Here is IcachePort’s implementation:
bool
TimingSimpleCPU::IcachePort::recvTimingResp(PacketPtr pkt)
{
   ...

    // we should only ever see one response per cycle since we only
    // issue a new request once this response is sunk
    assert(!tickEvent.scheduled());
    // delay processing of returned data until next CPU clock edge
    tickEvent.schedule(pkt, cpu->clockEdge());

    return true;
}
This snippet is also partial. An error handling case around hardware transactional memory was trimmed.
This function is quite simple: after sanity-checking that we do not have a tickEvent scheduled already, we schedule a tickEvent for the next clock edge. We needed to overwrite RequestPort’s recvTimingResp() so that we could add this delay.
Step 3: The big event
Once that next clock edge comes around, the tickEvent we scheduled in recvTimingResp() will be processed. The member tickEvent in IcachePort is an ITickEvent, so we can check its process() function to see what happens:
void
TimingSimpleCPU::IcachePort::ITickEvent::process()
{
    cpu->completeIfetch(pkt);
}
Now that it’s the next clock edge and we have our response from the icache, we can complete the fetch! We’ll stop our trace here to avoid digging into the details of how SimpleCPU instruction fetching works.
Step 4: But wait!
Let’s go back to that assumption we made in Step 2. What if the icache’s ResponsePort was busy and rejected our request (that is, recvTimingReq() returned false)? In that case, we won’t be receiving a response for this request quite yet; we have to wait for a retry.
The connected ReponsePort will send icachePort a retry request by calling its sendReqRetry(), which calls icachePort’s recvReqRetry(). This is the other method overridden in IcachePort! Let’s take a look at its implementation:
void
TimingSimpleCPU::IcachePort::recvReqRetry()
{
    // we shouldn't get a retry unless we have a packet that we're
    // waiting to transmit
    assert(cpu->ifetch_pkt != NULL);
    assert(cpu->_status == IcacheRetry);
    PacketPtr tmp = cpu->ifetch_pkt;
    if (sendTimingReq(tmp)) {
        cpu->_status = IcacheWaitResponse;
        cpu->ifetch_pkt = NULL;
    }
}
After sanity-checking that we are, in fact, waiting to retry a request to the icache, we use sendTimingReq() (just like we did in sendFetch()) to try sending our packet again. If we succeed this time, we’re back on track! Reefer to Step 2 above. If not, we don’t have to change much; we just go back to waiting for the next retry request.
Putting it all together
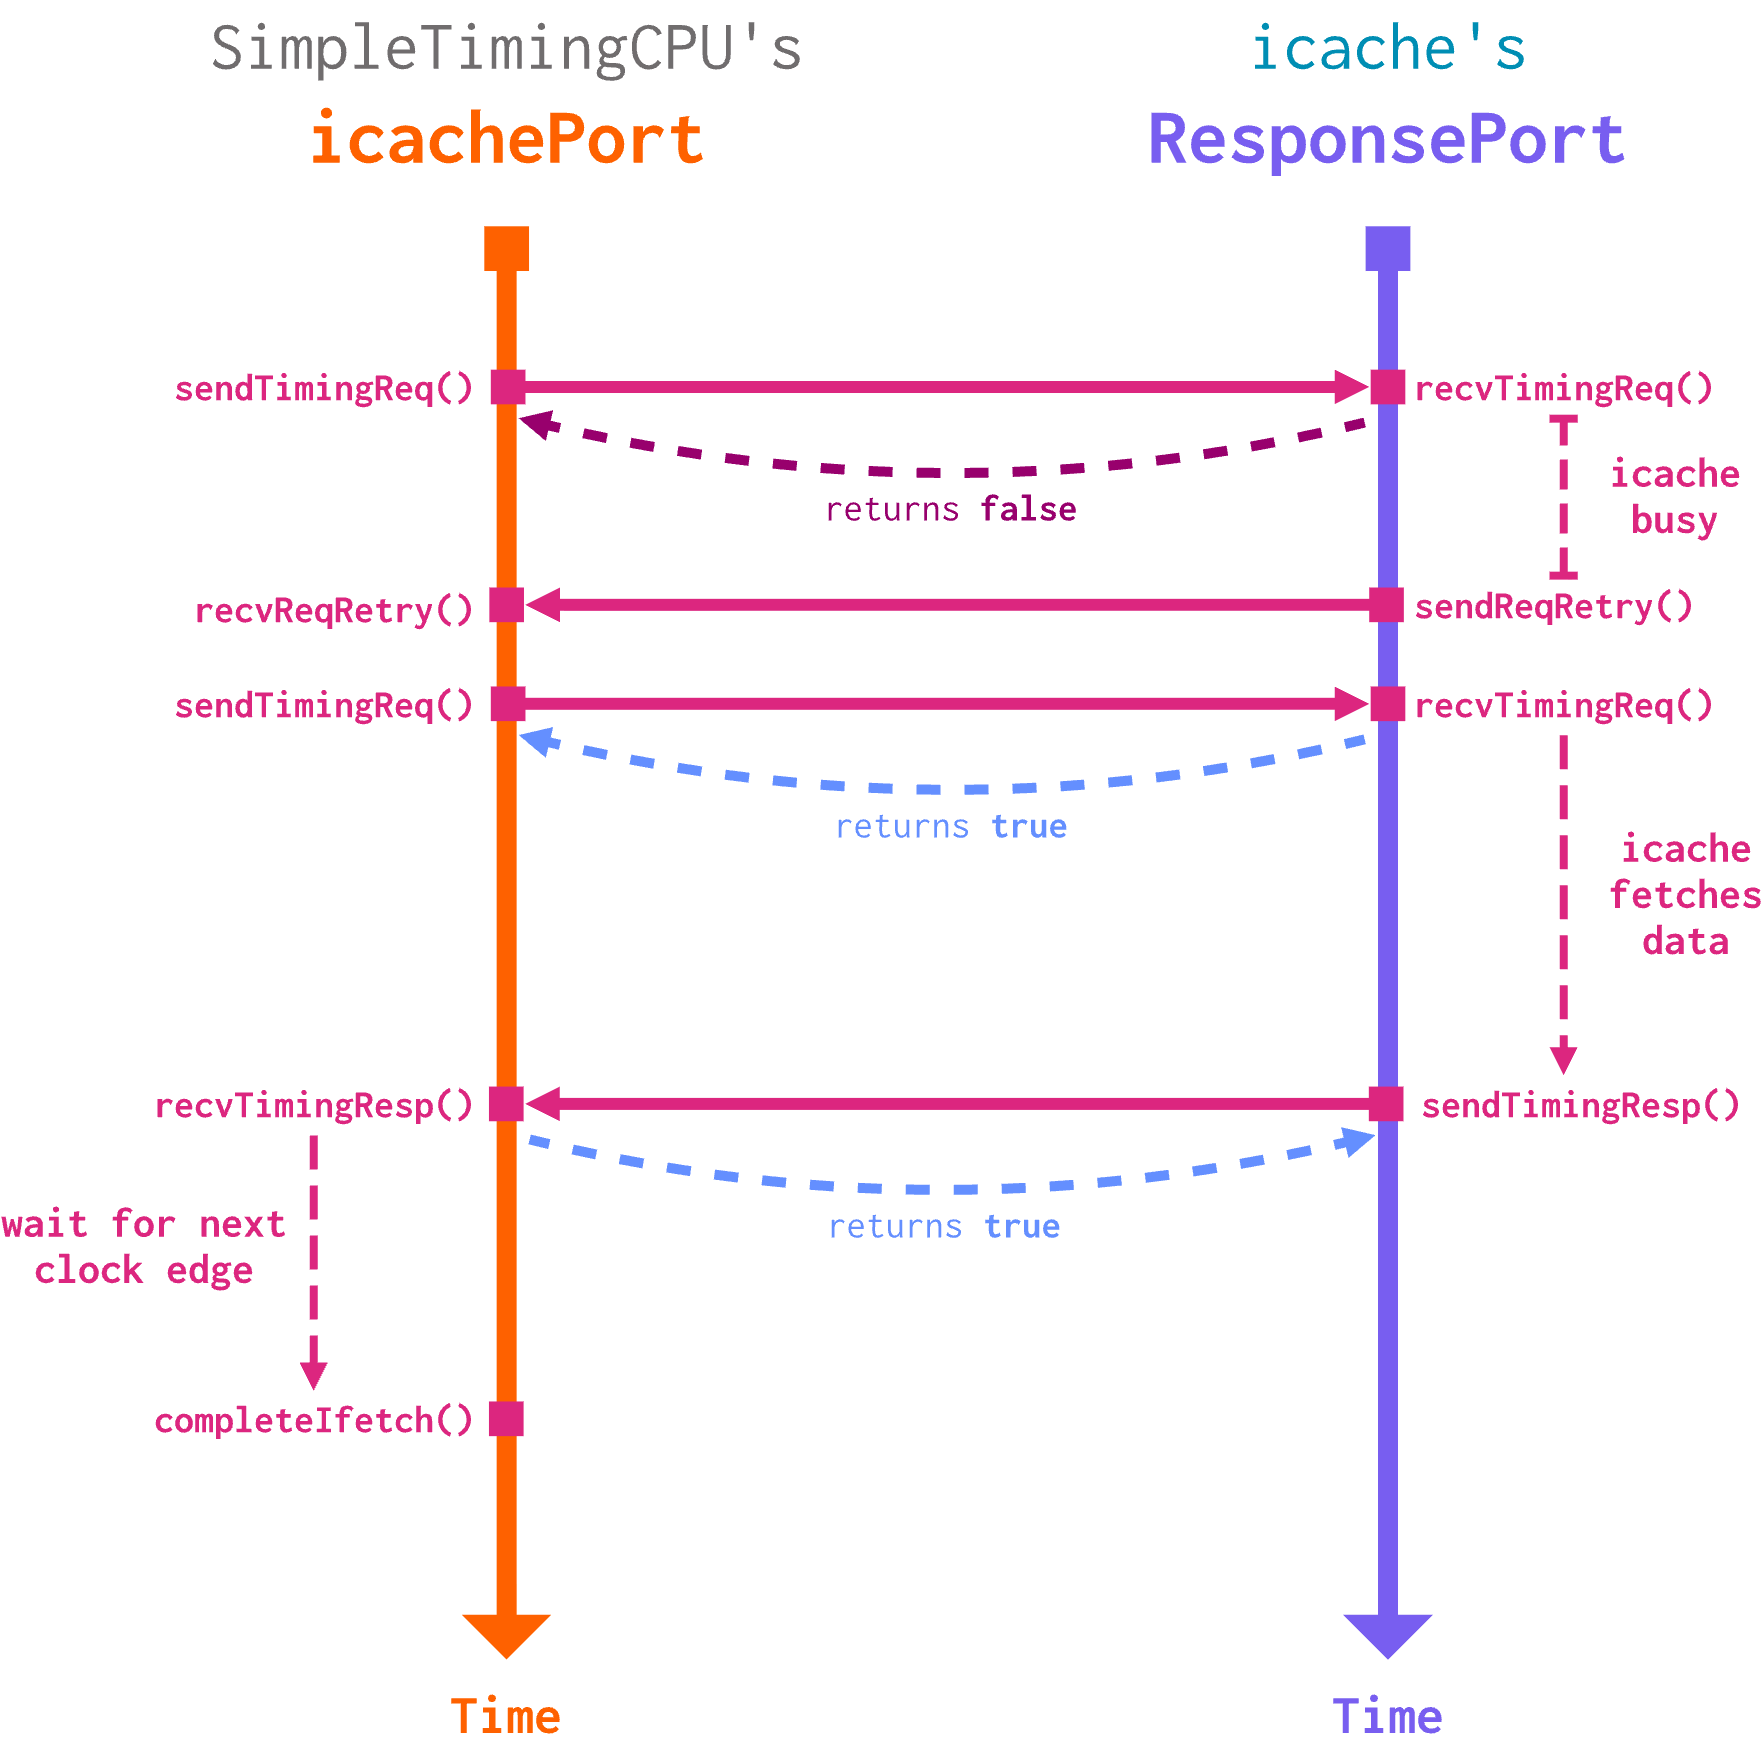
We just looked at an example of the request path of port communication. In this example, TimingSimpleCPU (the requester) interfaces with its icache (the responder) through its icachePort to send an instruction fetch.
icachePort is a member of the TimingSimpleCPU class, and it is of type IcachePort, a class that (eventually) extends RequestPort.
-
icachePortmakes a fetch request by callingsendTimingReq(), which calls the responder port’srecvTimingReq(). If this function returnstrue, the CPU waits for a response to the request, which will be sent at some point in the future. If it returnsfalse, it instead waits for a retry request, which will be sent when the icache is no longer busy. -
The icache’s
ResponsePortsends a response by calling itssendTimingResp()method, which itself callsicachePort’srecvTimingResp()method. TheIcachePortclass overwritesRequestPort’s implementation of this method to schedule a processing event for the next CPU clock edge. -
Alternatively, the icache’s
ResponsePortsends a retry request by calling itssentReqRetry()method, which callsicachePort’srecvReqRetry()method. TheIcachePortclass overwritesRequestPort’s implementation of this method to attempt to re-send the fetch request. -
On the next clock edge after the response is received,
TimingSimpleCPU’sTickEventis processed, which completes the fetch based on the data received from the icache.
This is not all too different from the more abstract
RequesterandResponderexample we looked at before; all that changed here is having to deal with the peculiarities of gem5’s codebase and the nuts and bolts of using events.
You’re now ready to interface with the memory system using ports!